Adhoc, where did you buy Terostat 930 from? And what thickness of it is ideal for CLD? Say I can't find it in Canada, what's the next best option?
Thanks
Shawn
From the company I work at here in Sweden ... We are the distributor for Henkel's products (among them the Loctite brand) intended for industrial use.
For you, google Henkel Canada and you find a pretty lousy web page (Henkel Northamerica) and you have to dig deep to find the technical info you search for. For supplier try: Distributor Search - Henkel and choose Distributor Type: "Loctite Industrial" => Country => Post code
The MS polymer stuff is, as Gedlee wrote, quite pricey for the private consumer. You may find good equivalents with less flashy and expensive brand names if you search around. Demand technical data sheets on its shear strength, dry content etc before you buy any. I used about 0,8 mm / 1/32" thickness with strips and bits of 0,8 mm thick butyl rubber sheet as shims when the MDF was glued together. Butyl rubber has good high internal damping. You find it as the inflatable inner tube in car / bicycle tires.
Last edited:
Thanks both.
Adhoc, what's the reason for the shims? And thanks for the site, Apparently there are a lot of Loctite dealers in my city.
Dr. Geddes, you weren't kidding about the polymers being pricey. I just got off the phone with a Canadian distributor. The micro-balloons are cheap though.
For the shore A urethane, what hardness do you recommend?
Also what's the reason for the micro-balloons? Maybe if the shore A urethane is out of my price range but the Loctite isn't could they be added to that?
Thanks
Shawn
Thanks both.
Adhoc, what's the reason for the shims? And thanks for the site, Apparently there are a lot of Loctite dealers in my city.
Thanks
Shawn
To have controll of the thickness of the non hardening soft layer in the middle. I used long strips of shims along the edges of the MDF sheets. The MDF sheets were a bit oversized all around, an inch or so, so the shims were cut off and no part of the baffle when it later was cut to size. Some smaller bits of shims were placed in the middle of the baffle where the cutouts for drivers would be. About 1 mm seems to be a commonly proposed thickness between wood sheets with thickness 3/4".
The MS polymer is spread out with a spatula and you have about 15-30 working time before it starts to form a skin. (Varies with its residual hardness after curing, longer working time with "softer ones".)
I’m nearly ready to purchase these components for another project - a large two-way, horn + woofer. I liked the idea of the Econowave but when I realized the efficiency was brought down to approximately 92db per watt I thought I’d try something else.
Dayton D250P
Dayton Audio D250P-8 1" Polyimide Compression Horn Driver
Dayton H6512
Dayton Audio H6512 6-1/2" x 12" Waveguide 1-3/8"- 18 TPI
Dayton PA310-8
Dayton Audio PA310-8 12" Pro Woofer
Eminence PXB2: 1K6 crossover
Eminence PXB2:1K6 2-Way Speaker Crossover Board 1,600 Hz
L-pad
Parts Express Speaker L-Pad Attenuator 100W Mono 3/8" Shaft 8 Ohm
I’d like help with the crossover. I wonder if I should just purchase the pre-made Eminence and tweak from there or build from scratch?
The Dayton waveguide keeps the project “all Dayton”. I’ve heard this waveguide playing in a Chinese restaurant and it sounded really great - sweet and detailed - I want it.
I’ve been enjoying an open baffle system consisting of all Eminence components based around the 12LTA on open baffle (supported by a compression tweeter and Alpha 15 for bass in an H-frame). It’s very efficient (the 12LTA is rated at 97db per watt and is clearly more efficient than anything I’ve used before - I love the detail and effortless way this system fills my room).
I want to try something different. Can someone advise on the crossover?
The pre made crossover may be a good way to 'hit the ground running'. As to whether any of it will remain once it evolves into the best it can be, there's no guarantee. It would be nice to know that at least some of those parts will be useable in the final iteration but who knows at this point. The variable L-pads are an interesting tool.
Godzilla,
Here's what Wayne remembers as the parts values for that network.
The inclusion of the variable Lpad will be critical for HF balance to the woofer.
I'd recommend kludging together an RC-based , HF compensation network ( to be placed between the HF output of the stock network & the variable Lpad.
-That's R1,R2,C3 in the picture.
Follow Zilch's network ( for layout guidance ).
Flex-Your-PCD-Mettle

SRC Project Summary

")
PS; the better bet ( when one can't design their own network ) is to follow an existing design to the letter ( which in this case means building up Zilch's Econowave SRC ).
The pre made crossover may be a good way to 'hit the ground running'. As to whether any of it will remain once it evolves into the best it can be, there's no guarantee. It would be nice to know that at least some of those parts will be useable in the final iteration but who knows at this point. The variable L-pads are an interesting tool.
WayneParham said:The Eminence PXB2:1K6 crossover is pretty much a textbook second-order woofer filter and third-order tweeter filter (without Zobels). It has been a while since I fooled with it, but as I recall the woofer values are 1.0mH and 10uF, and the tweeter values are 8.2uF, 0.6mH and 22uF, something like that.
Here's what Wayne remembers as the parts values for that network.
The inclusion of the variable Lpad will be critical for HF balance to the woofer.
I'd recommend kludging together an RC-based , HF compensation network ( to be placed between the HF output of the stock network & the variable Lpad.
-That's R1,R2,C3 in the picture.
Follow Zilch's network ( for layout guidance ).
Flex-Your-PCD-Mettle
SRC Project Summary
PS; the better bet ( when one can't design their own network ) is to follow an existing design to the letter ( which in this case means building up Zilch's Econowave SRC ).
Last edited:
SpeakerScott, where are you setting your crossover on this speaker (the blue one)? What size woofer is this?
Thanks!
http://www.diyaudio.com/forums/multi-way/284239-seos-dayton-2-way-2.html#post4559744
Thanks!
http://www.diyaudio.com/forums/multi-way/284239-seos-dayton-2-way-2.html#post4559744
New Design
Hello,
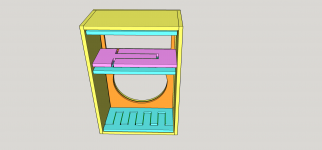
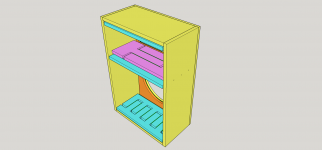
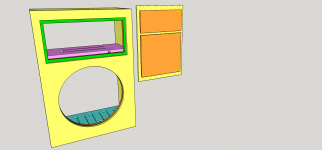
It's been a while. I keep hoping I'll have some time to finish this, and then something else comes up. So I redesigned it to make it a easier to cut and assemble. I have a couple questions.
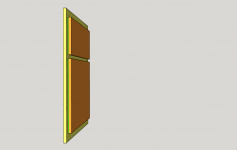
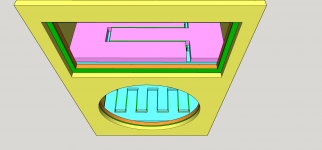
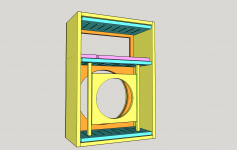
1. The front and rear panels are each 2 x 12mm (1/2") baltic birch ply with 3mm damping layer. Driver is rear mounted to the inside panel, little magnet brace, round-overs on outside edges, outside edge driver hole. Are these baffles stiff enough? (all other panels are 15mm, 12 ply)
If not, then instead I use 2 x 15mm (12 ply) with 3mm damping layer. The woodshop only has 1" round over bit, might be only 3/4". Between rear mount driver and round over edge on front baffle driver hole there will be hollow cylinder. Is this ok?
2. 3mm "Sikabond Construction Adhesive" mixed with 3M Microballoons. Good enough for damping layer? See attached product sheet.
Thanks,
p.s.
Round overs are not shown in images. But all outside edges will be rounded.
If the cuts look complicated, it will be CNC so not hard.
Green color is damping layer.
I can get Sikaflex 292 but it is 4x the price of Sikabond construction adhesive.
Speaker is designed to be as small as possible.
Hello,
It's been a while. I keep hoping I'll have some time to finish this, and then something else comes up. So I redesigned it to make it a easier to cut and assemble. I have a couple questions.
1. The front and rear panels are each 2 x 12mm (1/2") baltic birch ply with 3mm damping layer. Driver is rear mounted to the inside panel, little magnet brace, round-overs on outside edges, outside edge driver hole. Are these baffles stiff enough? (all other panels are 15mm, 12 ply)
If not, then instead I use 2 x 15mm (12 ply) with 3mm damping layer. The woodshop only has 1" round over bit, might be only 3/4". Between rear mount driver and round over edge on front baffle driver hole there will be hollow cylinder. Is this ok?
2. 3mm "Sikabond Construction Adhesive" mixed with 3M Microballoons. Good enough for damping layer? See attached product sheet.
Thanks,
p.s.
Round overs are not shown in images. But all outside edges will be rounded.
If the cuts look complicated, it will be CNC so not hard.
Green color is damping layer.
I can get Sikaflex 292 but it is 4x the price of Sikabond construction adhesive.
Speaker is designed to be as small as possible.
Attachments
-
 Speaker Rear, Open Back.png40.9 KB · Views: 182
 -
 Speaker Rear Side, Open Back.png56.2 KB · Views: 179
 -
 Front, Rear Panel Background.png45.5 KB · Views: 181
 -
 Back Panel.png11.3 KB · Views: 49
 -
 Front Panel, Inside Look.png59.7 KB · Views: 55
 -
 Magnet Brace.png36.1 KB · Views: 65
 -
SikabondConstAdhesive_pds.pdf307 KB · Views: 67
- Status
- This old topic is closed. If you want to reopen this topic, contact a moderator using the "Report Post" button.
- Home
- Loudspeakers
- Multi-Way
- SEOS / Dayton 2 way