....The third reason is that the MA drivers have such a thick flange that the remaining ledge is thin enough to easily sand the inner bevel by hand with coarse sandpaper....
Too thin I think.Using 18mm material, the ledge is only ~5mm. Not really enough to secure the screws. I will use at least 24mm material for the baffle in the future.
Bob
Pictures
There is wool stuffing loose in the front bottom area, and wool felt glued to the walls that are close to the driver. This time I got the rebated cut perfect, on the pensils the drivers protrude about 1mm. The front three sides are veneered continuously but my sheet was not wide enough so the sides are another section of veneer.
The removable back is done with pocket screws. It's a tight fit so I put some screws hanging out for something to pull on. Those pocket screws also allow you to add in bracing to a finished product. There is enough slack inside so that the panel can be flipped so the terminals are on the bottom. The back panel is cherry ply, the rest is BB.
My wife wants me to chill out for a while, but next I'll be replacing my rears with something cool. I may go with Alpair 7 or CHR-70 for the smaller size cabinet.
An externally hosted image should be here but it was not working when we last tested it.
There is wool stuffing loose in the front bottom area, and wool felt glued to the walls that are close to the driver. This time I got the rebated cut perfect, on the pensils the drivers protrude about 1mm. The front three sides are veneered continuously but my sheet was not wide enough so the sides are another section of veneer.
An externally hosted image should be here but it was not working when we last tested it.
The removable back is done with pocket screws. It's a tight fit so I put some screws hanging out for something to pull on. Those pocket screws also allow you to add in bracing to a finished product. There is enough slack inside so that the panel can be flipped so the terminals are on the bottom. The back panel is cherry ply, the rest is BB.
An externally hosted image should be here but it was not working when we last tested it.
My wife wants me to chill out for a while, but next I'll be replacing my rears with something cool. I may go with Alpair 7 or CHR-70 for the smaller size cabinet.
Last edited:
Nice! Absolutely top notch work. The pocket screws look like a lot of work but I'm sure you've got a cool tool that makes it easyAwesome work Ryan.
Scott
Kreg (and others no doubt)
An externally hosted image should be here but it was not working when we last tested it.
As with all tools/jigs, the extra few bucks ( $45 for the Kreg Jig Jr) is well worth it in terms of reliability / durability

On the Mar-Ken I intentionally did not do any bracing inside the cabinet to see how bad the vibration was. My conclusion is that it does need it, even considering how overbuilt this thing is. I feel significant vibration underneath the driver on the baffle as well as on the top panel. Not much on the sides. Therefore, the holey brace is going in! I will use those pocket holes to add it easily, they work like clamps for the glue too.
Also on the Pensils I had about 1mm of space between my holey braces and the driver. When I shimmed it, there was a noticeable drop in the vibration felt at the driver basket. So there you go the holey brace is worth it.
On the lower part of my pensils were I just used simple bracing side to side, I was very satisfied with the results, there is really no vibration in that area.
After listening to the pensils and the Mar-Ken, I have to say I prefer the way the Mar-Ken deals with the low end and the pensils seem a bit better at absorbing the rear output of the driver for a smoother sound.
Keep in mind, I'm shaping the response so that it measures the same on both speakers. The Mar-Ken is probably using more power to get the same bass output, but it sounds a lot more precise. I believe this is because the 1/4 wave reinforcement of the pensils is not an ideal way to extend the low end of a driver.
More experimentation is necessary to be sure. The next step for me will be to use stuffing to block the port on the pensils converting them to aperiodic enclosures then recalibrating to bring back the bass that I lost from that. I'm thinking that will result in better sound at the expense of efficiency. We will see.
Last edited:
After listening to the pensils and the Mar-Ken, I have to say I prefer the way the Mar-Ken deals with the low end and the pensils seem a bit better at absorbing the rear output of the driver for a smoother sound.
Keep in mind, I'm shaping the response so that it measures the same on both speakers. The Mar-Ken is probably using more power to get the same bass output, but it sounds a lot more precise.
Good observation - I have also found the bass articulation of the P10 Ken's very likeable. The Pensil might go louder and deeper, but the bass output is not as well controlled.
More experimentation is necessary to be sure. The next step for me will be to use stuffing to block the port on the pensils converting them to aperiodic enclosures then recalibrating to bring back the bass that I lost from that. I'm thinking that will result in better sound at the expense of efficiency. We will see.
In my experimentation with A12 in Super Pensils I found more stuffing throughout the cabinet results in slightly more controlled bass output, but somehow sounds like there's less "life" in the overall sound.
You let us know what you find with the A 10.2.
-Zia
Last night the backs came off and the stuffing was adjusted so there was much less output from the bottom. The response was significantly reduced below 300hz which did result in the lifeless sound. At that point I ran the calibration once more. That definately forced the response back the way it was only this time more of it comes from the driver instead of the opening on the bottom. There is noticably more cone movement but with the high pass at 40 it's not bad, with a 60hz high pass it's negligeable. This method of forcing the speaker to have a flat response in an aperiodic alignment is not very efficient but it does sound very nice indeed. I would only recommend it if you only need low volumes or you are using a high pass and a subwoofer. I'm not sure if this would sound good with a regular equalizer, that always seems to screw up the sound for me but there are probably some nice eq's out there.
In conclusion I prefer the way it sounds when the signal is adjusted to correct the lean bass with an overstuffed cabinet. I would be nice to know how much extra power the amplifier is using to pull this off but there is no way for me to tell unless someone has any suggestions on how to figure that out.
In conclusion I prefer the way it sounds when the signal is adjusted to correct the lean bass with an overstuffed cabinet. I would be nice to know how much extra power the amplifier is using to pull this off but there is no way for me to tell unless someone has any suggestions on how to figure that out.
Last edited:
A few more pictures
An externally hosted image should be here but it was not working when we last tested it.
An externally hosted image should be here but it was not working when we last tested it.
Trimming the port slots was tricky. I used a bastard file and patience with hand sanding. It was all worth it in the end but I only had to build the one center channel.
Now I wish I had done bigger bevels on the pensils. That could be done by adding meterial to the inside of the corners at the front. Oh well, next time.
Now I wish I had done bigger bevels on the pensils. That could be done by adding meterial to the inside of the corners at the front. Oh well, next time.
Trimming the port slots was tricky. I used a bastard file and patience with hand sanding. It was all worth it in the end but I only had to build the one center channel.
Now I wish I had done bigger bevels on the pensils. That could be done by adding meterial to the inside of the corners at the front. Oh well, next time.
"next time" - haven't you run out of rooms yet?
yeah, just run 1" square cleats along the inside of front baffle for the required extra core
nice veneer work Ryan - particularly the trimming of port slots - I've been getting a bit sloppy with that lately
Good catch Chrisb, the port slots look impeccable. Quite tricky to do nicely.
On the Mar-Ken I wrapped the veneer and it worked very well. I apply my veneer with a spray contact adhesive. It comes out of a huge pressure tank. The glue is sprayed to the cabinet and then on the veneer. After a few minutes of dry time I can stick the surfaces very carefully because the bond is instant and unforgiving. I use a large flat scraper to press the surface.
This method is especially bad in this case because the spray glue gets in the vents and needs to be sanded out. That aspect of the job was a pain.
My wife wants some matching rear speakers but says they need to be small wall mounted like the existing ones. Any ideas?
This method is especially bad in this case because the spray glue gets in the vents and needs to be sanded out. That aspect of the job was a pain.
My wife wants some matching rear speakers but says they need to be small wall mounted like the existing ones. Any ideas?
this is where iron on glue comes into its own - lots of time to adjust for grain matching/wrapping and the iron makes a great press.On the Mar-Ken I wrapped the veneer and it worked very well. I apply my veneer with a spray contact adhesive. It comes out of a huge pressure tank. The glue is sprayed to the cabinet and then on the veneer. After a few minutes of dry time I can stick the surfaces very carefully because the bond is instant and unforgiving. I use a large flat scraper to press the surface.
This method is especially bad in this case because the spray glue gets in the vents and needs to be sanded out. That aspect of the job was a pain.
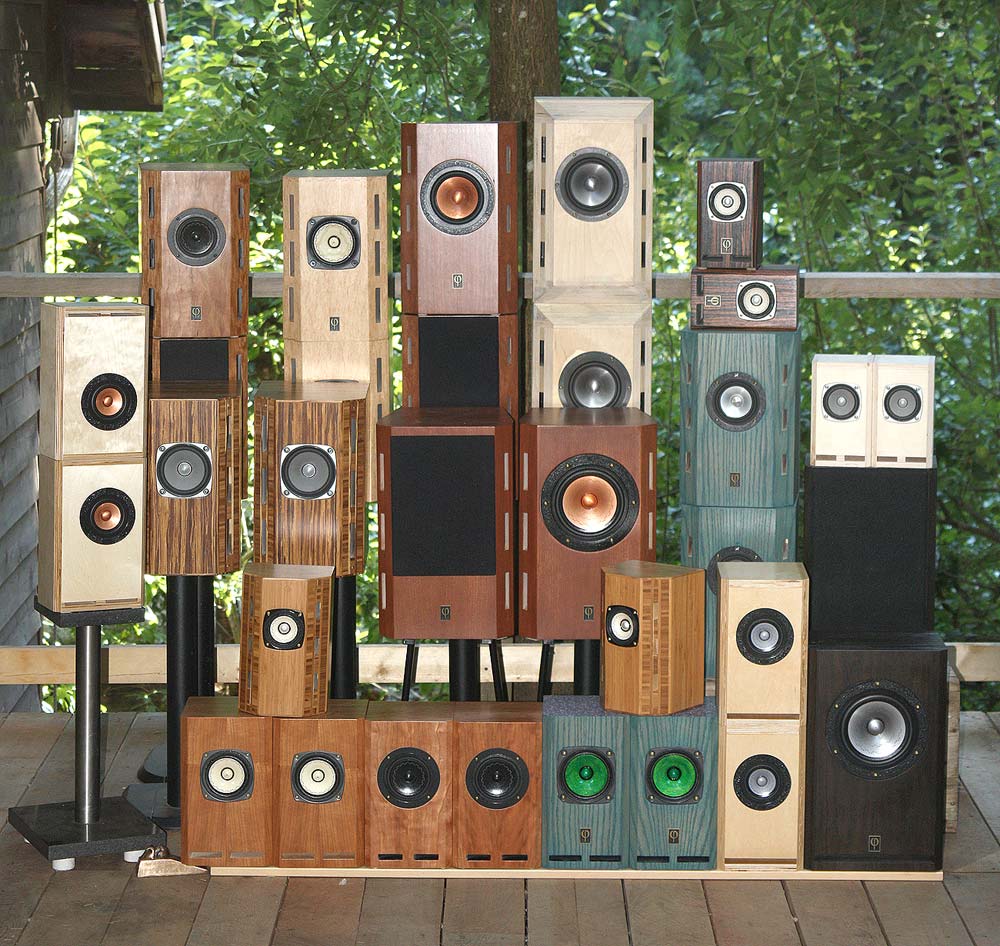
Alpair 6 (M to match the signature of the 10.2s ) - will work in as small as less than 3 liters, vented - I very much like them in the "milli" sized box (don't ask me the full length name) . I'm not sure if Dave has published the drawings, but he's just an e-mail away, - below is a family picnic photo showing the range of enclosure sizes/aesthetic treatments (just remember to tell her, "yes, I can put grilles on these if you like") .My wife wants some matching rear speakers but says they need to be small wall mounted like the existing ones. Any ideas?
man, that's a lot of Fonken speakers
(yeah, juvenile, but I never get tired of that)
- Status
- This old topic is closed. If you want to reopen this topic, contact a moderator using the "Report Post" button.
- Home
- More Vendors...
- Planet 10 hifi
- Ryan's Pensil 10.2 Build Log