Spirit 84,seems to me that your deck is well on the way as far as good mods go.In my case the addition of the outboard Hercules power supply(called a MOSE)was the single best mod.Since you already have the Origin PSU fitted, thats a biggie out of the way.What i Also tried to do was add some mass to the whole table by fabricating an 8mm thick brass crossbrace to replace the thin pressed steel brace.This is damped by the nylon buttons that hold the small circuit board and the various other bits and pieces that screw or bolt on.I was concerned about it ringing, but that has not been the case in my table.I also think the solid Rosewood hardwood plinth helped in some small way to enhance the sound of the table.Another change i felt was significant was the use of the small teflon main bearing pad i purchased from SRM Tech in the UK.Of course the biggest change i made was the new subchassis made from 8mm aluminium.This one was a double edged sword for me.On the one hand it made the table very neutral in sound,very accurate,but on the other hand i felt it lost some warmth(colouration) that i actually like in the Ariston.I change back and forth between the original subchassis and the new one every so often.Perhaps a subchassis similiar to the "Sole"( a layer of MDF sandwiched between two layers of aluminium plate) would give the right mix of detail and warmth.Some time in the future i may try that. I also experimented with different armboard materials.I liked the result just using plain 10mm acrylic,but remember my armboard is just a 90mm circular piece,not the large plate the RD11 uses.The bolt mods probably helped somewhere along the line but as i did those at the same time as the new plinth it was hard to tell what effect exactly they had. Still to do.... i want to add some sorbothane dampning to the underside of the top plate. Its hard to suggest things to do especially as you say you are not DIY inclined.I must admit i probably would have found it difficult without my early mechanical background.Cheapest mods to start with then are:
*Get the SRM Tech teflon main bearing pad.Only a few bucks.
*Damp the underside of top plate.
*Experiment with a set of Linn black springs if you wish.
*Do the bolt mod,either one or both sides.
*You could try a new cross brace(i would try making it from 6 or 8mm aluminium plate)
*If you havn't already, get a Boston or similar platter mat.Nice bit of extra detail and "blacker background".
* I liked the effect of the Pete Riggle VTAF,but not sure how it will sound on the RD11 with full armboard.
*Get a new plinth made up from hardwood.Find a good woodworkers hobby tool shop and ask the guys if they know someone who will do it for you.Mine cost me about US $300,but its a beautiful thing.
* Lastly,think twice about fooling with the subchassis.Its not all that bad.Try just adding a few thick layers of wrinkle finish paint to damp it a little more.Works well.Alternatively make up a 'U' shaped section of 1.5mm thick aluminium to add a brace down the length of the subchassis, similiar to the Linn's,then araldite it down along the full length.
Hope this helps,contact me if you ever decide to get a new plinth made up.There are some details you need to be aware of before you put 'router to wood'.
RCruz,thanks for the kind words about my turntable.
You are right about the bolt mod to stop the top plate vibrations.As fot the changing of the motor position perhaps Nanook can come in here as he is in the process of doing this very mod.I dont know if there is any reading to be be had at this time about this mod.The only thing ive seen was a review written about the 'Funk Firm' (i think)Linn mods which include a new carbon fibre top plate and repositioning the motor at the 7 o'clock position.Might be wrong about Funk Firm,but cant think of the other company at the moment.
You are right about the bolt mod to stop the top plate vibrations.As fot the changing of the motor position perhaps Nanook can come in here as he is in the process of doing this very mod.I dont know if there is any reading to be be had at this time about this mod.The only thing ive seen was a review written about the 'Funk Firm' (i think)Linn mods which include a new carbon fibre top plate and repositioning the motor at the 7 o'clock position.Might be wrong about Funk Firm,but cant think of the other company at the moment.
Hi againatavid said:
*Get the SRM Tech teflon main bearing pad.Only a few bucks.
*Damp the underside of top plate.
*Experiment with a set of Linn black springs if you wish.
*Do the bolt mod,either one or both sides.
*You could try a new cross brace(i would try making it from 6 or 8mm aluminium plate)
*If you havn't already, get a Boston or similar platter mat.Nice bit of extra detail and "blacker background".
*Get a new plinth made up from hardwood.Find a good woodworkers hobby tool shop and ask the guys if they know someone who will do it for you.Mine cost me about US $300,but its a beautiful thing.
I believe almost all of these mods could be done also on a RD80 (The SRM Tech pad is too thick for my present setup because there is no clearance and the belt would probably fall under the paltter)
The Linn springs are a good option that I want to try.
Do you know if the platter has the same weight as the RD11 ?
Ricardo
still here....
...turntable is in pieces. I did hack out a new mounting location for the motor. Slightly time-crunched to finish. I've had it part too long. The original motor works well, it was the spring in the clutch setup that didn't. Finally have the bearing sorted (after a few tries)
Because this is a table owned by somebody else I've had to make changes that can easily be undone. I'll use 3M body trim adhesive tape to hold a knock-down fastener to the top plate, and then use threaded rod screwed into that. The rod need be cut to length first. also need to add the braces to the plinth, and perhaps a bottom plate of Baltic Birch. For feet, I'm thinking of using speaker spikes.
The end results should be similar to the "Chadwick Mods" of the Thorens TD 150-166.
I'm absolutely terrible at updates, so please excuse my tardiness.
atavid, what Aralide adhesive? Is it just an epoxy? Wonder if a suitable Loctite product could be used (never heard of araldite before...)
Last edited:
Hi,
7 o´clock position is used on DPS turntables. You can get more details from: dps turntable, der plattenspieler, dps 2, dps 3, Schroder No. 2 fw - Soundscape HiFi And Music
Best regards,
Bins.
7 o´clock position is used on DPS turntables. You can get more details from: dps turntable, der plattenspieler, dps 2, dps 3, Schroder No. 2 fw - Soundscape HiFi And Music
Best regards,
Bins.
Hi guys, nice to hear from you again.
Nanook,i used two products to secure bolts to top plate.Firstly i used Loctite 243 and let it set for a week,then i used a two part epoxy(brand name here is Araldite)that requires 24 hours to set,but is best left for a week also before it gains full strength.I added the epoxy over the bolt head after it had lost some of its viscosity(began to set) so it would cling to the bolt head and shaft rather than run off the bolt and just spread itself thinly over the top plate.I did all this of course with the top plate and turntable upside down.
What did you do with the bearing?
I've tried speaker spikes and they are ok,but on my other turntable i'm currently experimenting with squash balls set in chrome furniture feet containers underneath a slab of 20mm acrylic.Not sure yet how i feel about the sound compared to the spikes.Want to try the same with the Ariston.
RCruz is a RIAA a phono stage?Any pics?
what about the bearing?
I had the original one knurled out, and a new insert made of Delrin (similar to the original bearing liner) installed. The bottom of the stock bearing sucks! Had a cap made of tool steel, held up by set screws. I can still add a small Teflon thrust plate if need be.
As I am planning on using knock down furniture connectors on the top plate, I can drill through the plate or attach them from the underside. 3M body tape is excellent, instant, and virtually impossible to break the seal on. I hung a 24" piece of aluminium channel on a 3"X3" tile wall and could hold myself up by it , and I am 90 kg (or 200# ). So a 10-15 # weight should be easy to manage.
When I can get some photos and get them resized, I'll post them here or on flickr or similar.
and...
moved the motor mounting location to approximately the 7 o'clock position.
This location was actually calculated, taking the tracking error of a 9" arm into consideration. As it turned out, it was symmetrical to the existing motor mount location about the "x" axis.
moved the motor mounting location to approximately the 7 o'clock position.
This location was actually calculated, taking the tracking error of a 9" arm into consideration. As it turned out, it was symmetrical to the existing motor mount location about the "x" axis.
Attachments
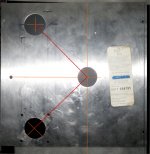
the 7 O'clock position...
well the stock location is actually at the 10:30 position. So the modified position is at the 7:30 position.
I had done an analysis of the two locations some time ago and the modified position reduces lateral torque about the stylus by a significant amount. I need to do a more rigorous analysis and actually post it.
QUOTE]
I did not know Nanook died of starvation.... I really like FZ but that is all I know about "eating yellow snow"... please give me a hint")
yup, he did...
regarding the yellow snow...from Frank Zappa's anti sealing song "Don't eat the yellow snow". Do a search, the lyrics are online
Look for "the funk firm" online. They have a pretty fair explanation of the 7 O'clock position on their website. Basically the torque applied to the stylus tip due to the location of the motor, drops a significant amount (to 1/20th of that of the original 10:30 position, and to 1/5th in the worst case scenario) between the 10:30 position and the 7:30 position. This can be significant when a motor is mounted to a rigid structure whilst the platter is suspended as found in the Ariston, Heybrook and Linn types. Pretty much non existent when both the platter and the motor are mounted rigidly.
Last edited:

Before I set off on my quest to revive an Ariston RD11s, I was wondering if anyone here could identify this arm? It seems to be a unipivot design, but I don't have any idea what make or model it might be.
Any help would be appreciated
Any help would be appreciated
Attachments
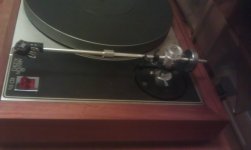

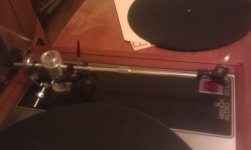
Before I set off on my quest to revive an Ariston RD11s, I was wondering if anyone here could identify this arm? It seems to be a unipivot design, but I don't have any idea what make or model it might be.
Any help would be appreciated
Mayware Formula IV Manual - Professional Laboratory Variable Mass Silicone-Damped Pick-up Arm - Vinyl Engine
Twist the suspension grommets until the arm board is centered. Adjust the nuts on the suspension until it floats horizontally and freely.
Clean and replace the bearing oil with Linn LP12 oil.
Last edited:
- Status
- This old topic is closed. If you want to reopen this topic, contact a moderator using the "Report Post" button.
- Home
- Source & Line
- Analogue Source
- Revive an Ariston RD-11S