1. You can use 2 pairs, but you have to connect them with wires and add rezistors. But you can simply build Nmos 350 and only mount 2 pairs like I did.hi guys !
this is my first post in this forum
i want to build nmos200-TO247 version but before building i have a few questions :
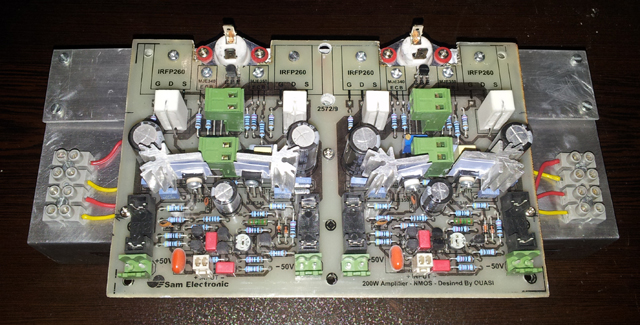
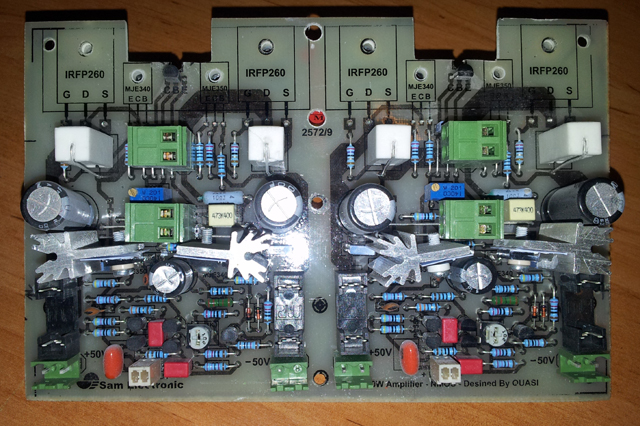
1.can i use 2 pairs of irfp260 fets in this amp instead of one pair ? (for driving 4Ohm speaker) how should i connect them ?
2.what was the final decision about using an amber LED instead of r21 in this circuit ? does it improve sound quality ?
3.can i use 2sd669/2sb649 instead of mje340/350?
4.can i use 2n5401 instead of bc556 ?
forgive me for my poor english ..
cheers
2. I don`t know, I build Nmos 350 and I kept everything like in schematic.
3. Most likely you can use 2sd669/2sb649, but try not go over +/-60v dc for 2sd669/2sb649 and +/-80v dc for 2sd669A/2sb649A
4. Yes and watch out for pinouts.
Good luck.
hi guys !
this is my first post in this forum
i want to build nmos200-TO247 version but before building i have a few questions :
1.can i use 2 pairs of irfp260 fets in this amp instead of one pair ? (for driving 4Ohm speaker) how should i connect them ? -- offcouse can use everyone you have ( just care Vgs)
2.what was the final decision about using an amber LED instead of r21 in this circuit ? does it improve sound quality ? offcouse they 've ready tested it .. see also Nmos page .
3.can i use 2sd669/2sb649 instead of mje340/350? the same item1
4.can i use 2n5401 instead of bc556 ? the same item1
yes they are.Do you know, that 2sk1058 are "LATERAL" Mosfets?
ok thank you AndrewT i read about lateral fets and understood the diferences of them with vertical fets.
now another question came to my mind . sorry if i ask alot.
is it necessary to put 0.27 ohm resistors if i match the Vgs of fets?
should i put the output coil like nmos350 if i use 2 pairs of fets?
now another question came to my mind . sorry if i ask alot.
is it necessary to put 0.27 ohm resistors if i match the Vgs of fets?
should i put the output coil like nmos350 if i use 2 pairs of fets?

If you check your scaling against say, the outline aluminium profile (which will be pretty close to a standard metric profile) then follow with 10 mm electrolytic lead centres (where applicable), spade connector centres and standard transistor lead centres and case profile, (those fuseholders may be an issue if you haven't used the same type) then you won't go far wrong - bearing in mind that real parts have wide tolerances, so use standard dimensions as they appear on datasheets and likely the CAD drafting program would too.
When it comes to calibrating the scale of your print-out, I'd double the size and compare that, then scale back to real size for a final print. Still check it, though.
The PCBs are only required for your use, I imagine, so the critical measurements are only the fixed lead spacings and if you have the largest of these correct in both X,Y direction, I don't think the rest really matters. After all, if your artwork is what you'll be etching, there isn't much else you need to match up with since mounting bolts can be set later.
Good luck if this is an early attempt. It takes confidence but when we get to Ostripper and Co. standard, they'll be a piece of cake!")
When it comes to calibrating the scale of your print-out, I'd double the size and compare that, then scale back to real size for a final print. Still check it, though.
The PCBs are only required for your use, I imagine, so the critical measurements are only the fixed lead spacings and if you have the largest of these correct in both X,Y direction, I don't think the rest really matters. After all, if your artwork is what you'll be etching, there isn't much else you need to match up with since mounting bolts can be set later.
Good luck if this is an early attempt. It takes confidence but when we get to Ostripper and Co. standard, they'll be a piece of cake!
- Home
- Amplifiers
- Solid State
- Power amp under development