Sorry Lineup, but the safety match was invented in 1836 by the Hungarian Irinyi János!Match: Swedish Safety Match for making fire.
First invented in 1844 by one of our swedish inventors.
The safety match was invented in 1844 by the swedish Gustaf Erik Pasch (1788-1862) and was improved by Johan Edvard Lundström (1815-1888).
Just to be historicaly correct.
")
Greets:
Tyimo
P.S. Sorry for the off topic...
Re: Pfm Grand
Hi Rock
This is a verry nice construction. Congratulations.
Sorry for my ignorance, but what exactly is this project? I can take the risk to suppose that the one unit it is a power supply. But for the for second unit (the silver) i can't do this. what is exactly? A preamplifier? An amplifier for headphones? A power amplifier?
Is it easy for you to inform me please?
Regs
Fotios
ROCKMANDRAKE said:
Hi Rock
This is a verry nice construction. Congratulations.
Sorry for my ignorance, but what exactly is this project? I can take the risk to suppose that the one unit it is a power supply. But for the for second unit (the silver) i can't do this. what is exactly? A preamplifier? An amplifier for headphones? A power amplifier?
Is it easy for you to inform me please?
Regs
Fotios
nice idea
Hi Rock
I had almost the same idea like you, to build a preamplifier in 3 seperate units: 1) The power supply unit, 2) The main preamplifier unit, 3) The input selector unit. The only difference there is in the volume control for which my plans was to include it in the preamp unit between the input and output buffers which is the usual way.
I have build a preamp in two units, one for the power supply and another one for the rest. Because i used latching type relays as input selectors, the final result was a real confusion with enough buzz noise although i was very carefull to avoid any ground loop in pcb drawing and in the practice implementation.
If i understand well, your preamp does not include double buffers and it is a simple stereo buffer with some gain. With simplest words, i suppose that your preamp works like a power amplifier with input attenuating pots. If i am wrong, please correct me.
But i think, this implementation it is by far the most noiseless from any other.
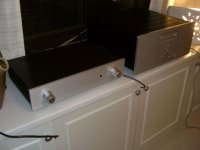
Another one wonderfull thing - that is presented in the photos - it is that you use single wires for connections. I know very well that the multiclone usual cables, they present enough parasitic capacitance. The single clone wires are superb in this by presenting far less stray capacitance than the flexible multiclones.
Regs
Fotios
Hi Rock
I had almost the same idea like you, to build a preamplifier in 3 seperate units: 1) The power supply unit, 2) The main preamplifier unit, 3) The input selector unit. The only difference there is in the volume control for which my plans was to include it in the preamp unit between the input and output buffers which is the usual way.
I have build a preamp in two units, one for the power supply and another one for the rest. Because i used latching type relays as input selectors, the final result was a real confusion with enough buzz noise although i was very carefull to avoid any ground loop in pcb drawing and in the practice implementation.
If i understand well, your preamp does not include double buffers and it is a simple stereo buffer with some gain. With simplest words, i suppose that your preamp works like a power amplifier with input attenuating pots. If i am wrong, please correct me.
But i think, this implementation it is by far the most noiseless from any other.
Another one wonderfull thing - that is presented in the photos - it is that you use single wires for connections. I know very well that the multiclone usual cables, they present enough parasitic capacitance. The single clone wires are superb in this by presenting far less stray capacitance than the flexible multiclones.
Regs
Fotios
Pfm Fuselage + Soar 1 ( active or passive Db Lifter )
Hi Fotios,
Congratulations for your remarks... They are absolutely right...
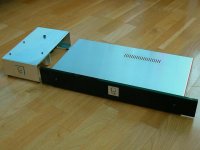
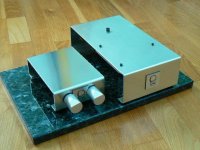
Pfm Fuselage ( passive preamp ) + Soar 1 ( Active stage ) on
dedicated granite base
Greets
Rock
Hi Fotios,
Congratulations for your remarks... They are absolutely right...
Pfm Fuselage ( passive preamp ) + Soar 1 ( Active stage ) on
dedicated granite base
Greets
Rock
Attachments
Thanks Rock for your kind words.
I don't know if the bend work of alu plates it is made from you or from a workshop. You have the same problem like me. In the bended corners the plate presents small cracks. If it is not anodized, try to wipe off the cracks with sandpaper.
The alu it is the better material for such works - included DIY - because it is soft, but its behaviour during proccess it is a real nightmare. Millions of chips, bad smell from the diesel cutting fluid, smudge plates which are difficult to cleaned-up, and so on
Regs
Fotios
Audio Analogue Maestro
I have in front of a me a very nicely built Audio Analogue Maestro Mono Block amplifier and the matching preamp.
Unit #1 Audio Analogue Maestro preamp has no display
Unit #2 Audio Analogue Maestro Mono Block
Power supply goes into protection mode with Output finals attached.
With finals removed power supply works fine.
Does anyone have any ideas? I have a service manual (in Italian)
This is a very interesting design since each step of dis-assembly has several tasks to accomplish.
This picture is with the sides and top removed. The channels are being removed for testing. The Front end circuits are located on the center PCB. This Front end PCB is mounted to a ground plane. Under the ground plane is the power supply and logic circuits.
Re: Audio Analogue Maestro
Nice units!
I can't see any picture, because there is not any picture posted. Please try again.
Fotios
VintageAmp said:I have in front of a me a very nicely built Audio Analogue Maestro Mono Block amplifier and the matching preamp.
Unit #1 Audio Analogue Maestro preamp has no display
Unit #2 Audio Analogue Maestro Mono Block
Power supply goes into protection mode with Output finals attached.
With finals removed power supply works fine.
Does anyone have any ideas? I have a service manual (in Italian)
This is a very interesting design since each step of dis-assembly has several tasks to accomplish.
This picture is with the sides and top removed. The channels are being removed for testing. The Front end circuits are located on the center PCB. This Front end PCB is mounted to a ground plane. Under the ground plane is the power supply and logic circuits.
Nice units!
I can't see any picture, because there is not any picture posted. Please try again.
Fotios
Bonsai's Pre-amp
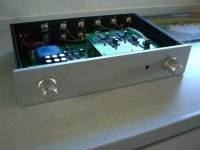
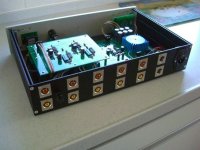
Here are some pictures of my pre-amp which I have partially completed. The main control amp is based on an LM4562 single ended to balanced design with a gain of approx 3. All inputs are relay switched with control via a swtich located on the LHS of the front panel. I use an Alps Blue Velvet pot (10k - I also like lowish value potentiometers - and with a bipolar input op-amp, this gives better noise performance). For the power supply, I used an Amveco transformer (very low mechanical noise and much better I discovered than the Block transformer brand in this regard). Main supply is built around LM317/337. Each op-amp supply is further decoupled with a 22 Ohm and 100uF. In series with each balanced output, I have 50 ohms to isolate cable capacitances .
The pre-amp input to output is DC coupled, but no servo is necessary.
For the headphone amp, I am driving a diamond buffer stage straight from the pre-amp output stage, so no gain. I have used capacitive coupling on the output of the headphone amp.
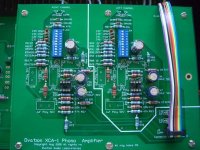
I've mounted the phono board, but its not yet complete - I still have to get some parts - its based heavily on Dennis Collin's design out of Audio Amateur. On each input, I have a 10 way DIL switch for selectable cartridge loading. The supply lines on the op-amps on the phono card are also decoupled with 22 ohms and 100uF.
I am playing it through my power amp and driving a pair of B&W 703's and I must say the sound to my ears is very good - clean, open with great bass. I listen mainly to jazz, classical and light rock.
CD player is a Pioneer DV-655A which does SACD as well.
Dimensions are 450mm (W) x 300 (D) x 100 (H) and weight is around 5Kgs.
Here are some pictures of my pre-amp which I have partially completed. The main control amp is based on an LM4562 single ended to balanced design with a gain of approx 3. All inputs are relay switched with control via a swtich located on the LHS of the front panel. I use an Alps Blue Velvet pot (10k - I also like lowish value potentiometers - and with a bipolar input op-amp, this gives better noise performance). For the power supply, I used an Amveco transformer (very low mechanical noise and much better I discovered than the Block transformer brand in this regard). Main supply is built around LM317/337. Each op-amp supply is further decoupled with a 22 Ohm and 100uF. In series with each balanced output, I have 50 ohms to isolate cable capacitances .
The pre-amp input to output is DC coupled, but no servo is necessary.
For the headphone amp, I am driving a diamond buffer stage straight from the pre-amp output stage, so no gain. I have used capacitive coupling on the output of the headphone amp.
I've mounted the phono board, but its not yet complete - I still have to get some parts - its based heavily on Dennis Collin's design out of Audio Amateur. On each input, I have a 10 way DIL switch for selectable cartridge loading. The supply lines on the op-amps on the phono card are also decoupled with 22 ohms and 100uF.
I am playing it through my power amp and driving a pair of B&W 703's and I must say the sound to my ears is very good - clean, open with great bass. I listen mainly to jazz, classical and light rock.
CD player is a Pioneer DV-655A which does SACD as well.
Dimensions are 450mm (W) x 300 (D) x 100 (H) and weight is around 5Kgs.
Attachments
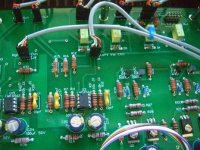
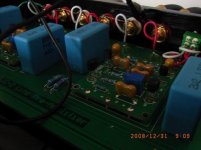
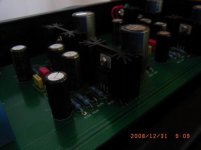
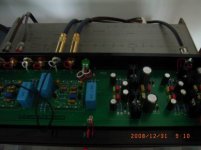
Bonsai said:Internal shot of the main amp and regulator board.
First class parts inside!
Cornell-Doubilier silver mica caps, Panasonic (blue=low ESR) electrolytics etc... resistors are Vishay?
In the front, the 4 small yellow parts are NAIS relays? Or Panasonic? What type are you using?
Fotios
- Home
- Amplifiers
- Solid State
- Post your Solid State pics here