Found it thanks
Are the parts in the BOM the best or the most affordable?
Any recommended changer to the BOM parts?
Thanks
EvilYoda said:Just click on his link, search for "BOM"...not that hard.
Are the parts in the BOM the best or the most affordable?
Any recommended changer to the BOM parts?
Thanks
Re: Found it thanks
Everything there is good.
1. The Xicon 15000uf 50V - that you would have to ask Pavel or Per-Anders.
2. The wire connectors (2MV-08) might be changed to wago's (Mouser doesn't carry).
3. Also missing: The LM4780 (Mouser doesn't carry), heat sinks, toroidal and spacers.
Did you notice the last update of the BOM (see components thread)?
ppcblaster said:
Are the parts in the BOM the best or the most affordable?
Any recommended changer to the BOM parts?
Thanks
Everything there is good.
1. The Xicon 15000uf 50V - that you would have to ask Pavel or Per-Anders.
2. The wire connectors (2MV-08) might be changed to wago's (Mouser doesn't carry).
3. Also missing: The LM4780 (Mouser doesn't carry), heat sinks, toroidal and spacers.
Did you notice the last update of the BOM (see components thread)?
Re: Re: Found it thanks
Where is the last update of the BOM Please?
BNK said:
Everything there is good.
1. The Xicon 15000uf 50V - that you would have to ask Pavel or Per-Anders.
2. The wire connectors (2MV-08) might be changed to wago's (Mouser doesn't carry).
3. Also missing: The LM4780 (Mouser doesn't carry), heat sinks, toroidal and spacers.
Did you notice the last update of the BOM (see components thread)?
Where is the last update of the BOM Please?
Upupa Epops said:Original BOM isn't updated, 'cos all is correct...
I meant the one on the components thread to order from mouser.
According to Pavel's recommendations (document):
Caps should be updated there to Chemi-Con 15000uf 50V.
Resistors should be updated to Vishay.
Part numbers??
Please post part numbers
BNK said:
I meant the one on the components thread to order from mouser.
According to Pavel's recommendations (document):
Caps should be updated there to Chemi-Con 15000uf 50V.
Resistors should be updated to Vishay.
Please post part numbers
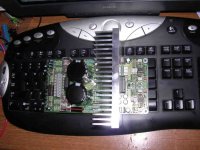
Well here is my PA03 99% completed, all but the heat sink being attached.
Very well done design, I have to admit for someone who just likes to solder and put things together. This design was a lot of work, but so well designed and documented I had NO problems with anything, thus far...
Very well done design, I have to admit for someone who just likes to solder and put things together. This design was a lot of work, but so well designed and documented I had NO problems with anything, thus far...
Attachments
Mine is now about 90% done, and it has been easy so far.
I now have to attach the heatsink to the chip. Sorry but I have some very basic questions here.
Do I drill some holes in the heatsink and tap a thread in these holes, or do I just use some cement?
Also do I need to dril holes in the base of the heatsink, to atanch it to the pcb?
help appreciated
I now have to attach the heatsink to the chip. Sorry but I have some very basic questions here.
Do I drill some holes in the heatsink and tap a thread in these holes, or do I just use some cement?
Also do I need to dril holes in the base of the heatsink, to atanch it to the pcb?
help appreciated
http://www.wakefield.com/pdf/accessories.pdf
Would these delta pads work for connecting the LM4780 and the VR's to the heat sink? Page 73 of the above data sheet, link above.
Or would it be more prudent to by one of the TO - 220 mounting kits, like the mica, thermal III kit? Which is better?
Would these delta pads work for connecting the LM4780 and the VR's to the heat sink? Page 73 of the above data sheet, link above.
Or would it be more prudent to by one of the TO - 220 mounting kits, like the mica, thermal III kit? Which is better?
Chalkandtalk,
Drill 3 holes in the heatsink and tap a thread in these holes for the 3 devices and drill 2 holes in the base of the heatsink and tap a thread in these holes for connecting the heatsink on the PCB.
In case of metric thread, you can use M3 as well as M4.
Easy to do and perfect connection.
Drill 3 holes in the heatsink and tap a thread in these holes for the 3 devices and drill 2 holes in the base of the heatsink and tap a thread in these holes for connecting the heatsink on the PCB.
In case of metric thread, you can use M3 as well as M4.
Easy to do and perfect connection.
chalkandtalk said:Mine is now about 90% done, and it has been easy so far.
I now have to attach the heatsink to the chip. Sorry but I have some very basic questions here.
Do I drill some holes in the heatsink and tap a thread in these holes, or do I just use some cement?
Also do I need to dril holes in the base of the heatsink, to atanch it to the pcb?
help appreciated
What about thermal conductive adhesive (glue)?
jaybombalous said:http://www.wakefield.com/pdf/accessories.pdf
Would these delta pads work for connecting the LM4780 and the VR's to the heat sink? Page 73 of the above data sheet, link above.
Or would it be more prudent to by one of the TO - 220 mounting kits, like the mica, thermal III kit? Which is better?
???
what??? Does that have to do with insulating washers for the LM4780
I do see what u mean though if u speak of my picture and C11 , C15. As far as that goes, this is what came in the group buy kit, so I just soldered them on. ex007 was the one who made all the choices.
I will re-read the instructions and check the BOM for more info... thanks
I do see what u mean though if u speak of my picture and C11 , C15. As far as that goes, this is what came in the group buy kit, so I just soldered them on. ex007 was the one who made all the choices.
I will re-read the instructions and check the BOM for more info... thanks
Have you looked at the closeup pictures, or checked how the LM4780 look like? The package is all in plastic (the anser is no).jaybombalous said:what??? Does that have to do with insulating washers for the LM4780
Dear all, couldn't you study the material, look at pictures, get datasheets and try to get a grip of this design. The answers for many questions are rather clearly written.
- Home
- Group Buys
- Pavel Dudek's super Gainclone group buy