or if actually there ever was a record recorded quite that hot.
Shure does not provide the source of the data presented, I wonder what the data from the actual LP survey that Channel D did looks like on the same graph.
Hard to know whether to laugh or cry.......Trackability at 1 gram (10 mN ) Tracking Force (typical values shown in cm/sec peak velocity):
400 Hz: 30 cm/sec
1 kHz: 46 cm/sec
5 kHz: 80 cm/sec
10 kHz: 60 cm/sec
")
A few years back I wrote a calculator that allowed me to explore physical trackability limits in terms of programme levels and physical grove parameters. All trace gone in the great purge, presumably.
Attached below are 4 charts from that calculator 'groovy' that show 'what if' for those conditions from the Shure literature.
Parameters in red are, IMO, untrackable at any VTF by any cartridge. Amber is possible but difficult.
Absolute physical trackability limits are about +/- 120um groove amplitude, 40 degree groove angle, and 1200G curvature/acceleration IME, for good theoretical reasons. At different frequencies, cartridge spring, cartridge damping, and cartridge inertia dominate.
There must be some mistake.......
LD
Attachments


Last edited:
Let me PM someone over on VE who does some pretty amazing stylus images to see what he reckons. If you have a DSLR its only a few hundred more to get the other bits to get you going.
How do you get to hundreds? I think most people with a DSLR have at least two lenses (else why bother?), so what else do you need? A macro coupler costs <$20, a small but sturdy tripod, an illumination source (Sol works pretty well but some moveable LEDs should too), and yes a finely adjustable stage, which you can get pretty cheap from China these days or likely DIY without too much effort or expense. Obviously I have never got results like 667s but did pretty OK just hand-holding the 2 lenses together; I reckon with a coupler I could have done much better.
Not trying to be bloody-minded just curious how you figured hundreds of dollars/pounds/euros given a DSLR already in hand.
Pano I have no idea, I was just thinking about the setup used by one member on Vinyl Engine, though on second thought I am probably not thinking about the same guy Bill was referring to. I have seen the photos that I now think he is referring to, and yes that is another level.
OTOH if you can clearly see the pointy end of the stylus, how much smaller do you need to go?
OTOH if you can clearly see the pointy end of the stylus, how much smaller do you need to go?
If only somehow we could make a dynamic compliance stylus+cartridge which adjusts compliance as music content.
Two elastomers ? Shape of elastomer ? different compliance elastomer for vertical and horizontal motion ?
This video has been posted before but posting again.
SEM stylus motion in groove. (Kind of stop animation film)
Two elastomers ? Shape of elastomer ? different compliance elastomer for vertical and horizontal motion ?
This video has been posted before but posting again.
SEM stylus motion in groove. (Kind of stop animation film)
IMO optical microscopy can't have the resolution we need to see detail that is at issue. Besides, I suspect we actually need to see surface detail sufficiently to verify there is no difference........Do you think we'd get enough magnification with just a macro lens? The FOV is tiny, as a single groove is on 50-70 µm wide.
A resolution of 1000 pixels across that FOV would do, and that might help.
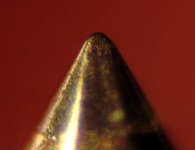
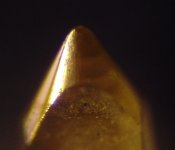
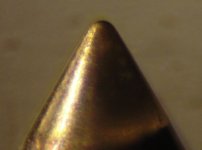
Optical microscopy has limitations due to wavelength of light. Here are a couple of my own images in as fine detail as I could obtain, of 2M Blue and 2M Red stylus tips. They're better than many (if I might say), but one still can't explore the contact regions to any meaningful extent.
Since these images are up, thought to raise a flaw in the basis of Hunt/Barlow/Walton et seq indentation tests: these tests were done (IIRC) by scraping a stylus across a flat plane of vinyl, and measuring the scratch.
However, the contact point in that case would be the base of the stylus, which need not have the same radius nor polish as the true contact regions. In these images, the base radius isn't too badly pointed, but it's not a safe assumption that stylus base has the same shape, radius, nor polish as the contact regions - and AFAIK back in the day this was never measured in those tests.
One has to scrutinise this stuff, not just accept the narrative/conclusions, IMO.
Also in the Barlow article Hiten linked, one might see how Walton's description of a 'try' at explaining dynamic behaviour had become lore and accepted as fact- whereas it omits significant viscoelastic and other physical properties of vinyl as previously pointed out.
And one can begin to see how a self-fulfilling spiral of acceptance might have emerged which, IMO, often doesn't stand scrutiny or describe what might really go on at the stylus groove interface. Never in the field of human endeavour was the Hertz equation wheeled out so many times when boundary conditions proscribe its application
Anyways, here's some of my own pretty pictures of 2M styli from the archive.
LD
Attachments
Last edited:
NezBleu: yes I was talking about the Ray Parkhust pictures. He is different as he uses focus stacking and software to assemble a high DoF image, which is what you would need if you wanted even a minute chance of picking up what is going on. Below his list of the sort of rig he uses.
He then lists a setup that would cost about $250 with slightly less quality and more mandraulic.
The focus stacking is what really helps. Couple of examples from Ray's photobucket of a Nakimi microridge from side and above.
Photobucket
Photobucket
Now whether this technique is suitable for vinyl or high enough resolution is the question. Needs to be tested!
Canon DSLR: Canon is chosen for a few good reasons, which I can elaborate on if folks are interested. An older camera body will cost ~$175-$300.
Teleconverter: Vivitar's 2x Macro Focusing Teleconverters can't be beat, and will cost ~$50.
Bellows and Adapters: There are several choices from ~$75-$150. Adapters are needed to mount the camera on one end, and objective on the other, and will cost ~$35.
Objective: Nikon, of course. The 10x objective will cost ~$200.
Macro Stand: There are several options. A converted microscope stand is ~$200 and is very compact, while a full size copy stand is ~$150-$300
Z-Stage: This is needed to adjust focal planes for the stack of ~30-50 images needed to get the whole stylus into focus. If you're willing to do this manually, the stage will cost ~$75. If you want software control, a stepper-based system will cost ~$300-$500.
XY stage: This is an option that makes framing the stylus in center of the image much easier. It can be purchased in conjunction with the Z-stage (XYZ), or separately for ~$100.
Lights: IKEA's Jansjo LED gooseneck lamps work great, and are $10 each. You'll need 4 of them, two for side illumination of the contact surfaces, and two for overall illumination. You'll want to diffuse them so will also need to buy some heavy vellum or other diffusion material at an art store.
Software: Camera control software comes with the camera (Canon) and lets you view the stylus on your computer screen and snap the shots when doing manual stacking. The automated stacking system has its own software to control the stepper motor. Helicon Focus or Zerene Stacker will cost you a yearly fee of ~$50. CombineZP is free, and not too hard to use, though the output is not as well-behaved.
Adding it all up, you're talking ~$1000 for all the pieces.
He then lists a setup that would cost about $250 with slightly less quality and more mandraulic.
The focus stacking is what really helps. Couple of examples from Ray's photobucket of a Nakimi microridge from side and above.
Photobucket
Photobucket
Now whether this technique is suitable for vinyl or high enough resolution is the question. Needs to be tested!
Ah ha! Focus stacking. I have been reading about extreme macro photography and they all talk about stacks, stacks. Didn't know what that meant. We've been stacking images for high dynamic range for years, had forgotten all about high DOF stacking. Amazing results.
That's what's so striking about SEM photographs - unlimited DOF. They show topology so well, which is what is needed for LP grooves.
That's what's so striking about SEM photographs - unlimited DOF. They show topology so well, which is what is needed for LP grooves.
Well it would appear from a quick google that universities do rent out time on their SEMs for around $60/hr. I should ask around. A couple of sessions a year would be affordable for the data it gave us if 2 or 3 people would chip in!
LD: where does the diamond end and the shaft start on that?
LD: where does the diamond end and the shaft start on that?
Yes Bill, I've also been looking at to cost of SEMs and it's affordable. The big problem is the destruction of the test LP. That makes it so much harder to do progressive wear images.
The stacked images are amazing. The stacker hardware I just looked at will do Z axis movements as fine as 2 microns. That's impressive. But all the price of the hardware needed to do proper optical would buy a lot of SEM time.
The stacked images are amazing. The stacker hardware I just looked at will do Z axis movements as fine as 2 microns. That's impressive. But all the price of the hardware needed to do proper optical would buy a lot of SEM time.
The destruction is ok if we do the testing properly before hand to get 'value' from the destruction and we can find a modern test LP that is replacable. Unless we can find someone who can do the carbon film trick that Walton used, in which case the record should be undamaged.
True. Is that done any more?
It may take a "stack" of test LPs sacrificed to the microscope.
What would be nice is to see if you buddy how did the stunning stylus macros and do a few LP grooves for us to look at. That way we can see if optical would show enough surface detail.
It may take a "stack" of test LPs sacrificed to the microscope.
What would be nice is to see if you buddy how did the stunning stylus macros and do a few LP grooves for us to look at. That way we can see if optical would show enough surface detail.
The destruction is ok if we do the testing properly before hand to get 'value' from the destruction and we can find a modern test LP that is replacable. Unless we can find someone who can do the carbon film trick that Walton used, in which case the record should be undamaged.
What about the "liquid plastic" record cleaning method used years ago, peels right off?
The Record Revirginizer Record Cleaning System | Analog Planet I have several PVA products used in the art community, I might give it a try.
Last edited:
- Home
- Source & Line
- Analogue Source
- mechanical resonance in MMs