Wow Shin,
Outstanding work. Are those amp modules mounted to the heatsink the entire amp minus the power supply or only the output stages. They seem very small.
Is your custom made pre/crossover also a DAC or USB DAC. This is looking like about the coolest DIY project I have seen.
Since I am building two pair of nice mid size floor standing speakers this year your design has inspired one of mine. I will post the cabinet concept shape.
Keep up the good work. Maybe it's a good think you are missing the UK DIY audio meet. You will make everyone else feel ashamed.
Originally posted by ScottG Wow - your own personal stalker! You are like a rock star of the DIY world now.
Rock star?!? Well maybe the odd bit of air guitar.

(..hmm, did spot a few areas on that tweeter baffle that needed some sanding down though.
Originally posted by sqlkev I was gonna say that your work is flawless, but I see a bit of chipping on the primered tweeter faceplate. (3rd picture down)
I'm sure you saw that before I did though.
Sorry to break the illusion guys
The blade on the mitre saw could do with replacing/sharpening so the cut is clean once again. Then again I still tend to get a little bit of that even with a new blade. The problem is that the thin paper top layer of MDF tends to rip should the blade not be cutting into it and, instead, out from it. This is the case with quite a few of these angled cuts into thick laminations. But its not really an issue because I had similar chips on the mid/bass baffle that's in the same shot as the chipped tweeter baffle and once you recoat and then sand the primer, the edge comes back and you'd never know otherwise.
Hezz said:Are those amp modules mounted to the heatsink the entire amp minus the power supply or only the output stages. They seem very small.
The modules aren't that big but they're long, overall size is 18cm x 5cm per board and all components except the supplies are on mounted on each. The heatsink tends to make them look lost because its big at 60cm long x 16cm high.
Is your custom made pre/crossover also a DAC or USB DAC. This is looking like about the coolest DIY project I have seen.
No DACs in preamp as such but I'll be looking into swapping the ones in the DEQX to Russ's OPUS DACs with I2S in the future. Once we figure out if its possible that is!
Since I am building two pair of nice mid size floor standing speakers this year your design has inspired one of mine. I will post the cabinet concept shape.
Thanks Hezz. Look forward to seeing your project. Post a link or pictures here otherwise I might miss it.

A little update of my own...
Hey Guys,
Thanks for all the nice comments. You guys rock.
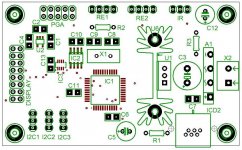
Component silk for new preamp controller which will be part of Shin's preamp along with the PGA modules.
There are some extra bits there which I will use on some other projects.
I would post the full layout with traces but it would just be difficult to read.
Cheers!
Russ
Hey Guys,
Thanks for all the nice comments. You guys rock.
Component silk for new preamp controller which will be part of Shin's preamp along with the PGA modules.
There are some extra bits there which I will use on some other projects.
I would post the full layout with traces but it would just be difficult to read.
Cheers!
Russ
Attachments
Re: A little update of my own...
I really hope you make this available to buy on your website Russ. For too long have folks going the active route had to put up with ganged pots such as those from DACT or attenuating at the source and losing precision with digital crossovers. Its all rather ugly and an instant turn off.
This solution is entirely modular where the controller can be connected upto many 2 channel PGA modules to provide the functionality needed. For example the preamp I'll be using will be a 10 in and 14 out solution:
Once thing the preamps won't do is control individual channel level, it only acts as a master control. A shame about that because some people would have found that useful for driver level matching. It can be done using the hardward but writing the software to provide this functionality is a major headache. Maybe in the future Russ or someone else will tackle this and provide the source code for us all to benefit.
Russ White said:Hey Guys,
Thanks for all the nice comments. You guys rock.
Component silk for new preamp controller which will be part of Shin's preamp along with the PGA modules.
There are some extra bits there which I will use on some other projects.
I would post the full layout with traces but it would just be difficult to read.
Cheers!
Russ
I really hope you make this available to buy on your website Russ. For too long have folks going the active route had to put up with ganged pots such as those from DACT or attenuating at the source and losing precision with digital crossovers. Its all rather ugly and an instant turn off.
This solution is entirely modular where the controller can be connected upto many 2 channel PGA modules to provide the functionality needed. For example the preamp I'll be using will be a 10 in and 14 out solution:
An externally hosted image should be here but it was not working when we last tested it.
Once thing the preamps won't do is control individual channel level, it only acts as a master control. A shame about that because some people would have found that useful for driver level matching. It can be done using the hardward but writing the software to provide this functionality is a major headache. Maybe in the future Russ or someone else will tackle this and provide the source code for us all to benefit.
Hezz said:OK,
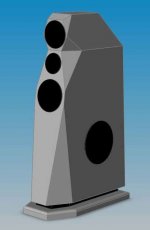
Not as large or as cool as Shin's design but it has a few similar design elements.
Whoa!
Hezz that is a beautiful design. Its hard to put my finger on one specific aspect but the overall shape is appealing and benefits sound in obvious ways. Its everything I like about a loudspeakers shape.
Tenson said:Can these pre-amps offer balanced in and balanced out?
I might have a customer who would buy a 6in-6out if they do, but he would want it fully built.
I don't know if Russ will be selling these or not, I just think it would be a great idea to do so. However yes they will run balanced in and out.
ReTrO said:Looksing very good Shin.
What are you using for the amp housing? It's looks fairly custom, but I guess you didn't make the front?
On the speakers what are you using for the inputs? I'm sure I saw XLRs on the last set.
Thanks Richard.
The amp chassis is none of my work unfortunately. I bought from a small manufacturer who supplies to DIY'ers:
http://www.atiresearch-anodized.com/products.html
I'll be using speakons again for the inputs. Nothing beats these IMO.
ReTrO said:Purely out of interest how much whas the complete ATI 639M chassis?
Just over £300, about £100 of that was shipping though - the company is in Thailand.
- Status
- This old topic is closed. If you want to reopen this topic, contact a moderator using the "Report Post" button.
- Home
- Loudspeakers
- Multi-Way
- 'LGT' Construction Diary