I replaced the 135w uhp in my z3 with your 150w ac and it works fine for now (5h test). Hope the bulb will last ") .
.
Picture of the result (Ice Age II/720p - 2m diagonal)
.Picture of the result (Ice Age II/720p - 2m diagonal)
An externally hosted image should be here but it was not working when we last tested it.
elektron said:I replaced the 135w uhp in my z3 with your 150w ac and it works fine for now (5h test). Hope the bulb will last
Picture of the result (Ice Age II/720p - 2m diagonal)
An externally hosted image should be here but it was not working when we last tested it.
Sweet! Thanks for posting your results. Could you maybe share some insight on how you replaced it? I am curious about the following:
1) How did you weaken the cement to remove the old bulb?
2) How did you find the focal point of the new bulb?
Removing the topglass was kind of a problem, I've placed the lamp in my over on 200°C for about 20 minutes and the silicone was still hard. So I broke of 2 facing corners of the reflector and grinded the glass away untill I could get my screwdriverd underneath the glass and I popped it up. Then the type of cement they used was very hard, I drilled a few holes in the cement around the lamp and then I used a screwdriver to remove the remaining cement. I broke the lamp so I wasnt able to see how the lamp was positioned originally. I just placed the new lamp on "touch" (on feeling?) and used "modelgips" (in dutch). If you use "lusterklemmen" like I did to connect the wires, make sure you remove the plastic. On my picture the plastic is still on, but I removed it a little later. (Dont solder the wires, the soldering-tin will probably melt again).
This lamp was really a pain in the *** to modd, hardest one I've done since now.
An externally hosted image should be here but it was not working when we last tested it.
An externally hosted image should be here but it was not working when we last tested it.
This lamp was really a pain in the *** to modd, hardest one I've done since now.
ywh said:Hi TonkaTuff!
OK ! the total price is $150, shipping is me.
Ok great.. How do I send you the money and my address???
My email is tonkatuff@tonkatuff.com
Cheers,
Tonks..
elektron said:Removing the topglass was kind of a problem, I've placed the lamp in my over on 200°C for about 20 minutes and the silicone was still hard. So I broke of 2 facing corners of the reflector and grinded the glass away untill I could get my screwdriverd underneath the glass and I popped it up. Then the type of cement they used was very hard, I drilled a few holes in the cement around the lamp and then I used a screwdriver to remove the remaining cement. I broke the lamp so I wasnt able to see how the lamp was positioned originally. I just placed the new lamp on "touch" (on feeling?) and used "modelgips" (in dutch). If you use "lusterklemmen" like I did to connect the wires, make sure you remove the plastic. On my picture the plastic is still on, but I removed it a little later. (Dont solder the wires, the soldering-tin will probably melt again).
An externally hosted image should be here but it was not working when we last tested it.
An externally hosted image should be here but it was not working when we last tested it.
This lamp was really a pain in the *** to modd, hardest one I've done since now.
Thanks for the great info.
LP350 lamp replacement
This weekend I replaced the lamp in my Infocus LP 350 with that one from ywh (JYS/DC lamp 270 W SHP).
I had to make a hole in the ceramic holder to screw the
lamp - no problem so far using a small drill for tiles and then increasing the diameter with larger drills.
Then I did the axial lamp positioning with some modelling clay popular here in Germany (Fimo - hope it will be stable in practical use ). I used the clay only between the ceramic fittings - no direct contact to the lamp itself.
After that my first test was with the lamp outside the projector and it was really bright (immediately burned a hole in the paper I put 10 inches in front to find out focus diameter). Diagonal in front a hair dryer did cooling (sure - switched to cold air).
So far - so good. But then I put everything together and got no picture. Only the diffused light was bright - but nearly no light came out of the projection lens ! So I untightened the lamp cage screws and tried some mechanical adjustments during operation.
Seems to be that the adjustment is the main problem - I could get some picture moving the lamps cage a little bit up - but still didn`t get a really bright picture. Now I assume the axial lamp positioning is not ok.
I'm not sure how to focus the beam to the lens in front of the color wheel (looks like a glass marble). Does the beam become smaller when I put the lamp deeper inside the reflector or more to the front ? I have to think about mechanical solutions to do that under operation . Anybody some ideas ?
Hi fly2max,
I've gone through some similar problems with bulb positioning.
Can you post a pic of where the lamp is now in the reflector?
I don't know of any real way to measure
I have gone from what I've read on here and some ways that you are trying.
I've gone by "before" close-up pics of mine for reference..
I did run across the same problem having the lamp too far back into the reflector. re-positioned it and it helped.
Have you tried around 4mm from the back of the reflector to the bottom of the bulb?
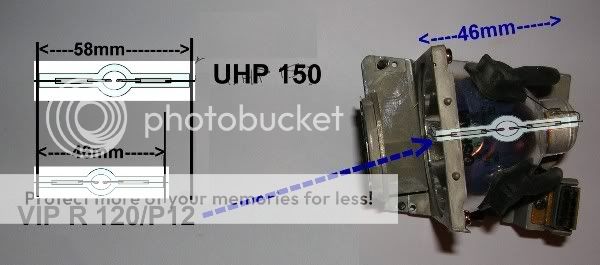
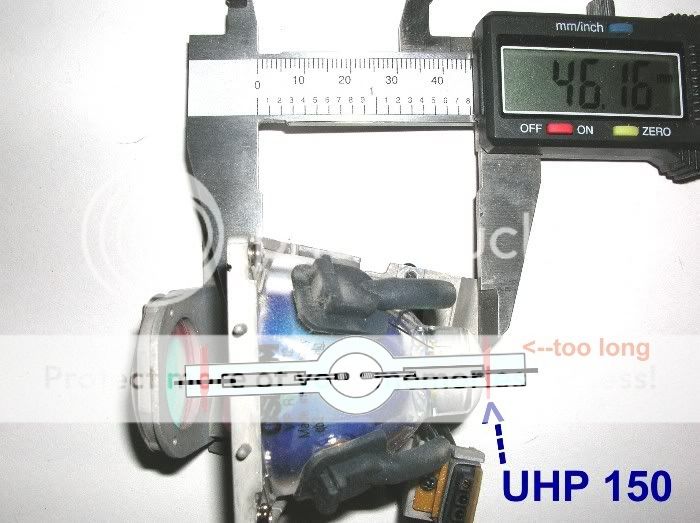
I'll try to explain my method, but for this method the condition is that the original lamp is still in the reflector.
Remove some of the cement untill you reach the glass of the reflector, then you mark the lamp (or the metal piece on the lamp) where I placed the first line on the picture (on the left). Then you remove the lamp and you measure the distance (x) between the mark and the middle of the arc (between the electrodes, where I placed the 2nd line on the picture). If you have measured the distance you mark the new lamp on that same distance starting from the middle of the arc. Now you now how far the new lamp has to be placed into the reflector (untill the mark reaches the glass of the reflector).
I hope you people understand, its not easy to explain it in english for me
Remove some of the cement untill you reach the glass of the reflector, then you mark the lamp (or the metal piece on the lamp) where I placed the first line on the picture (on the left). Then you remove the lamp and you measure the distance (x) between the mark and the middle of the arc (between the electrodes, where I placed the 2nd line on the picture). If you have measured the distance you mark the new lamp on that same distance starting from the middle of the arc. Now you now how far the new lamp has to be placed into the reflector (untill the mark reaches the glass of the reflector).
An externally hosted image should be here but it was not working when we last tested it.
I hope you people understand, its not easy to explain it in english for me
elektron said:I'll try to explain my method, but for this method the condition is that the original lamp is still in the reflector.
Remove some of the cement untill you reach the glass of the reflector, then you mark the lamp (or the metal piece on the lamp) where I placed the first line on the picture (on the left). Then you remove the lamp and you measure the distance (x) between the mark and the middle of the arc (between the electrodes, where I placed the 2nd line on the picture). If you have measured the distance you mark the new lamp on that same distance starting from the middle of the arc. Now you now how far the new lamp has to be placed into the reflector (untill the mark reaches the glass of the reflector).
An externally hosted image should be here but it was not working when we last tested it.
I hope you people understand, its not easy to explain it in english for me
Makes perfect sense. That seems like an excellent method for making sure you get the focal point correct. Thanks for sharing. If you have anything else feel free to share it.
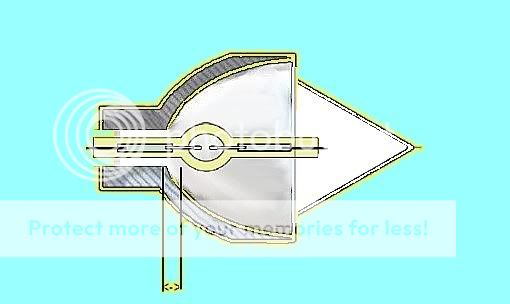
What I do to align the bulb is putting transparant tape on the topglass, then I draw diagonals (from facing corners). Then I place it on the reflector if the lamp is in place and look right above it to see if the lamp is right in the middle, if its not I move it a little and have an other look (I do this untill its right).
About the cement, I use "modelgips", we also call it plaaster and I think a right wordt in English is plaster (like the stuff for broken arms, leggs,...). I use as little water as possible, you should be able to work it like gum.
About the cement, I use "modelgips", we also call it plaaster and I think a right wordt in English is plaster (like the stuff for broken arms, leggs,...). I use as little water as possible, you should be able to work it like gum.
An externally hosted image should be here but it was not working when we last tested it.
LP350 lamp replacement - ongoing
Hi Dumbfounded, elektron
thanks a lot for your suggestions - the drawings are really nice and I will try to do a similiar one when I hopefully succeed sometime.
It's to late today (Germany) to take some pictures but I'll try tomorrow. It's true that the old lamp was around 4 mm from the back of the reflector and that was my first try. But I think that the old lamp (already a replacement) was mis-positioned because the picture was very dark. Outside the projector it was really bright (not so bright like the new one). Because of the cement I couldn't change the old lamps position in the reflector so I ordered the replacement lamp (my thanks to ywh).
In the 4 mm lamp position my impression was that the beams diameter did cover much more than only the lens towards the color wheel and so a lot of light energy was wasted.
My next trial then was to put the lamp as far inside as possible - meanwhile I think it was the wrong direction (some thoughts about optics and reflections).
Another problem was that the lamp was not centered correctly and lifting the cage did help .
I think will try to assemble some mechanics to move the lamp back and forth during operation because all other methods didn't work (one left - tomorrow I will try to use a laser pointer for some measurement).
- Status
- This old topic is closed. If you want to reopen this topic, contact a moderator using the "Report Post" button.
- Home
- General Interest
- Everything Else
- The Moving Image
- DIY Projectors
- I got my new lamp. It is for commercial projection use. people use it to replace the