I hoped to get some photos and such out before I left on vacation, but I was close to the wire. I am typing this from a hotel room on my phone, so pardon any typos. ")
Here are some notes on the different kit parts....
Cronus
The kit includes the asembled module, mounting hardware (including stacking hardware), two sets of 20-pin male/female headers, an 8-pin male header with a shunt, two crystal sockets, and 2-pin and 4-pin terminal blocks.
The 20-pin conectors are for making conections to the Hermes and, optionally, to the 8-channel Buffalo-III. Both male and female are included to allow flexibility in how you arrainge your boards.
The 8-pin header and shunt are for the clock-divider selector.
The two crystal sockets mount to allow plugging in Rhea or other clocks.
u.fl connectors for external clocks are also provided, as well as for I2S/DSD and MCK output. The 4-pin terminal block can also be used for output; if you decide to mount it, I suggest mounting it under the board to allow access to the u.fl connectors.
The 2-pin header is for 5V power input. If you are mounting to a Buffalo-8, power will come through the 20-pin header. Otherwise, use the 2-pin tb.
Hermes-BBB
This kit includes the asembled module, a male header to mounting on the BBB, a 20-pin set of male/female headers, a 4-pin (2x2) set of male/female headers, 4 green LEDs (rectangular), mounting hardware (including stacking), and two 4-pin terminal blocks**.
The BBB header is pretty straight forward. It allows mounting the Hermes on P9 of the BBB.
The female 4-pin header mounts on the BBB just behind it's power connector, and mates to the 4-pin male header mounted under the Hermes near the P9 connector. This brings the options for battery usage.
The terminal blocks provide optional battery backup connection, and un-isolated 5V power (meaning, before the isolators).
There are four LED drivers on the board connected to the four LED outputs (2x4 pads). The provided LEDs can be mounted directly or remotely, or replaced by the LEDs of your choosing. the drivers should accomidate a wide variety of LED choices. You could also use these outputs to signal external devices if desired.
You will also see an area of prototyping holes on the board. This is for adding/experimenting/etc. There are two sets of 3.3V power provided as well, both on the un-isolated side and the isolated side. What you do with them is up to you, but nothing is required.
The 20-pin connectors are for mating to the Cronus, and again, both are provided to allow you to mount the boards the way you want.
Hermes-Amanero is the simplest kit. It contains two sets of 20-pin male/female headers for mounting to the Amanero and Cronus, and mounting/stacking hardware.
Again, sorry for the briefness of this, but more info will be available in the next couple days (I am back Friday). We have datasheets and manuals on the way, and please ask questions here and on our support forum. I am going to try to make some videos as well, if time permits.
Now, off to the Smithsonian Zoo with the kids.
** The terminal blocks are made up of smaller terminal blocks, which can be separated of joined before mounting, as needed.
Here are some notes on the different kit parts....
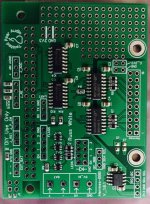
Cronus
The kit includes the asembled module, mounting hardware (including stacking hardware), two sets of 20-pin male/female headers, an 8-pin male header with a shunt, two crystal sockets, and 2-pin and 4-pin terminal blocks.
The 20-pin conectors are for making conections to the Hermes and, optionally, to the 8-channel Buffalo-III. Both male and female are included to allow flexibility in how you arrainge your boards.
The 8-pin header and shunt are for the clock-divider selector.
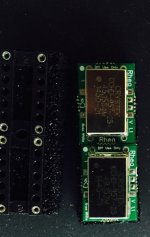
The two crystal sockets mount to allow plugging in Rhea or other clocks.
u.fl connectors for external clocks are also provided, as well as for I2S/DSD and MCK output. The 4-pin terminal block can also be used for output; if you decide to mount it, I suggest mounting it under the board to allow access to the u.fl connectors.
The 2-pin header is for 5V power input. If you are mounting to a Buffalo-8, power will come through the 20-pin header. Otherwise, use the 2-pin tb.
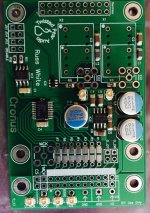
Hermes-BBB
This kit includes the asembled module, a male header to mounting on the BBB, a 20-pin set of male/female headers, a 4-pin (2x2) set of male/female headers, 4 green LEDs (rectangular), mounting hardware (including stacking), and two 4-pin terminal blocks**.
The BBB header is pretty straight forward. It allows mounting the Hermes on P9 of the BBB.
The female 4-pin header mounts on the BBB just behind it's power connector, and mates to the 4-pin male header mounted under the Hermes near the P9 connector. This brings the options for battery usage.
The terminal blocks provide optional battery backup connection, and un-isolated 5V power (meaning, before the isolators).
There are four LED drivers on the board connected to the four LED outputs (2x4 pads). The provided LEDs can be mounted directly or remotely, or replaced by the LEDs of your choosing. the drivers should accomidate a wide variety of LED choices. You could also use these outputs to signal external devices if desired.
You will also see an area of prototyping holes on the board. This is for adding/experimenting/etc. There are two sets of 3.3V power provided as well, both on the un-isolated side and the isolated side. What you do with them is up to you, but nothing is required.
The 20-pin connectors are for mating to the Cronus, and again, both are provided to allow you to mount the boards the way you want.
Hermes-Amanero is the simplest kit. It contains two sets of 20-pin male/female headers for mounting to the Amanero and Cronus, and mounting/stacking hardware.
Again, sorry for the briefness of this, but more info will be available in the next couple days (I am back Friday). We have datasheets and manuals on the way, and please ask questions here and on our support forum. I am going to try to make some videos as well, if time permits.
Now, off to the Smithsonian Zoo with the kids.
** The terminal blocks are made up of smaller terminal blocks, which can be separated of joined before mounting, as needed.

I have received boards, but it seems all so complicated that I think I'll wait for manuals or the experts to give instructions. Connecting to a B3 doesn't seem so complex, but I have no idea how to hook it all up synchronously to a dual-mono BII!
I haven't even attempted installing Botic on my BBB yet...
I haven't even attempted installing Botic on my BBB yet...
Thanks for the updates. My kit is still in transit, hopefully will receive it somewhere this week.
In the post I am missing a reference to I2C, there is a isolated I2C header on the Hermes-BBB right?
Correct. I did not mention it only because there is no connector in the kit for it.
Delivery Hermes/Chronus
Hi Brian/Russ
I have sent an Email to partstp.....
Thanks for looking into it,
Ed
Correct. I did not mention it only because there is no connector in the kit for it.
Hi Brian/Russ
I have sent an Email to partstp.....
Thanks for looking into it,
Ed
Thanks for the confirmation! No problem, I'll add the connector myself.Correct. I did not mention it only because there is no connector in the kit for it.
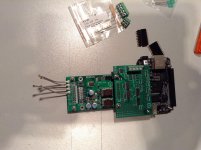
I recieved my boards today. As I am using it for a dddac the stacking of the boards will be a bit different from a buffalo dac user; I have the cronus at "floor" level.
Still have to figure out how to use all the extra headers/connection points.
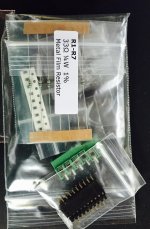
There are also through hole (33r) and smd (330) resistors in the package. i assume they need to be placed on the output paths of the cronos. But which resistor is best for this position?
What kind of smd resistors are these?
Still have to figure out how to use all the extra headers/connection points.
There are also through hole (33r) and smd (330) resistors in the package. i assume they need to be placed on the output paths of the cronos. But which resistor is best for this position?
What kind of smd resistors are these?
Attachments
Do I need to power hermes with 5v AND power the BBB? Or is it enough to feed BBB and that feeds the unisolated side of hermes? Or the other way around: feed hermes and that feeds the BBB?
I would like to tap power for the secondary side of the isolators from my dac supply. As this will all be connected to each other I suspect it has no use so use separate power supplies. Any reason not to?
Regards,
I would like to tap power for the secondary side of the isolators from my dac supply. As this will all be connected to each other I suspect it has no use so use separate power supplies. Any reason not to?
Regards,
Brian is it ok ,if I start a new thread for OPUS DAC and Hermes- chronus boards?
Absolutely.
Very simple question what exactly are the specs for the jumper cables for connecting those I 2S signals ?
supersurfer is using uFL cables (which work well but have limited mating cycles). You can also use short standard hookup wire (if you keep it < 3" or so you will have no issues).
- Home
- More Vendors...
- Twisted Pear
- Hermes-BBB/Botic cape for BeagleBone Black