Very nice build ")
Over the weekend we garnered a bit of progress wrt FH3.
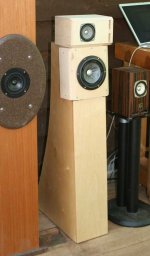
Turns out FE138eSR works great in the FH3 -- as a bass driver. This is leading us to a FAST based on the FH3. We stuck the FF85wk on top and bi-amped (PLLXO @ 100 Hz as it was handy). This ended up VERY good.
But to fit the FE138eSR in the box necessitated a supraBaffle and the extra room it made for the monster magnet on this driver. SO we ended up with the prototpe of the removable sB version of the baffle that we will be offering with the next batch of FH3 flat-paks.
dave
Over the weekend we garnered a bit of progress wrt FH3.
Turns out FE138eSR works great in the FH3 -- as a bass driver. This is leading us to a FAST based on the FH3. We stuck the FF85wk on top and bi-amped (PLLXO @ 100 Hz as it was handy). This ended up VERY good.
But to fit the FE138eSR in the box necessitated a supraBaffle and the extra room it made for the monster magnet on this driver. SO we ended up with the prototpe of the removable sB version of the baffle that we will be offering with the next batch of FH3 flat-paks.
dave
Attachments
Over the weekend we garnered a bit of progress wrt FH3.
Turns out FE138eSR works great in the FH3 -- as a bass driver. This is leading us to a FAST based on the FH3. We stuck the FF85wk on top and bi-amped (PLLXO @ 100 Hz as it was handy). This ended up VERY good.
dave
Dave,
So the FH3 cab becomes a bit like a "horn (sub)woofer"? I ask because besides aesthetics are there other benefits of placing a bass driver inside the FH3 cabs?
-Zia
Last edited:
Dave,
So the FH3 cab becomes a bit like a "horn (sub)woofer"? I ask because besides aesthetics are there other benefits of placing a bass driver inside the FH3 cabs?
-Zia
Well the FH3 is a tapped something or other BLH, but I wouldn't exactly classify what we heard as "sub" woofer territory, and there will be limits to size of driver that will fit this enclosure.
In the case of the 138, not only do the substantial magnet and mounting depth (50 and 93.5 mm respectively) run into conflict with the vertical divider, but the 123mm driver opening leaves very little clearance (8.5mm) on either side of the 140mm line.
Many candidate 5 - 6" mid bass drivers for a FAST type arrangement would still need careful shoehorning and spacers / suprabaffles to fit.
Chrisb,
Not to take away anything from the fact that such arrangements would not be on par with dedicated "sub" woofers, can we safely presume that there would be a decent amount of bass augmentation? For instance in certain FR designs the bass extension can be surprising at times, fooling ppl into thinking there is a small sub somewhere; true that SPL limitations will be there, but for folks with 150-250 sq ft rooms and who don't listen to 90+ dB continuous, it can work.
So taking the concept fwd and putting in something like a CHP-70BW in the FH3 cab should be easy - now how that performs needs to be tested... again this is not a killer FAST I am talking about.
Not to take away anything from the fact that such arrangements would not be on par with dedicated "sub" woofers, can we safely presume that there would be a decent amount of bass augmentation? For instance in certain FR designs the bass extension can be surprising at times, fooling ppl into thinking there is a small sub somewhere; true that SPL limitations will be there, but for folks with 150-250 sq ft rooms and who don't listen to 90+ dB continuous, it can work.
So taking the concept fwd and putting in something like a CHP-70BW in the FH3 cab should be easy - now how that performs needs to be tested... again this is not a killer FAST I am talking about
.CHBW has no better bass than CHP and cdertainly not up to EL70. Even so earlier today i was thinking of using the A10BW that Bob left behind as a helper woofer with Mar-Kel70.
Because it should improve the midrange. And because the bass horns are exactly the same width
dave
Because it should improve the midrange. And because the bass horns are exactly the same width
dave
Few comments on the FE138eSR on 1st page of this thread:
http://www.diyaudio.com/forums/full-range/195037-fe167e-replacement.html
http://www.diyaudio.com/forums/full-range/195037-fe167e-replacement.html
Hmmm...
They've gone for a 2-way mechanical XO according to the FE138ESR datasheet - https://www.madisound.com/store/manuals/FE138ES-R-1.pdf
Some correction is in order for that to work out nice.
They've gone for a 2-way mechanical XO according to the FE138ESR datasheet - https://www.madisound.com/store/manuals/FE138ES-R-1.pdf
Some correction is in order for that to work out nice.
CHBW has no better bass than CHP and cdertainly not up to EL70. Even so earlier today i was thinking of using the A10BW that Bob left behind as a helper woofer with Mar-Kel70.
Because it should improve the midrange. And because the bass horns are exactly the same width
dave
Bit disappointed in the CHP-70BW if that is the case; definitely worthwhile exploring the performance with A10BW, but such a driver will not support the frugal part too much.
How would these fare?
HiVi M5a 5" Aluminum/Magnesium Midbass
HiVi F5 5" Bass/Midrange
How does the FE138eSR perform on it's own?
It has a few places where it literally shreiks (well beyond shout), that if excited have you running for cover.
dave
How would these fare?
I'm guessing that quite a fewlittle woofers will work. We have Silver Flute W14 here so that is where we'll start.
dave
Totally awesome! I've got to get me one of those bits for my next project!
I have a lock miter joint bit as shown above. I found setup to be a real PIA. In the end it does make a nice joint and you can use veneered ply and have a uniform outside appearance. Of course that means you have no option but a sharp corner. I made 5 or 6 test pieces to make sure everything lined up properly. In the end I did still have some mismatch due to the pieces lifting slightly off the router table. You really need a good long table as this is not a bit you can go back over and have good results. I was cutting long panels and it was very hard to keep them where they needed to be. In the end I have gone back to biscuits that are plenty strong and so much easier to setup and use. Not to mention the ability to use a big roundover to lessen edge diffraction.
I created mitred joints just using my table saw for my last project. They came out ok, but I had to use some wood filler in spots. plus it is real easy for the veneer on the plywood to chip. i didn't dare do the front panel like this though. i had enough veneer to cover the front.
Question, could you use that bit for all edges of a box...or would you have to use a standard mitre for the front? Scratching my head trying to figure out if it can all lock together.
Question, could you use that bit for all edges of a box...or would you have to use a standard mitre for the front? Scratching my head trying to figure out if it can all lock together.
I have a lock miter joint bit as shown above. I found setup to be a real PIA. In the end it does make a nice joint and you can use veneered ply and have a uniform outside appearance. Of course that means you have no option but a sharp corner. I made 5 or 6 test pieces to make sure everything lined up properly. In the end I did still have some mismatch due to the pieces lifting slightly off the router table. You really need a good long table as this is not a bit you can go back over and have good results. I was cutting long panels and it was very hard to keep them where they needed to be. In the end I have gone back to biscuits that are plenty strong and so much easier to setup and use. Not to mention the ability to use a big roundover to lessen edge diffraction.
yes, the lock mitre is a PITA to set up - long in and out-feed tables and featherboards required - the horizontal pass is far easier to set up than the vertical
not to mention the risk of tear-out or crushing of material near the "pointy end" on veneer ply / PB or MDF cores
a "simple" 45'd folded mitre joint with full length spline provides substantial additional glue surface contact area and while you'll still want to use a feather board to ensure alignment , is far easier to set-up and machine than lock miters (all cuts can be done with the workpiece horizontal on table saw)
Yes, you can do a whole box with it. I would be pretty nerve racking to have to glue up the entire box at once though. There is no real good way to clamp panels together if both panels already have a 45° miter on them.
Dry fit first of course, but masking or packing tape* is your friend - tape long edges good face up with 2" tape , then flip over and brush glue on both surfaces, fold the parts together, then apply tape across the joints. 3M construction grade (203) is particularly good, and much sturdier than you'd think - it's amazing how much uniform pressure you can achieve while leaving no clamping marks and only a small trace of adhesive residue, which even on finished veneers can be cleaned off with contact cement thinners and a light sanding.
*I think of it as adjustable, self adhesive band clamping on a roll
- Home
- Loudspeakers
- Full Range
- Frugel-Horn Mk3