Hi Samuel,
I do not have any experience with this driver, not sure if Dave Dlugos has treated one or not. However, I can likely teach you how to find what is needed. The only thing we can rely on is an empirical testing format. You will need a pen nib wand or a similar hardwood tapered stick with a tip of around 2mm in diameter. You want it to be stiff but very light weight as you are going to use it to locate the resonant "bones" that make up the emission pattern of transverse energy from the diaphragm. These "bones" are in very specific places and while this cone is severely distorted in it's topography these resonant "bones" will be easy to find and are actually linking up off of the cone surface. Their "bone" to "bone" link up are what cause beaming, phase issues at specific points in the frequency response and the hall of mirrors sonic reprint that occurs within the first 4ms of every tone and transient emitted by the driver.
So, the first step is to obtain a lightweight round stick with a spherical or rounded over tip that you can use to lightly tap on the surfaces of the driver with. Since this driver diaphragm is such a tortured shape it might be easier to learn how to listen to the taping you must perform, by using a cheap speaker, with a more normal conical shape to the cone. Once you have found an appropriate taping stick and really the long wooden pen wand from a calligraphy pen set is the perfect tool for this, just post a "ready to learn" note here and I will help you with the next step.
Bud
Thank you Bud, for your response. I have done the 'tap test' on the Fostex drivers.
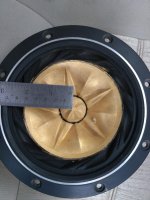
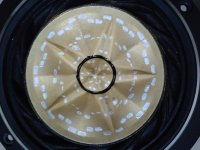
Found ringing in these 3 areas:- (1) Right around the circumference where the conical structures are the widest. (2) A concentric circle around the middle of the driver cone and (3) close to the dust cap where the smaller conical structures are the widest.
This means, like most other drivers three sets of EnABL rings are needed. The dust cap/phase plug would also need a pattern.
The difference from other drivers, I think would work best is to divide the circle into 20 divisions, instead of the usual 18. This would treat the contoured surface more equally and evenly.
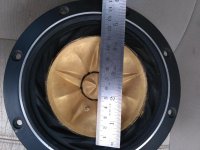
The diameter of the largest ring would be 3.75" (at the edge of the cone near the surround) and the smallest would be 1.5"; the diameter of the base of the phase plug is 1.25'.
The larger of the middle rings would be 2.5" diameter.
Bud, do you think that my assessment is alright? If you concur, I would be grateful if you can provide me with a pattern set.
Thank you.
Found ringing in these 3 areas:- (1) Right around the circumference where the conical structures are the widest. (2) A concentric circle around the middle of the driver cone and (3) close to the dust cap where the smaller conical structures are the widest.
This means, like most other drivers three sets of EnABL rings are needed. The dust cap/phase plug would also need a pattern.
The difference from other drivers, I think would work best is to divide the circle into 20 divisions, instead of the usual 18. This would treat the contoured surface more equally and evenly.
The diameter of the largest ring would be 3.75" (at the edge of the cone near the surround) and the smallest would be 1.5"; the diameter of the base of the phase plug is 1.25'.
The larger of the middle rings would be 2.5" diameter.
Bud, do you think that my assessment is alright? If you concur, I would be grateful if you can provide me with a pattern set.
Thank you.
Last edited:
Hi Samuel,
I cannot judge your placement for rings from the picture and your meaurements as I have no idea what size the driver is. I can sort of guess.
I would expect to place a ring set on the flat just past the cone surface deformation and another, a triple ring set, at the dust cap / cone joint. This would follow a gen 1 patterns locations. Pulling a tap test on this driver has me concerned. When you found the points of ringing, where on the convolutions were you taping? Were you out on the large open area or on the sharp spine?
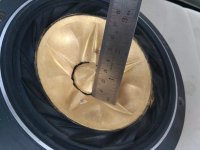
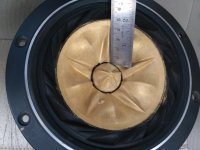
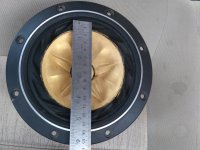
If you could provide another picture with a ruler laid across the cone with the edge just at the half way point this would help.
I don't actually have a way to change the pattern divisions without rewriting the Auto Cad lisp program that generated the original pattern sets for Gen 1 applications. I wrote that thing about 30 years ago and haven't looked at writing programs since.
Bud
I cannot judge your placement for rings from the picture and your meaurements as I have no idea what size the driver is. I can sort of guess.
I would expect to place a ring set on the flat just past the cone surface deformation and another, a triple ring set, at the dust cap / cone joint. This would follow a gen 1 patterns locations. Pulling a tap test on this driver has me concerned. When you found the points of ringing, where on the convolutions were you taping? Were you out on the large open area or on the sharp spine?
If you could provide another picture with a ruler laid across the cone with the edge just at the half way point this would help.
I don't actually have a way to change the pattern divisions without rewriting the Auto Cad lisp program that generated the original pattern sets for Gen 1 applications. I wrote that thing about 30 years ago and haven't looked at writing programs since.
Bud
Bud, thanks again for your response.
I found most ringing in the large open areas of the big and small contours. I did not tap directly on the spine(s), but I heard an increasingly damped sound as I neared the spines.
I would deeply appreciate if you could point me to the differences between Gen I and II patterns.
If possible to help with patterns, perhaps the attached pictures might help. Even otherwise, they should help for more informed advice.
Thank you.
Attachments
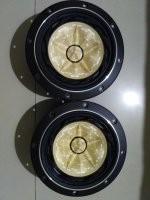
Thanks once again Bud, for your guidance and encouragement. Though not very accurate, but with no pattern, stencil or guide, I went by my own judgement and applied the EnABL rectangles by free hand. I think they are pretty ok. These are a pair of brand new Fostex FE168Sigmas. One more conformal coating is to be done. I plan to listen to these before starting on the old pair I have. Here are a couple of pictures to show the outcome thus far.
Attachments
Hi Sam,
Sorry to not have been much help here. Illness has once again taken it's toll and with Dave in even more difficulty,
neither of us could come to your rescue. However, I have no argument with what you have done. I might suggest taping radially on the open surfaces just to see if the actual pattern of ringing follows a perfect circle or if it has a shape specific to the open area, one more conformal to each area.
Bud
Nooope! I'm good...I could tell you far more than you want to know about your bodies response to an invasion from a still unknown parasite.
I could joke and claim it was just loss of my fat head. Or I could tell you far more than you want to know about your bodies response to an invasion from a still unknown parasite.
Hey Bud sorry to hear of your illness
you seem like an out of the box type thinker think on this a bit.
https://www.youtube.com/watch?v=xMlXd9hLpcY
watch the entire vid listen carefully this may save your life.
Lawrence
I have not dealt with this driver. However the subjective experience will follow that of all other drivers. All of those things you have to listen through to hear the actual music, those tiny edges to sound that should not be there, the occasional, but repeated, loss of internal phase structure to instrument tones, all of that will disappear. You will be left with just music. And then you will begin to hear those subtle non musical sounds inserted by the rest of your system. Other than a very surprising "ease"...a complete lack of tension while awaiting the next bit that will cause you to wince...there will be nothing except the music. Many "audiophiles" have a problem with this, the drivers make beautiful music, but no longer "do audio" in the terms that Harry liked to throw around and commercial high end audio thrives on, as metrics for competition.
Bud
Bud
Questions about Enabl process
I've been slogging through the posts about Bud's Enabl process, but I still have a few questions.
1. Dave Dlugos talks about Mod-Podge; Bud uses Micro Scale Micro Gloss. Is there a difference between these materials? Is one preferable to the other? Do I need both? (I ran across a few posts which said an application of Mod-Podge is the first step and an application of Micro Gloss is the last. Is this the correct method?)
(Note 1: Dollar Tree sells 2 ounce bottles of Mod-Podge for a buck apiece. Not all stores stock it so you may have to visit several stores to find it.)
(Note 2: There are plenty of DIY Mod-Podge formulas using water and white glue to make the stuff. DON'T! White glue deteriorates over time. It might be OK to experiment with, but don't use it on anything you don't want to throw away.)
2. Bud recommends flat acrylic paint for the dots. After application, they're coated with Micro Gloss. What difference does it make if the paint is flat or gloss?
3. Do the Enabl dots lie flat on the cone, or do they make raised bumps?
4. Has anybody ever tried flocking the Enabl dots? Seems like this might be a combination of the Enabl process with the Mamboni process. (Flocking material can be bought at Rockler Hardware, probably elsewhere, too. There is also a product called Stampendous Fun Flock. Costs $2.99 for a half-ounce jar, but I don't know where it can be bought except online and eBay. This doubles the cost with shipping charges.)
Thanks in advance for any answers provided.
- Home
- Loudspeakers
- Multi-Way
- EnABL - Listening impressions & techniques