Hi Alex,
The speaker is a NHT SuperZero with a different tweeter and x-over from stock. I've almost finished soldering the x-over components and will be putting this all together in the next couple of days.
Outer dimensions are: 140 mm [width] x 230 mm [height] x 130 mm [depth] and walls are 14 mm thick.
The speaker is a sealed design and will be densely stuffed with polyfill. The back wall will have the terminal cup with the x-over board mounted on stand-off's that are on the back of the cup. Almost the whole of the back wall area will be taken up by the x-over board though there will be a ~1.5" distance between the board and the back wall due to the stand-off's.
I also applied an EnABL pattern at the base of the shallow waveguide of the tweeter [which is all the EnABL that I can do (or am permitted to do by SWMBO") ) externally]. You can see that in the pic.
) externally]. You can see that in the pic.


The speaker is a NHT SuperZero with a different tweeter and x-over from stock. I've almost finished soldering the x-over components and will be putting this all together in the next couple of days.
Outer dimensions are: 140 mm [width] x 230 mm [height] x 130 mm [depth] and walls are 14 mm thick.
The speaker is a sealed design and will be densely stuffed with polyfill. The back wall will have the terminal cup with the x-over board mounted on stand-off's that are on the back of the cup. Almost the whole of the back wall area will be taken up by the x-over board though there will be a ~1.5" distance between the board and the back wall due to the stand-off's.
I also applied an EnABL pattern at the base of the shallow waveguide of the tweeter [which is all the EnABL that I can do (or am permitted to do by SWMBO
) externally]. You can see that in the pic.
Last edited:
Hi Keith,
First disclaimer is that I haven't treated a sealed enclosure but I have treated many cabinets of different sizes. I will give you the approach I would take if those speakers were mine. Please note that this will take hours to do and it is frustrating but well worth the effort.
Inside block size 5mm x 2.5mm
Outside block size 6mm x 3mm
Do the enabl treatment inside the box before mounting the crossover etc. Despite the fact that you will have crossover occupying a large proportion of the space the sound and vibration will still impact all panels especially as the box is sealed. My block material of choice for cabinets is either PVC duct tape or self adhesive vinyl shelf covering. You can lay the blocks onto sheets of self adhesive vinyl and stick the sheets directly onto the inside panels.
1. Run multiple patterns across the entire inside bottom panel so that the whole thing is covered in contiuous rows of patterns separated by one block width between each pattern row. Align the patterns so they go from left to right (not front to back). I lay the blocks onto a cut to size sheet of self adhesive vinyl then stick that onto the bottom.
2. Do the same for both side panels but only go halfway up from the bottom. Align the patterns so they run from the bottom towards the top and separate each row by one block width between each pattern row. Again lay the blocks on a cut to size sheet of self adhesive vinyl.
3. Run a pattern around all remaining internal panel edges. You can use strips of the vinyl for this also.
External edges
Cut the blocks from clear self adhesive vinyl shelf covering or similar. Reassure SWMBO that these will be essentially invisible and also removable (not that you'll want to undo all this work). You'll need to lay each block individually for this. Do all external edges including the bottom panel.
Driver treatment
Buy either clear or black paint to treat the drivers so it will be invisible.
You should run a paint pattern all around the openings in the speaker basket.
That should be enough to get you started. Please ask me questions because I'm sure I've missed some details.
Cheers
Alex
Thanks! Alex.
I think I will first start with the inner walls and see what effect it has.
Your advice for treatment is clear for the most part except for the following:
UNLESS:
by row of block you mean a row of block pairs. If this is indeed what you mean then within a block pair the row spacing will be the height of a block, BUT the distance between 2 rows of block pairs would be the width of a block.
Can you please clarify this?
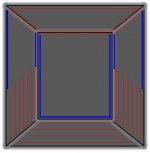
OK, so for the inside, this covers the bottom and 2 sides. This leaves the top, the back and the front. I cannot do anything to the front because there's no space to manoeuvre and you're saying that for the top and the back, I treat only the complete perimeter right?
Also, what should the height/width of the red colored area [the distance between blocks and the cabinet inner edges] be in the attached pic?

I think I will first start with the inner walls and see what effect it has.
Your advice for treatment is clear for the most part except for the following:
By "inside block", I'm assuming you mean the blocks to be used for the inside of the cabinet, yes?Inside block size 5mm x 2.5mm
In your Block size calculator the distance between rows of blocks are shown to be the height of a block. But, here you specify that this distance should be the width of a block which means that the distance between blocks will be 5mm or 6mm [depending whether the blocks are outside or inside]. Any particular reason for deviating from the regular? Not that I'm complaining - the more the distance, the lesser the rows of blocks and the lesser the effort I will have to put towards this...patterns separated by one block width between each pattern row...
UNLESS:
by row of block you mean a row of block pairs. If this is indeed what you mean then within a block pair the row spacing will be the height of a block, BUT the distance between 2 rows of block pairs would be the width of a block.
Can you please clarify this?
OK, so for the inside, this covers the bottom and 2 sides. This leaves the top, the back and the front. I cannot do anything to the front because there's no space to manoeuvre and you're saying that for the top and the back, I treat only the complete perimeter right?
Also, what should the height/width of the red colored area [the distance between blocks and the cabinet inner edges] be in the attached pic?
Last edited:
*"inside block", I'm assuming you mean the blocks to be used for the inside of the cabinet, yes?
Yes
In your Block size calculator the distance between rows of blocks are shown to be the height of a block. But, here you specify that this distance should be the width of a block...Can you please clarify this?
Yes the gap between patterns should be one block height (not width). So for a block size of 6mm x 3mm the gap would be 3mm.
OK, so for the inside, this covers the bottom and 2 sides. This leaves the top, the back and the front. I cannot do anything to the front because there's no space to manoeuvre and you're saying that for the top and the back, I treat only the complete perimeter right?
Yes treat the edges only of the top panel and the top edges of the back and side panels.
Also, what should the height/width of the red colored area [the distance between blocks and the cabinet inner edges] be in the attached pic?
One block height i.e. 2.5mm for your cabinets.
Great questions. Please ask more questions as needed.
Cheers,
Alex

Greets!
Several kits are available. You may express any interest over in the sales thread:
http://www.diyaudio.com/forums/swap-meet/119852-enabl-kit-18.html#post4589302
Several kits are available. You may express any interest over in the sales thread:
http://www.diyaudio.com/forums/swap-meet/119852-enabl-kit-18.html#post4589302
Your input much appreciated:
Background: I lived without my 'reference' speaker system for a couple of years but recently got it up and running in a new abode with a new hi-rez 'player', better DACs, and some amp upgrades. Sadly, I now hear the very beginnings of trouble in one of my LE8T-H midranges - the one with the oldest moving parts. Factory cone replacements are no longer available, and I don't trust generic parts (especially the voice coils) to recreate the driver's desirable properties. The last step in the gentrification of my system has been to relocate all of my drivers into new WAF-max enclosures. So, before I start...
I see three options - which would you say is least likely to waste my time?
1. Recone using 'aftermarket' kits, break-in, and EnABL as best I can. The kits are cheap, ~$45 each. They will be playing from ~180-4000Hz.
2. Give the Alpair 12P a try. At $157 each they aren't cheap, but they seem amenable to significant refinement using EnABL methods.
3. Break the bank. Go for a pair of Lowthers - probably EX3s. $1289.
What would you suggest?
Frank
2. Give the Alpair 12P a try. At $157 each they aren't cheap, but they seem amenable to significant refinement using EnABL methods.
For midrange? Might i suggest the A10p instead.
dave
For midrange? Might i suggest the A10p instead.
dave
...appreciate your thoughts, Dave...
My room is now fairly large, so I thought that the larger piston would have an advantage. The 12P is about the same area as what I have. But, are there any votes for twin A10Ps? I have not dealt previously with lobing, but your MTM alignments seem popular! Parallel or series wired?
Bit the bullet and ordered a pair of Lowther DX3s. I feel most comfortable managing 8" drivers with exceptional motors. ...changed to the DX series because of better access to the rear of the cone and certainly less potential for back reflections, which could be heard (and resolved) even with the JBLs. Will eventually search back to see what advice and patterns exist in the thread. I think Bud is using a pair of Lowthers, no?
They might cost a lot but you will not be disappointed.
Breaking-in the DX3s now. At lower volumes they are becoming quite transparent! Clearly, the cones are already treated with a penetrating resin. Does anybody know what that material is? Acrylic?
I know that an 8" midrange (as opposed to smaller) may seem foolish, but the room is sizable (~5000 cu.ft.) and acoustically difficult. Plus, I like it loud... I will not be EnABLing these until the very last step in a major re-build. I may experiment with running them sans tweeter for DSD sources. So, plenty of time to consider what should be done...
Hi Franco,
I have not treated a pair of DX3 drivers. Dx4, Dx65, A 45 , A55 and PM6A are what I have pattern guides for. You are welcome to them.
I did finally cure my PM6A's shrieking. Lost a bit of high frequency power above 10k Hz and have added a set of super tweeters on a slant in from a 14 kHz pole.
The trick to killing both shriek and 7 kHz hump is a 3/8" wide stripe of full strength Zig 2 way acrylic glue applied to the outer edge of the main cone, on the back side. Then a 30% Zig to distilled water coating on the back side of the whizzer and suddenly, perfection. Seriously, they do nothing wrong any more and are as delightful as I had always hoped for.
I do need a much bigger room for the system though......
Bud
Great to hear from you Bud! I'm fairly certain that the moving parts are identical between the DX3 and DX4. The shriek was fairly prominent at first but is coming down... I have Zig RTG once the DX3s stop changing.
I think these 'highly-tuned' drivers are a lot like stringed instruments. They need to be played to develop and maintain full expressiveness (as espoused by my violinist father). After almost 3 years of inactivity, my other drivers came back ka-ranky! They too are starting to open up again.
Cheers!
Frank
Hi Franco,
I have not treated a pair of DX3 drivers. Dx4, Dx65, A 45 , A55 and PM6A are what I have pattern guides for. You are welcome to them.
I did finally cure my PM6A's shrieking. Lost a bit of high frequency power above 10k Hz and have added a set of super tweeters on a slant in from a 14 kHz pole.
The trick to killing both shriek and 7 kHz hump is a 3/8" wide stripe of full strength Zig 2 way acrylic glue applied to the outer edge of the main cone, on the back side. Then a 30% Zig to distilled water coating on the back side of the whizzer and suddenly, perfection. Seriously, they do nothing wrong any more and are as delightful as I had always hoped for.
I do need a much bigger room for the system though......
Bud
Here is a report - intended as a data point for other Lowther tweakers.
Bud speaketh the truth!

My brand new DX3s reached a break-in point where shriek only happened at upper volumes, but still not relaxing. I did as Bus prescribed and cured them. I will offer this tip on technique for managing the whizzer. I have perfected making custom-shaped cotton swabs in order to clean the dog's ears. For the whizzer I made two swabs to apply the Zig - one about 8 mm in diameter and one about 4 mm in diameter. Both had thin tapered tips. The swabs leave a thin coating and the paper of the cones is sealed, which prevents soaking. So under the angle of the whizzer I used full-strength adhesive. I broke off the swab stick so it was short and held it at a 'reverse angle' in a medical hemostatic forceps (ultra-mini vice-grip). A saturated swab was held in the back-side angle as the speaker was rotated two full revolutions. For the rest of the whizzer I used diluted Zig and a longer, thicker tapered swab. I didn't worry about getting too close to the voice coil. Again, two or three full rotations left an even, thin coating.
The shriek is gone, and that is a great relief with my live room acoustics. I can enjoy the musical artistry without being on-guard for uncomfortable moments. I too am using separate tweeters, so any effects above ~5000Hz are inconsequential.
To make custom swabs: use a thin stick (bamboo skewer?) or a toothpick and wet the end. Delaminate a cotton ball and form some of the loose fibers into a strand of 3-4" length - flattish helps. Put one end against the stick/pick and twirl. As the cotton wraps you can direct it to form any shape you like - within reason.
Again, thanks so much Bud!
Frank
Last edited:
Fostex FE168Sigma EnABL Pattern
I have applied a coat of a Water based Acryl which I was able to locate in Kuala Lumpur from a recent visit there. MicroGloss is not available anywhere within my reach.
The attached picture shows the treated speaker and the Acryl container. I applied a first coat as my speakers were getting affected by fungus.
I would be very grateful if anyone could provide me with a EnABL Pattern set for the Fostex FE168Sigmas.
Thanks in advance.
- Home
- Loudspeakers
- Multi-Way
- EnABL - Listening impressions & techniques