I have not treated one of these crenelated drivers yet, so I can only provide where I would expect control to be needed. You will need to get experienced with the "tap test" method to assure yourself of just where the two cone rings need to be placed. My best guess for where I would start looking and what I currently would expect to find a need for is attached.
Bud
Bud
Attachments
I probably would not use modge podge on one of these drivers. I would be much more interested in leaving the driver to do for itself and perform the minimum needed to quell any "breakup mode". Those angular forms are there to disrupt the formation of a feedback of energy from the major resonance node to the dust cap, through the air adjacent to the cone. An attempt to get all of the energy to flow towards the surround by making the rather narrow zone where this usually arises an irregular surface. This is a step in the right direction, but it is my suspicion that they have just pushed this zone further out into the cone and thus up higher in frequency. Just my working hypothesis though.
Adding any significant mass to the cone surface is going to produce unknown effects and aggravate frequency response difficulties. While it will quell paper noise I suspect this is going to be less of a problem than it is in say, a 126 or 127 with their thin, highly calendered surface, paper cones.
Bud
Regarding FE127E, thanks so much for the new ring templates.
I will be doing the rings in the border of dustcap in the new way and not as shown in the picture of my last message.
In the template PDF file provided by BudP, I see there are the following:
- Backside outer ring: It means that we can add blocks in the backside of the driver?
- Frontside middle ring and mid dome pattern: Is it worth doing them? The middle ring seems ok but the mid dome pattern is pretty small. Is it possible to do it using the #56 pen nib? Or maybe a sharp needle?
thanks!
HF
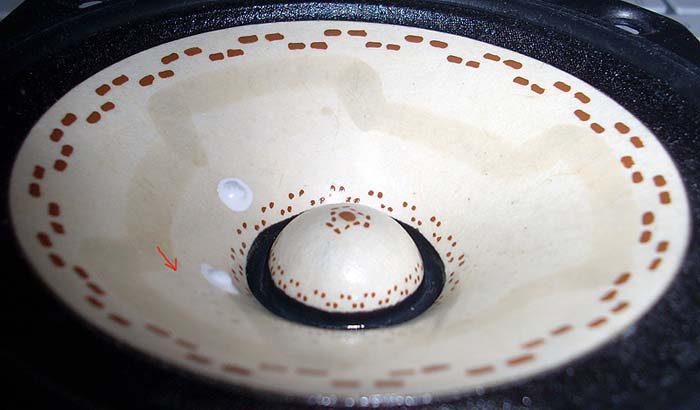
The front side mid cone pattern Dave is pointing to, which is done with clear flat just to keep peoples eyes from spinning in their sockets, is REQUIRED. The mid dome ring, which I don't think Dave applies, just adds a silky smoothness to highs and helps to make the driver disappear within the depicted volume that music will be arising within. You will no longer have two speakers, just music seeming to arise from a specific locations, no matter where in the room you are listening from, That spot is, as often as not, well on the other side of the wall behind the speakers, in the room you are listening in. This sort of holographic sonic projection is a bit disconcerting and the fact that you can no longer hear anything actually coming from the speakers is also a bit weird, but you will adjust.
For the mid dome ring set I used the small metal quill pen tip in the kit, dropping it straight down so that it was at an angle to the dome surface and pushing it just slightly to open the pen tines and deposit a tiny round dot of paint. You need to have a set of visor style magnifiers ($20 at a hobby shop) and have spent some time learning how to do this, before you make that mid dome ring. Or you need to be under 30.
Bud
Last edited:


EnABLing is excessively tedious.
I would listen before you apply any Gloss coating, just to give you a general idea of what the Gloss coating does. And, I would allow the cones to cure out for a full 24 hours before I bothered to listen to them. Plus, I would listen between every coat of Gloss too.
Since adding the mid cone ring I think you should do a single coating using a 50% gloss applied with a one side tamped, full dip brush with each brush full providing a main radial strike and also filling the sides, as the needed coverage widens.
Allow to dry for a day and then do a set of circumferential strokes with a single brush doing about 1/3 of the height and 1/4 of the circumference, for each brush width in height up the cone from voice coil to surround.
I would not put a third coating on.
Bud
Bud, let me see if I understood:
The dustcap will receive only one coat.
thanks
HF
As I move the brush towards the surround, the needed coverage widens. If a apply a bit more pressure to the brush the stroke will widen and that should provide the coverage needed. Is that what you mean?... and also filling the sides, as the needed coverage widens.
For each brush (full dip one side tamped) cover an specific area of the code that is about 1/3 of the height and 1/4 of the circumference. Correct?... do a set of circumferential strokes with a single brush doing about 1/3 of the height and 1/4 of the circumference, for each brush width in height up the cone from voice coil to surround.
The dustcap will receive only one coat.
thanks
HF
I don't use a greater pressure myself as I am unsure about controlling flow rate, so I just add in the triangular sides after the main stroke, using the same amount of pressure. I expect the circumferential strokes to help even out any small differences in material application. Especially since you have a Modge Podge undercoating and the Gloss will not be sinking into the paper to any great degree.
Yes to your second question.
Bud
Yes to your second question.
Bud
I have done some listening here and I am amazed with the results, even without glossing.
Yesterday I put Lee Ritenour's Smoke and Mirror and the sound is great, also, one of the major change was the instrument placing, imaging and focus. There are more air between the instruments. The sound is more analytic, let say, but still very musical.
Is it going to be better with the glossing? 2 coats are safe?
thanks
HF
tap water is enough or must be distilled?
I use tap water that has been boiled and allowed to return to room temperature before combining with the Micro Gloss.
Cheers,
Alex
I have applied the microgloss. It is still in the drying process.
The black EnABL blocks suffered a little blur while applying the gloss mixture. It was caused by the gel food color I used. The blue pattern didn't suffered anything because I used less color.
Fortunately the blocks are intact and it was only caused by using too much color. What kind of coloration you use?
I will report more back soon.
thx
HF
It takes a minimum of 24 hours for a gloss coat to set. If you have applied two within less time than that it may take as much as 24 hours. Sorry, just the breaks.
The PVA dot will help to disperse on axis high frequency peks and open up a wider dispersion and sound stage.
Can't help with dye as I don't use any, I just purchase the color I want to use from Poly S, fortunate in being able to do so apparently.
Bud
The PVA dot will help to disperse on axis high frequency peks and open up a wider dispersion and sound stage.
Can't help with dye as I don't use any, I just purchase the color I want to use from Poly S, fortunate in being able to do so apparently.
Bud
Is there a break-in period after glossing?
The sound is very clear and precise, but something is missing. Maybe the low and mid-lows decreased and highs as emphasized. It seems to be a little fatiguing now. I'm not sure yet, need to do more listening.
Maybe de PVA spot can help? Can I use unthinned modpodge?
thanks
HF
The sound is very clear and precise, but something is missing. Maybe the low and mid-lows decreased and highs as emphasized. It seems to be a little fatiguing now. I'm not sure yet, need to do more listening.
Maybe de PVA spot can help? Can I use unthinned modpodge?
thanks
HF
- Status
- This old topic is closed. If you want to reopen this topic, contact a moderator using the "Report Post" button.
- Home
- Loudspeakers
- Full Range
- EnABL How-To for Fostex FE127e and other speakers