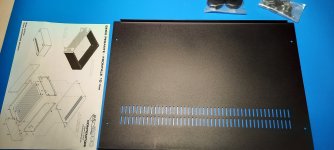
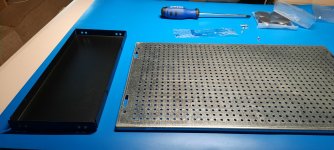
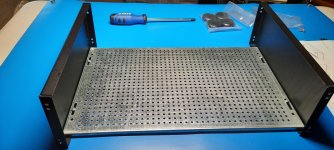
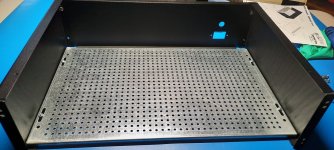
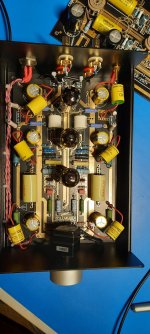
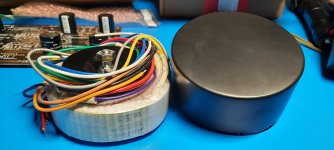
OK, I finally pulled out my Chassis that I bought back when I first ordered the EAR 834P Zhili PCB kit, it's been in the shed for 3 years and today I pulled it out of the shed to start the Dry Run Fit with PCB layout and Transformer position. It' a good size and great build quality. I still may move the transformer outside but will try it inside the chassis first.
This will be an all out build, the EAR 834P clone I got a few months ago that I have done quite a bit of upgrades and mods has turned out so good, I decided to go ahead with what I had bought back during when covid first hit. As you can see there is plenty of room and height to this chassis and now I can use all the TOTL parts that I have order and will fit. Just don't know if I'm going to separate the Zhili pcb's or keep them together and if I want to place the Cinemag SUT inside the chassis. Too many components and I cab reduce 3 into one. As you can also see the Transformer with have a think cover to eliminate the stray fields that may induce hum. I ordered the Transformer from Antek.
I already have all the Rhodium Plated RCA connectors. Mogami wire, AC Inlet with EMI/RFI filtering, and Hi grade IEC Plug. Also will be adding some nice isolation feet to it when its all done and working correctly.
I have learned so much with the EAR clone I have upgraded that this "Should" go well without a hitch.")
Any constructive feedback is welcomed.
This will be an all out build, the EAR 834P clone I got a few months ago that I have done quite a bit of upgrades and mods has turned out so good, I decided to go ahead with what I had bought back during when covid first hit. As you can see there is plenty of room and height to this chassis and now I can use all the TOTL parts that I have order and will fit. Just don't know if I'm going to separate the Zhili pcb's or keep them together and if I want to place the Cinemag SUT inside the chassis. Too many components and I cab reduce 3 into one. As you can also see the Transformer with have a think cover to eliminate the stray fields that may induce hum. I ordered the Transformer from Antek.
I already have all the Rhodium Plated RCA connectors. Mogami wire, AC Inlet with EMI/RFI filtering, and Hi grade IEC Plug. Also will be adding some nice isolation feet to it when its all done and working correctly.
I have learned so much with the EAR clone I have upgraded that this "Should" go well without a hitch.
Any constructive feedback is welcomed.
Attachments


@pete- Yes, This PCB will have the Thorsten Mods. I have the PCB that came with the unit that I have upgraded the power supply and some caps/resistors on it along with the TKD pot. Then I have a PCB with all Nichicon KX 100uf (6) caps. I will do the same with the resistors on this one. The 3rd bare PCB I just got will have the Thorsten mods along with upgraded 100uF Caps and the Jensen Copper Foil PIO caps and the Duelund Alexander caps. The power supply will have the same upgrades as the one I did already but I will upgrade the Bridge rectifier for the Heaters. This final build will have the very good RCA's and IEC inlet along with a nice power switch. I will also maybe put the Cinemag SUT's inside too.
Today I went to add my new IEC plug with AC Filtration, it was just slightly too long and hit the transformer case inside my EAR 834P power supply. So I just put the one back in that came with the Phono preamp clone but added a CL-60 to reduce the current spike when the unit is first turned on. This will give it a Soft Start and not spike like it did before.
I was looking at the fuse that came with it and noticed it was 10A Fast Blow fuse. I remembered when I was checking for that humming issue with my scope I saw a large spike on the Heater power supply as I mentioned here. So I put my DMM inline between the switch and transformer after the fuse and saw a 4.5A spike, then after 5 minutes I turn on the the unit again and saw a 9A spike. Now I know why the fuse was so big. The unit produces a nasty spike if not let to discharge at least 30 mins or longer, after an hour it was back down to 4.5A. So that's why I put the NTC in the power supply to reduce this spike and it did help. Once the spike occurs and unit is left on the continuous amps are very small and I measure a steady 160mA.
This spike is more probably due to the extra capacitance I added to the power supply, but the fuse size was 10A before I did the upgrades and it came with the EAR Phono preamp.
I really don't care for the volume pot that the EAR clone came with. If I have it on anything other than max, it really constrains the music, rolling off the highs (very noticeable with big band jazz brass) and resulting in looser bass.
I run this phono pre into my Marantz AVR, so I am guessing the lower output impedance when I adjust the volume knob down does not match well with the Marantz.
I can live with it maxed out, but I think I may either replace it with a better pot, or just straight wire it and remove it altogether.
I run this phono pre into my Marantz AVR, so I am guessing the lower output impedance when I adjust the volume knob down does not match well with the Marantz.
I can live with it maxed out, but I think I may either replace it with a better pot, or just straight wire it and remove it altogether.
@jayme, I didn't like those Alps pots from my days back upgrading/Modifying Counterpoint gear, the Alps are ok but when compared to better Vol pots or Stepped Attenuators there is no comparison and you will hear right off the bat once you replace them what they were adding and holding back.
I too was hearing what you were but I already knew I was going to replace the Alps pot, I just wanted to try some other upgrades and mods to see what the basic design could do and knew some the parts the clone came with are not that good specially the resistors and caps they gave the clone a fuzzing type sound.
Once I sorted out those other issues I then went and changed out the Alps for the TKD pot and there was a huge jump in sound quality and transparency. No constrains of any kind now, The mew all out build I have started on now with a nice chassis I'm thinking of bypassing the pot but still on the fence with this because the Clone matches up well with my tube preamp and I like having the pot in but two pots in the circuit is not good over all sound wise but nice to have if my preamp goes down for any reason.
Today I will be adding the bypass caps on the 33uf caps on the preamp PCB. I do have some Silver Mica caps and Resistors for the RIAA coming in and will add these as the final touches for this EAR clone I bought. These projects/experiments have given me a very good idea what I want to do with the all out EAR 834P clone build I started. That I will take my time on and not be in a rush to make sure it's done right.
The CL-60 in line worked out great and the clone is not getting slammed with high current like in stock mod.
I will try to take pics, since I'm here reporting what I did and keep forgetting to take pics of the steps I did with upgrades. Sorry guys!
The CL-60 in line worked out great and the clone is not getting slammed with high current like in stock mod.
I will try to take pics, since I'm here reporting what I did and keep forgetting to take pics of the steps I did with upgrades. Sorry guys!
Thanks. I think I will just remove the pot. And then replace the aluminum front panel with a Lexan panel to be able to see the tubes glowing in there. Or rehouse the board into a separate shorter box and expose the tubes through the top.changed out the Alps for the TKD pot and there was a huge jump in sound quality and transparency
I already replaced the coupling caps, so just need to tackle this one last issue. It sounds amazing otherwise.
Did the Auricap XO 0.33uF cap bypass on the 6 33uF Electrolytic caps. This mod gave me the answer I was looking for about how bad those gold looking caps that came with the EAR clone are (like the Alps pot was). Very quiet background now, all the noise and other junk is now gone unlike before the mod. This will be corrected in the " All Out" build. I can turn the pot all the way up and the sound stays the same, no more messiness in the sound like before the upgrades. I have been thinking about removing the 50k pot on the Final build but may just leave it just incase.
Now that I have eliminated the noise and other sound issues, I'm starting to think hard about the Allen Wright Super Regulator for the B+ line. I'm mean if the bypass caps improved the sound and removed a lot of that background noise, can just imagine what the Super Regulator would do other than keep the Voltage stable.
Here's some pics of the Auricaps I installed today. Don't laugh cause this was a experiment as I have been doing with the EAR Clone I bought so it looks a little messy, all will be cleaned up in the final All Out build. Getting all the issues out of the way one by one so I can just have everything ready to go on the final build. The Douk PCB in the background is the All out PCB that I'm slowly putting together for the final build. The Power Supply PCB is almost finished, just need a few more parts to finish.
Attachments
Last edited:
Very interesting. I replaced the 33uf gold caps with 82uf Nichicons which was a step in the right direction. The next step for me is to bypass them. I'm not sure what I'm going to use.
I am also planning on replacing the volume control and I like the CL-60 soft start idea.
Pete
I am also planning on replacing the volume control and I like the CL-60 soft start idea.
Pete
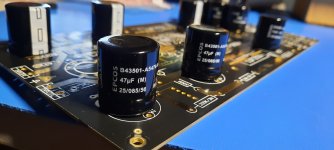
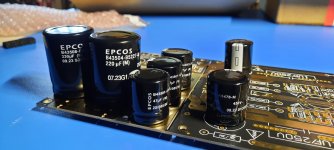
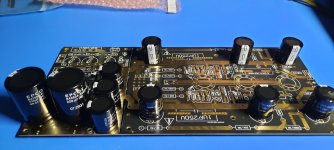
Today I started sorting out my components for the All Out EAR 834P build. I finally tracked down where I put the Antek AS-05T280 transformer and cover shield for it. I also did a dry run of how to mount the Filter caps in the power supply and preamp pcb's, they all fit with a little different placing. For the power supply filer caps I'm using all EPCOS caps and for the Heater Supply again I will use Kemet. Here are some pics.
Attachments
I have another order of parts coming in and I will start the assembly portion of the PCB's. I think I will use Mogami Quad interconnects for all the internal connections. RCA connectors I already have along with good Isolation feet. Still trying to find a nice place for both the luminated power switch and Volume Pot on the Front Panel.
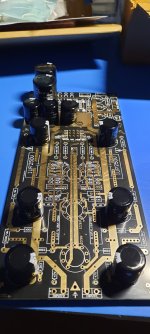
This PCB will have the Jensen Copper Foil PIO caps and those Dueland Alexander Copper Foil PIO caps.
This PCB will have the Jensen Copper Foil PIO caps and those Dueland Alexander Copper Foil PIO caps.
@Pete- They look funny but are correctly going to the big Negative trace on top and Positive spot where it should be. I had to move them over so the EPCOS caps could fit. I just turned the Negative on the 220uF and 330uF to right but now looking at the pic, I see I may have to move the 220uF back and reposition the 47uF cap at the end so to make room for the 220uF cap going back to the original spot to make room for the MJE13009. I do have two spare PS PCB's just incase there is any damage in the rework process, but should be no biggie.
So as you can see here in the pic of a bare PS pcb, it's correct just looks weird.

So as you can see here in the pic of a bare PS pcb, it's correct just looks weird.
- Home
- Source & Line
- Analogue Source
- EAR834P Project