Questions to answers
Stop the presses bud.
Thin with the dye 100% alcohol only!!!
Sprayed onto raw wood will work. But for your purposes tint some laquer. It will end up working as a shading stain. The laquer will give it a good degree of tranparency and give you wonderfull depth of finish.
And yes ethanol is good. Just don't be tempted to sneek a sip.
To dye , to sleep that is the question! ( scary shakespeare flashback)
If you must dye do it quietly and please don't make it messy. ( I'm to sharp this morning )
To recap the dye idea:
NUMBER ONE RULE: AFTER FILLING THE GRAIN SAND VERY SMOOTH! 180 to 220 GRIT next.....
The background is the open pored wood. It will be darkest.
The foreground will be the lighter more closed grain wood. Therefore it should be lighter.
The tint/laquer mixture will be for shading purposes only. Not the final top coats. Start with a 25% tint and build it up in layers. Or try a test with the 50%. But practice first. The 50% is the maximum allowed in a laquer mix. The idea is to build up a depth of transparent colour. If you do it right it is awesome.
Plaster must be dyed darker than the foreground colour. The filled areas will set off the contrast that you desire. After the filler process you should brush or spray a coat or two of shellac. This will seal the plaster. Next you can spray the dye. The dye should be mixed with laquer as mentioned. And it should be sprayed within about twenty minutes of the shellac coats. It will bond better. ( your plant sprayer is highly recomended as long as the spray patern is even. Practice on some card board with some water. You will soon figure it out.) This shading stain will darken or deepen the colour that you will have allready started with.
To understand what is happening think about it this way. The dyed plaster will have become entangled in all the wood grain. Some of the more open areas will be quite dark the more closed grain areas will be more of a grey. This is before shading with the dye on top of the shellac coats. If you want a deeper colour then after the mentioned sealing process you can try shading the foreground with the laquer tint mix. When you think that you are happy switch from tinted laquer to a clear laquer. If you followed the number one rule then you will be able to get away with two or three coats of clear. After they have dried for a while ( a couple of hours at least. Better over night ) wet sand the surface with some 400 or 600 paper. By wet I mean water with a drop or two of dish soap for every 500 ml. This will keep the surface cool and lubricated and the paper cleaner. One more tip. Get yourself a black of MDF and cut it out so that a quartered sheet of sand paper covers it comfortably. It should be slightly shorter than the paper and the paper should wrap around the edges so that when your grasp the black you hild the paper. Now seall the blck with something. If you have it, polyurethane is the best.( more water proof than shellac or laquer ) Use this block for all of your sanding from the get go. You will have a much more problem free finish. Sanding with hand pressure on paper is a NONO! On veneer your hands will cause the open pore areas to become sunken due to their being softer. With a block this does not happen.
Finishing 101 is now over. The next step will be finishing 201.
Remember this. Anyone can make a mistake. It takes a true craftsman to fix them!
Mark
Re: Free moment
Can you expand your explaination a bit. For example, I butt-jointed two 3/4" plywood at 90 degree to each other. Are you saying that there is a way for me to use one continuous piece of veneer to cover the two surfaces that are jointed together at 90 degree?
Do I need to use a router and router a radius at the joint?
With the right touch on the sanding before hand and a good technique you can wrap a corner that is really a small radius. Looks a lot better than pieced corners.
Can you expand your explaination a bit. For example, I butt-jointed two 3/4" plywood at 90 degree to each other. Are you saying that there is a way for me to use one continuous piece of veneer to cover the two surfaces that are jointed together at 90 degree?
Do I need to use a router and router a radius at the joint?
THere are more than one ways to skin a cat!
Poor cats.
OK how to do this. Check out the crude drawing. THe blue is the speaker or whatever you are going to veneer. Note that on the corner there is a small chamfer ( small as in less than a 1/8th radius ) or even a rounding of the corner. This allows the thicker veneer to wrap around the corner with less of a tendencie to break. The underlying idea is to allow for the more or less double thickness of the veneer some room to bend without the cracking that would normally occur. There are other ways as well:
This is from illusus. No amateur either. He uses small light taps with a mallet to crush the veneer into submission and then obedience. ( Gone a little to far ) it works well. The other good tip from illusus is the veneer softener. Something that I don't use enough. I usually warm it up with an old iron and it behaves itself.
Mark
Poor cats.
OK how to do this. Check out the crude drawing. THe blue is the speaker or whatever you are going to veneer. Note that on the corner there is a small chamfer ( small as in less than a 1/8th radius ) or even a rounding of the corner. This allows the thicker veneer to wrap around the corner with less of a tendencie to break. The underlying idea is to allow for the more or less double thickness of the veneer some room to bend without the cracking that would normally occur. There are other ways as well:
A couple tpis from me as well; pieced corners can look good if a radius is not an option; to get them to look good I use a wooden mallet to gently mash the perpendicular edges together, many, many tiny taps.
This is from illusus. No amateur either. He uses small light taps with a mallet to crush the veneer into submission and then obedience. ( Gone a little to far ) it works well. The other good tip from illusus is the veneer softener. Something that I don't use enough. I usually warm it up with an old iron and it behaves itself.
Mark
Attachments

Thanks Mark,
I picked up some plaster of paris from home depot this afternoon. In typical home depot salesman fashion, they where no help regarding the dye. They told me that they have "no dyes whatsoever."
I was thinking RIT dye... something like this maybe?
http://www.ritdye.com/store/dye_powder.asp
Although I have no info about how if responds to wood, colorfastness, fade resistance, what will happen with finish... grrr too many questions.
And on a side note, I was using titebond wood glue to seal the edges where my boards don't line up quite right. The bottle says "sands easily" All I have to say is: "LIES BLOODY LIES."
I can think of many better descriptions, such as "sands like mud" or maybe "sands like silicon". Epoxy sands way better. I am doing something wrong... I do have a rather thick layer built up to make the seal (approximately 1 mm) but come on! I was wacking away with a belt sander and 40 grit for 20 minutes!
Sigh, I need to breath/sleep/get the stupid valet parking attendent not to crash my car into a concrete post!!!
Oh well, another story another time.
Thanks for all the help - sorry for the rant.
-Wes
PICTURES!
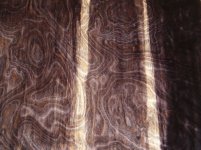
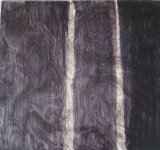
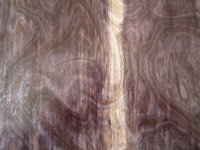
OK, so these pictures are from my first run at it. I'm not really satisfied with the result so I plan on ordering some more samples and trying again.
My process was as follows:
1) Brush with H20 to lift the grain
2) Plaster of Paris mixed with black RIT dye.
3) Sand back with 200 grit to expose the grain
4) Zinzer seal all wax free shellac sealer (2 coats)
5) Brushing lacquer mixed with transtint black dye (2 coats)
The different bands are different concentrations of dye in the lacquer. And the grain isn't quite that prominent, but is brought out more by the camera flash.
Attachments
Ok, now come the questions! (I know you're excited )
1) I want to get more contrast between the black background and the lighter wood grains. How might this be accomplished? (I was thinking of three options... 1) Putting another application of dyed plaster and sanding again or 2) Brushing alcohol/dye after the pore filling, but before the shellac and then sanding it back again. Although I tried mixing the dye directly with the plaster and it did not work at all. So I don't think this would work. 3) Maybe some tung oil before the shellac? As you can see from the pictures, There was OK contrast after the shellac, but the tinted lacquer just turned everything darker... Unfortunatly, without it, there was no depth to the colors. Basically, the black needs to be blacker and the gold needs to be golder.
2) As you can see from the pictures, the filled areas still look rather "grainy". Is there a way to make them more uniform... perhaps not sanding back as much?
3) I don't know how they do this, but the B&W speakers have a quality of looking almost completely black until direct light is shined on them. Then the grains really "pop" like the tigers eye stones. Is there anyway to get this effect?
Thanks again for all your help and expertese.
-Wes
)1) I want to get more contrast between the black background and the lighter wood grains. How might this be accomplished? (I was thinking of three options... 1) Putting another application of dyed plaster and sanding again or 2) Brushing alcohol/dye after the pore filling, but before the shellac and then sanding it back again. Although I tried mixing the dye directly with the plaster and it did not work at all. So I don't think this would work. 3) Maybe some tung oil before the shellac? As you can see from the pictures, There was OK contrast after the shellac, but the tinted lacquer just turned everything darker... Unfortunatly, without it, there was no depth to the colors. Basically, the black needs to be blacker and the gold needs to be golder.
2) As you can see from the pictures, the filled areas still look rather "grainy". Is there a way to make them more uniform... perhaps not sanding back as much?
3) I don't know how they do this, but the B&W speakers have a quality of looking almost completely black until direct light is shined on them. Then the grains really "pop" like the tigers eye stones. Is there anyway to get this effect?
Thanks again for all your help and expertese.
-Wes
Well, you could try using an amber stain in your top coat, that would help the highlights. For a darker background, try more coats of black stain, with or without the plaster. Different brands of black stain also give different results, some work better with certain woods. I can't really advise on a particular type, as you have different types in the US to what we have in the UK.
The fun begins!
Hello oh wise one!
Now you have a taste for what can be done but can't quite get there.
Welcome to the whacky world of wood finishing.
The open pores that you see are areas that are not properly filled.
Some questions. How thick and how black did you mix the plaster. Did you just pour it on or did you trowel it on like you would plaster on a wall to push it in and down into the wood. Better yet squeeze it on with a spatula and then rub it in with a rag.
An idea ( now remember this I'm not there and have not seen the veneer in person but I'm guessing that it is a quilted maple knockoff that you are using. Try sealing the surface and then sanding it lightly. You may even tint the sealer a bit. Then try a fill with the plaster. This is definitely an experimental process. When you get to where you wan to be you will know.
The idea is to setup a contrast in the grain of the veneer. Your close to that now. You just have to refine the process a bit untill you get what you want.
SOme thing that I can do is visit the B&W dealer that is close to me and see in person exactlly what you are trying to emulate. ( if he has it in stock )
How much is the veneer? Maybe I could get some and do some hands on and really see what you are up against.
Mark
Thanks Mark,
The plaster was kind of a grey color. I tried adding more dye, but it didn't seem to darken it any more. Maybe some other type of dye would work better. I basically spooned it on and spread/pressed it down with a putty knife. I think that maybe next time I'll make it a little more watery to hopefully get it to seep into the pores more.
Forgive me because I am a rookie at this, but wouldn't sealing it prior to the plaster prevent it from filling?
Also, what do you think about applying tung oil before the sealer to bring out the lighter colors more?
Finally, I'd be happy to mail you a some of the veneer if you'd like. Just let me know and you can email me the address.
Thanks so much,
Wes
I got mail?
mwmkravchenko@hotmail.com
Tung oil is a no no in the prefinish stage.
The presealer would be sanded and the open area would be sealed and the other areas sanded to raw wood again.
Mark
mwmkravchenko@hotmail.com
Tung oil is a no no in the prefinish stage.
The presealer would be sanded and the open area would be sealed and the other areas sanded to raw wood again.
Mark
Right, but I want the plaster to penetrate into the open pored areas to turn it more black. I don't want the presealer to prevent this. Unless of course it just colors the wood and doesn't completely seal the pores... In this case I guess it would probably add more contrast.
Well I'll probably give it a shot anyway and see how it responds. Oh and I think that B&W has discontinued this finish. I tried to find it over the summer when I went home and the shop didn't carry them anymore. (Someone actually bought the set they had on sale for $16,000 )
)
-Wes
Well I'll probably give it a shot anyway and see how it responds. Oh and I think that B&W has discontinued this finish. I tried to find it over the summer when I went home and the shop didn't carry them anymore. (Someone actually bought the set they had on sale for $16,000
)-Wes
Hi Wes
How is the work progressing?
I get to check the net every couple of days and I didn't see any news.
If your stuck maybe you could mail a pice of the stuff and I could see exactly what you are working with and what can be done. This has definitly intrigued me. I'm thinking of pulling the same type of finnish on some boxes that I am working on.
Mark
Check this out
Hi Wes
Tell me that this is what you bought:
http://www.veneers.com/list_veneers.htm?2-1
I say this because I was looking through all the posts and what you have shown pictures f is very similar to maple burl. It won't do what you want it to.
Check out the name and the enlargement of type called Olive Ash Burl. If you didn't get this or something very close you are not going to get the great contrast in wood grain that you want. I think that I mentioned Olive Ash by name a while back.
If you look closly at the enlarged picture you will see all the dark bands. These are areas with much larger wood pores. VERY MUCH larger than the other areas.
I sure hope that you bought this stuff. And if you didn't I hope that you didn't buy to much of the wrong stuff.
Mark
Hi Mark,
I got the olvie ash burl listed here:
http://www.constantines.com/index.asp?PageAction=VIEWPROD&ProdID=1989
Its under the dyed/imatation section of constatines website. Unfortunately, I have had zero time lately and have mostly just been finishing undergraduate degree + applying to grad school. Thanks for all your help this summer. Hopefully I'll be able to get back to working on the speakers this winter. With luck, the ash veneer will still be available.
-Wes
gday! ones of my partner - masters of hydroabrasive work for marble will be able to reach fractal surface.
it's looks like your picture, or absolutly anyhow.
you can see samples of they work there:
http://www.artmaydan.org.ua/klerys.html
now I'm looking for new idea of loudspeakers design, based of this technology. and be sure - marble furthermore will be better then wood for box damping.
it's looks like your picture, or absolutly anyhow.
you can see samples of they work there:
http://www.artmaydan.org.ua/klerys.html
now I'm looking for new idea of loudspeakers design, based of this technology. and be sure - marble furthermore will be better then wood for box damping.
An externally hosted image should be here but it was not working when we last tested it.
Hi Mark,
Sorry, I didn't fully read your previous post. The stuff I got from Constantines looks almost identical to the link you posted when seen in person. I'm thinking that its probably the same stuff?
Anyway, I fully intend to finish these darn things once I get a little bit of time. I think that pretreating by spraying on a dilute dye/alcohol mixture and then sanding back prior to (or instead of) filling the pores with dyed plaster should hopefully give the effect we are looking for. I'll keep you posted.
-Wes
- Status
- This old topic is closed. If you want to reopen this topic, contact a moderator using the "Report Post" button.
- Home
- Loudspeakers
- Multi-Way
- Does anybody know how to get this finish?