MJL21193 said:Nice work, BUT...
This could have been done much cheaper, easier, faster and more consistently with three paint colours and spray equipment.
On a SMOOTH base, spray consecutive layers of each colour over and over again. Let dry, then sand through the layers with a random orbit sander to get the desired "grain" pattern.
Clear coat and you're done.
How does that relate to using a real wood finish?
Byrd said:
How does that relate to using a real wood finish?
Hi,
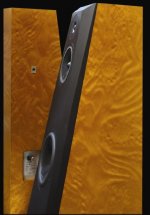
Is that a trick question? The subject was a finish, not necessarily a real wood finish (the example being the B&W speakers).
For anyone else (with an open mind) that's looking to do a similar grain pattern, there is an alternative.
Here's another example of a finish that many would mistake for exotic wood veneer:
Attachments
Ross, actually the thread was not about a wood finish, but rather a commercially constructed one. Here is the initial post. As you can see, it is a rather exotic swirl finish, that has nothing to do with wood grain. Since I am not an expert with spray painting, I have no idea just how it is done. And personally, it's a bit too 'modern' for my taste. But it is obvious that a compromise had to be reached, and John was talking about an easier way to come up with a more suitable substitute.
I would love to see how something like this is obtained, just for my own personal knowledge base. Perhaps John can show us how it is done?
I would love to see how something like this is obtained, just for my own personal knowledge base. Perhaps John can show us how it is done?
MJL21193 said:Nice work, BUT...
This could have been done much cheaper, easier, faster and more consistently with three paint colours and spray equipment.
On a SMOOTH base, spray consecutive layers of each colour over and over again. Let dry, then sand through the layers with a random orbit sander to get the desired "grain" pattern.
Clear coat and you're done.
Yes this a trick that graffiti artist have used for a number of year and no, I don't go spraying public property before you ask.
It takes some effort to have a picture of what you want in your head and translate that onto the work using layering of paint - your working in 3 dimensions here essentially. I'd definitely say that's art more than technique. But its easily possible to get some random and pleasing effects just by layering up the paint and changing the coverage and distribution of each coat. You could tweaked out overall pattern through selective sanding.
John L said:John was talking about an easier way to come up with a more suitable substitute.
I would love to see how something like this is obtained, just for my own personal knowledge base. Perhaps John can show us how it is done?
ShinOBIWAN said:
Yes this a trick that graffiti artist have used for a number of year and no, I don't go spraying public property before you ask.
Hi John, Hi Ant,
Last summer I was all set to do wood grain effect this way, to see if I could get it looking right. I had the paint - a reddish brown and a dark brown and black, but got sidetracked with work, and other duties so I never did get around to doing it.
It needs to be sprayed, each layer to cover the one beneath and you need to start with a very smooth surface and paint that several coat of the main colour (in that case it would have been the reddish brown). You let these layers flash or dry before applying the next.
Obviously, it's an asset to have three guns (another strike against me).
Spraying on three set of the three colours would give good results, allowing for a very complex "grain". Allow this to dry completely, then sand the paint layers to get the desire pattern. I'm sure a bit of practice is required to get realistic results.
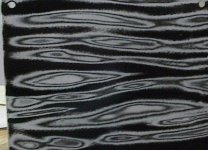
I can't use my sprayer at this time of the year, but I did do a little test with aerosol cans on an aluminum plate. This morning, before I left, I quickly sprayed 4 coats of black and silver (what I had) and this evening when I got home I sanded it by hand.
This is a (really) rough idea of how it could work. It goes without saying that the results would be better with proper spray equipment.
Attachments
Hi John
As was stated in the beggining of the thread, there were a number of references showing that although a constructed product, it was still manufactured using real wood veneer.
See this post.
MJL21193, not a trick question. As is shown above wrl was initialy talking about the B&W finish, which is shown to be constructed of real wood veneers. That was the finish he was after and the reason he used the method he did. You can see in the example that you supplied that the edges are not very well defined, and better spray equipment is not, in my experience, going to fix that.
The tone of your post was IMO a little arrogant in assuming that you know exatcly how B&W got it's finish and that you know the exact way it should be done. It was also IMO derogatory toward WRL.
WRL, very nice. I am impressed that it turned out so well. Lots of work, but worth it in the end.
Byrd said:
MJL21193, not a trick question. As is shown above wrl was initialy talking about the B&W finish, which is shown to be constructed of real wood veneers. That was the finish he was after and the reason he used the method he did. You can see in the example that you supplied that the edges are not very well defined, and better spray equipment is not, in my experience, going to fix that.
The tone of your post was IMO a little arrogant in assuming that you know exatcly how B&W got it's finish and that you know the exact way it should be done. It was also IMO derogatory toward WRL.
An alternative Byrd, not THE WAY.
My sample above was done with a total effort of 25 minutes (includes the time to spray the paint). Like I said, a rough idea. One can see the potential in this even if "edges are not very well defined".
Sorry I could make it perfect for you.
Hi John!
How's it hangin' there?
It looks like you could have used better lacquer or waited lil' bit before sanding. The reason edges are not so sharp could be either reason. Poor adhesion or not enuff drying rips off layers of lacquer.
Anyway, fake will not replace nature and I think you know it!!
Othervise, good work in 25 minutes, if that's correct!
Peter
peterbrorsson said:Hi John!
How's it hangin' there?
It looks like you could have used better lacquer or waited lil' bit before sanding.
Hey Peter, just hanging in there, unused
I could have waited for it to dry longer (cold in my shop) and I think the layers need to be thicker, especially the main colour.
This was a quick demo, not meant to impress the sharp eyes on this forum.
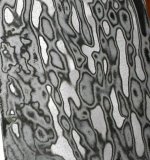
Going on the assumption that the paint was too fresh, not dry enough, I tried to sand it again. This time with my random orbit sander.
Result is below. Starting to see the potential yet? Imagine a properly prepared piece, with 9 layers to work with plus a true base.
Attachments
peterbrorsson said:Hi John!
How's it hangin' there?
It looks like you could have used better lacquer or waited lil' bit before sanding. The reason edges are not so sharp could be either reason. Poor adhesion or not enuff drying rips off layers of lacquer.
Anyway, fake will not replace nature and I think you know it!!
Othervise, good work in 25 minutes, if that's correct!
Peter
He didn't use lacquer/clear. That just a couple of different basecoat colours. The reason for the indistinct edges is he used a low grit paper, which fine for what he's done because it gets material off quick. If he went over with a fine grit you'd see a nicer transition.
I think John was demonstrating the basic concept rather than showcasing it. I have no doubt he could make it look better than what's shown.
An interesting (?) diversion...
Why do people buy speakers? Or more properly - do speaker companies *have* to mix a *design* element into their product to *get* people to buy their boxes?
It does kind of indicate that the sonics themselves aren't enough, that the speaker has a dual function, as art in itself, and a sonic reproduction device. I find that kind of bizarre.
I don't want ugly speaks any more than anyone else does but how far should that go?
There it is - the question - how far should that go and how much should we pay for it? Moreover, how much of that mentality is responsible for the *astronomical* price of what turn out to be (in many cases) middling (at best) sonic products that simply *look* slicker than their competitors?
Capricious question I know, but I found it mildly interesting.
What do you think?
Regards,
Tom
Tom, that is like turning ceramincs on a potter's wheel. There are basically two seperate and distinct parts to making wonderful pottery. First is that of the cylinder, or pot, bowl, etc, which comes out of throwing that cylinder. Learning how to do this is a time consuming period, and requires a great deal of dexterity and artistic eye.
But also just as important, and more difficult is the art of "glazing". Learning how to make that wonderful pot look great depends on how technically astute you are with the glazing process, and becoming an expert usually requires years of work.
This also works with speaker building. It is one thing to model and put together a nice speaker system, but finishing it into a wonderful looking and pleasing project, where it can be not only listened to but admired for it's asthetic value, requires "That Other" process too.
Re: An interesting (?) diversion...
Hi John,
In the spring/summer I will be trying this paint technique on a pair of speakers that I built a few years ago, and I'll open a thread to cover that.
I'm sure if there is enough interest it could ramble on...
John L said:John, have you considered starting a thread, and trying out different finishes, and how they are done? That would be more than interesting.
Hi John,
In the spring/summer I will be trying this paint technique on a pair of speakers that I built a few years ago, and I'll open a thread to cover that.
I'm sure if there is enough interest it could ramble on...
Re: An interesting (?) diversion...
Not everyone is capable of building a speaker cabinet or calculating the crossover. Most of the people will go and select speakers based on esthetical preferences and the price. Somehow, companies that invest money in the research also invest money in to the exterior element and duly so. Competition is tough and they need to make the product look different. On the contrary, to the misconception of “how much we have to pay for this exuberant design”, marketing departments in large companies work the opposite way. What’s the target consumer? What’s the competition? Can we make better looking (and better sounding) product for less?
My 5c to this thread is this. All synthetic veneers or reconstituted veneers are on the market for quite sometime. The main reasons for their emergence on the commercial market is consistency and the price. For example: real plain sliced Ebony Macasara-$5-$8 per ft2. Reconstituted substitute is about $1.35. If you making 1 panel or say table top for a commissioned piece, it’s fine and you could charge the price but doing say a 100 panels for a store may become quite costly. Consistence is another issue for the big order. Tree differs from tree and some costumers may not like variations in the graining.
I understand that some people actually prefer the look but there’s no substitute for me.
I would get a real quilted maple and black stain. Perhaps some pearl dies could create incredible effects.
B@W aren’t interested in having a craftsman working on each speaker because there wouldn’t be any consistency. They want to make the cabinet “different” and appealing. If I had a chance to see real cabinet, I could tell you exactly how they did it. It could also be a high quality plastic laminate. May be even custom made for them.
ptwining said:Why do people buy speakers? Or more properly - do speaker companies *have* to mix a *design* element into their product to *get* people to buy their boxes?
It does kind of indicate that the sonics themselves aren't enough, that the speaker has a dual function, as art in itself, and a sonic reproduction device. I find that kind of bizarre.
I don't want ugly speaks any more than anyone else does but how far should that go?
There it is - the question - how far should that go and how much should we pay for it? Moreover, how much of that mentality is responsible for the *astronomical* price of what turn out to be (in many cases) middling (at best) sonic products that simply *look* slicker than their competitors?
Capricious question I know, but I found it mildly interesting.
What do you think?
Regards,
Tom
Not everyone is capable of building a speaker cabinet or calculating the crossover. Most of the people will go and select speakers based on esthetical preferences and the price. Somehow, companies that invest money in the research also invest money in to the exterior element and duly so. Competition is tough and they need to make the product look different. On the contrary, to the misconception of “how much we have to pay for this exuberant design”, marketing departments in large companies work the opposite way. What’s the target consumer? What’s the competition? Can we make better looking (and better sounding) product for less?
My 5c to this thread is this. All synthetic veneers or reconstituted veneers are on the market for quite sometime. The main reasons for their emergence on the commercial market is consistency and the price. For example: real plain sliced Ebony Macasara-$5-$8 per ft2. Reconstituted substitute is about $1.35. If you making 1 panel or say table top for a commissioned piece, it’s fine and you could charge the price but doing say a 100 panels for a store may become quite costly. Consistence is another issue for the big order. Tree differs from tree and some costumers may not like variations in the graining.
I understand that some people actually prefer the look but there’s no substitute for me.
I would get a real quilted maple and black stain. Perhaps some pearl dies could create incredible effects.
B@W aren’t interested in having a craftsman working on each speaker because there wouldn’t be any consistency. They want to make the cabinet “different” and appealing. If I had a chance to see real cabinet, I could tell you exactly how they did it. It could also be a high quality plastic laminate. May be even custom made for them.
MJL21193 said:
Hey Peter, just hanging in there, unused
I could have waited for it to dry longer (cold in my shop) and I think the layers need to be thicker, especially the main colour.
This was a quick demo, not meant to impress the sharp eyes on this forum.
Going on the assumption that the paint was too fresh, not dry enough, I tried to sand it again. This time with my random orbit sander.
Result is below. Starting to see the potential yet? Imagine a properly prepared piece, with 9 layers to work with plus a true base.
Well John, you are getting old. same here
It's fun to play with these things, huh? Sorry thing with my work is that I've to develop crappy paints and lacquers just to make it fast drying. Normal finishing time, from raw board to stacking, is 5-8 min. Does not leave any artistic space, eh.
I've played with a similar treatment on chairs for an exibition and main thing was drying time, quality of paint and sanding grit as ShinOBIwan mentioned above.
Also thickness of layers is a thing to play with.
When I was young, I played with girls. Now I play with speakers.
Well at least, speakers doesn't bitch!
Keep hanging in there!
Peter
ShinOBIWAN said:
He didn't use lacquer/clear. That just a couple of different basecoat colours. The reason for the indistinct edges is he used a low grit paper, which fine for what he's done because it gets material off quick. If he went over with a fine grit you'd see a nicer transition.
I think John was demonstrating the basic concept rather than showcasing it. I have no doubt he could make it look better than what's shown.
Yes, a miss in terminology. Sanding grit, I agree.
I've seen what he's done, so no writing(Paint brushing
), how it should be done, on his nose.BTW, Your speaker look awsome!
Cheers
- Status
- This old topic is closed. If you want to reopen this topic, contact a moderator using the "Report Post" button.
- Home
- Loudspeakers
- Multi-Way
- Does anybody know how to get this finish?