I would second the solidity of ebony wands, i made two from macaser ebony, 12inch and 10inch. The 12inch was made in 2 pieces, split horizontaly, with a small groove in each piece for the tonearm wires with integral carved headshell formed in the top piece.
The smaller 10inch wand was made from one piece, with 3mm hole bored out, again with carved headshell. both appear stabel and very solid.
Azimuth can be fine tuned by slightly turning the offset counterweight, though i have not found this neccasary
An M4 grub screw is the magnetic gap height adjuster, and should be drilled out with the smallest diameter hole to accomodate the suspension thread.
To drill the grub screw i found it easiest to partially tap a M4 thread in a piece of scrap ally plate, insert the grub screw, turn it over and drill through from the other side. Some grub screws do have a slight dimple which keeps the hole central.
The suspension string is held in place by a small knot, hence the need for a small hole in the grub screw.
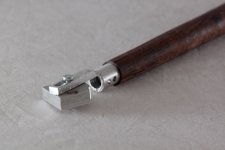
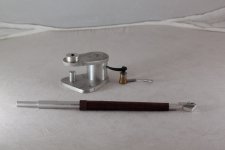
As regards unusual tonearm wand shapes, i did make a square section tapered wand from rosewood with magnetic suspension, not quite finished on this photo.
But now up and running and sounding excellent.
But now up and running and sounding excellent.
Attachments

Grub screws pre drilled
Lots of different sizes, sorry it all 'American' sizes. Vented cup.
No metric sizes with holes.
McMaster-Carr
Trying to find all my parts after moving
Ron
Lots of different sizes, sorry it all 'American' sizes. Vented cup.
No metric sizes with holes.
McMaster-Carr
Trying to find all my parts after moving
Ron
With the pre-drilled grub (set) screws, the knot in the thread has to be very very large as the hole is fairly big. If you do get a knot big enough to not pull through, then you may not have the depth needed for the allen wrench ( hex wrench?)
I used a brass metric grub, as brass id fairly soft and drilled the hole using a very small carbide bit that's used for drilling lead holes in PCB's.
I tapped a hole in a holder for the grub screw to sit in when drilling. The bottom of the hex in the grub is conical so drilling self centers the bit. It does pay to drill as close to the center as possible as the bottom of the cone does have a flat that may be a tick larger than the diameter of the drill bit.
Other than that, it was fairly easy to dill the holes.
I deburred the holes by hand with a slightly larger drill bit to clean up the edges as they may be sharp enough to cut the thread over time.
JD
JD,
Your lack of faith in the Force is most concerning...........
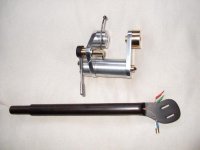
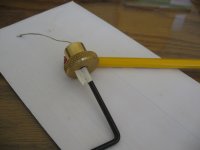
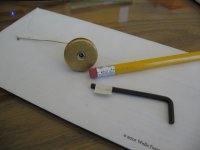
This is Vectran thread / string with 5 overhand knots tied in each end. I tugged on it and it did not pull through. The hole is .0600" in diameter. Which is .96 of 1/16th of an inch.
Both of these parts were purchased from the above website.
(Not the Vectran, it came from Ebay) Your suggestion, thanks!
The tape on the Allen Key is the depth of contact inside the allen set screw.
The knob is free spooling on the gallows arm, the threads are through the entire body so there is enough length for magnet distance adjustment after installation.
Ron
Your lack of faith in the Force is most concerning...........
This is Vectran thread / string with 5 overhand knots tied in each end. I tugged on it and it did not pull through. The hole is .0600" in diameter. Which is .96 of 1/16th of an inch.
Both of these parts were purchased from the above website.
(Not the Vectran, it came from Ebay) Your suggestion, thanks!
The tape on the Allen Key is the depth of contact inside the allen set screw.
The knob is free spooling on the gallows arm, the threads are through the entire body so there is enough length for magnet distance adjustment after installation.
Ron
Attachments

WoodturnerFran,
I epoxied mine in the aluminum wand shaft.
I paid the 7 year old kid next door to tie the thread for me. (not really)
I did put some water on it to help prevent it from fraying whilst tying though.
I'm still very far away from an actual build though. I'm just prepping.
Ron
I epoxied mine in the aluminum wand shaft.
I paid the 7 year old kid next door to tie the thread for me. (not really)
I did put some water on it to help prevent it from fraying whilst tying though.
I'm still very far away from an actual build though. I'm just prepping.
Ron
on mine:
press fit and Loctite Green
Hint on the Vectran... twist it and on the thinest section of where the twist is, put a drop of Superglue (AlphaCyanacrylate). Wicking action will absorb it. Wait around 30 seconds till in hardens then cut with a very sharp hobby knife at that section.... it should be thin enough to thread through the hole.
JD
Did you all just epoxy in the magnet to the armwand?
Oh, and can someone order a smaller pair of fingers so I can actually tie the knot in the vectran?!? think I need a tweezers!
Last edited:
Great stuff guys!!
Cleaning up tonight. I'm planning on sand blasting some parts to give a nice matt finish, but will probably polish a few parts as well. Other than tying the knot I'm nearly there. Last thing is that I'm waiting on some small grub screws for various part, tonearm cue etc etc.
Fran
Cleaning up tonight. I'm planning on sand blasting some parts to give a nice matt finish, but will probably polish a few parts as well. Other than tying the knot I'm nearly there. Last thing is that I'm waiting on some small grub screws for various part, tonearm cue etc etc.
Fran
Made great progress on the arm tonight. Really the mechanicals are pretty much all finished bar the counterweight. Something I've noticed: I set up the arm with the 2 magnets pretty close to each other, say 1mm or so. There is quite a bit of resistance to the up-down movement of the arm - in other words it wouldn't cope well with warps. I take it I just experiment with the magnet gap?
I ordered up some M3 grub screws for all the little fixing parts, the magnet, headshell, pillar, etc etc so until they arrive, I need to sort out the counterweight and the wiring. I plan on using some very fine copper for the wiring (used it on my air-bearing and really like it) - and I would like to have a nice tidy means of going from tonearm wire to interconnect.
Does anyone know what a good weight range is for a finished counterweight?
Fran
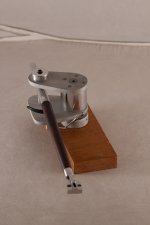
Frank, I changed the position of the knot as per your instructions above and yes, it makes a large difference - just judging by hand of course, but certainly its better.
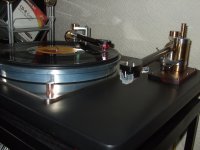
Thought I'd post another pic. The metal is a little dirty from handling, and the whole thing needs a good clean before final assembly.
Counterweight (need to get some brass I think) and neat grub screws still required.
Fran
Thought I'd post another pic. The metal is a little dirty from handling, and the whole thing needs a good clean before final assembly.
Counterweight (need to get some brass I think) and neat grub screws still required.
Fran
Attachments

- Home
- Source & Line
- Analogue Source
- DIY Schroeder Tonearm???