

Mongo now is relax.
Good Mongo...enjoy your amplifier.... i am happy you have it... and you do not imagine how this makes me feel happy.
regards,
Carlos
.....................................................................................................
Yes Nordic
I watched inside myself and i was worried to give up related my hobbie.... parts finishing...money too.....i felt sad and decided to sacrifice a lot of things i have in home, to dismount to have parts to my hobbie.
I call friends and they gave me a lot of nice junk.
The day after tomorrow i will go to my friend Paulinho's house to colect a lot of damaged things to dismount.
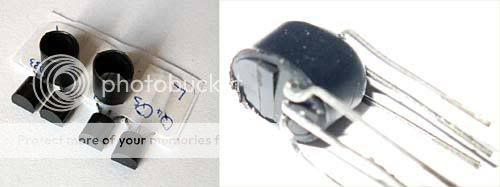
Will use 100 dollares to buy some small transistors (finished completelly), and some BD139/140 to continue my research.
Dudainc will include some small parts into the package you have sent him.... already has precious Field Effect Units there..... and i am watching my Class D unit..... hummmmmm...... has interesting supply.....nice output Fets....hummmmmm..... i think it will die for the cause of my continuity...to me to continue my activity.
So.... there are friends and hopes.... i think, soon, things will became better to me.
I am also lucky...one of those days someone will send an old system to the garbage can while i was having my morning walk..... and inside i will have hundred of parts to be cleaned, selected and used...ahahahha...i love those things.
No pension entering my pockets dear Nordic....no employment too...56 years old...no hope into this country to old folks...my wife is maintaining the house (ex wife).... i think she wants to keep me around (i cannot understand some women)... so.... parts is something very difficult to buy here.
I had a revoluctionary idea..... and this one no one had!... depends from Fets...the ones you send will be used and will produce a new thing for us.
regards,
Carlos
Good Mongo...enjoy your amplifier.... i am happy you have it... and you do not imagine how this makes me feel happy.
regards,
Carlos
.....................................................................................................
Yes Nordic
I watched inside myself and i was worried to give up related my hobbie.... parts finishing...money too.....i felt sad and decided to sacrifice a lot of things i have in home, to dismount to have parts to my hobbie.
I call friends and they gave me a lot of nice junk.
The day after tomorrow i will go to my friend Paulinho's house to colect a lot of damaged things to dismount.
Will use 100 dollares to buy some small transistors (finished completelly), and some BD139/140 to continue my research.
Dudainc will include some small parts into the package you have sent him.... already has precious Field Effect Units there..... and i am watching my Class D unit..... hummmmmm...... has interesting supply.....nice output Fets....hummmmmm..... i think it will die for the cause of my continuity...to me to continue my activity.
So.... there are friends and hopes.... i think, soon, things will became better to me.
I am also lucky...one of those days someone will send an old system to the garbage can while i was having my morning walk..... and inside i will have hundred of parts to be cleaned, selected and used...ahahahha...i love those things.
No pension entering my pockets dear Nordic....no employment too...56 years old...no hope into this country to old folks...my wife is maintaining the house (ex wife).... i think she wants to keep me around (i cannot understand some women)... so.... parts is something very difficult to buy here.
I had a revoluctionary idea..... and this one no one had!... depends from Fets...the ones you send will be used and will produce a new thing for us.
regards,
Carlos
Attachments

Has Carlos been a good boy?
Santa Claus wants to know what is on Carlos' Christmas list.
Rudolph is up to the task
Carlos, My family takes some pleasure in asking each other what is on their "list". Each of us has to suffer through well-intentioned teasing until the list is produced. So, it only serves to prolong the teasing if one resists making a list....What is on your list?
Check Santa's list before buying stuff...
Tio Carlos
According to Santa, your "gift bag" will include these semiconductors: 2SA1303, IRF9530, 2SA1943, FJL4215, IRFP064N, FQA34N20, BUZ11A, IRFZ44, TIP32, TIP32, BD139, BD138, BYV29F, LM3886T, LM4708TA, LM4701, etc. Hence you don't need to purchase any of these.
I will ask one of the Elves to compile a complete list and send you in the next 24 hours or so. Santa wanted to keep it a "secret", but he will understand that all I am trying to do is to avoid you spending money on parts that are already on his list.

I checked my "Nordic account" for the tracking number - Nordic set the bar way upthere with this groupbuy - outstanding!
After little "research" (using Clusty - 100x better than Google IMHO) I got here: http://oraweb.sapo.co.za/track_trace/owa/item_scans.get_history?mail_id=rd100840555
The package was mailed on December 3rd and it is currently in transit. I guess we will both be clicking this link on a daily basis. I am hopeful the package will be delivered in DC before the 17th..
Well, I need to leave for the office (yes, I know it is Sunday), but I need to catch up with some work delayed by the snow early this week.
Cheers!

Tio Carlos
According to Santa, your "gift bag" will include these semiconductors: 2SA1303, IRF9530, 2SA1943, FJL4215, IRFP064N, FQA34N20, BUZ11A, IRFZ44, TIP32, TIP32, BD139, BD138, BYV29F, LM3886T, LM4708TA, LM4701, etc. Hence you don't need to purchase any of these.
I will ask one of the Elves to compile a complete list and send you in the next 24 hours or so. Santa wanted to keep it a "secret", but he will understand that all I am trying to do is to avoid you spending money on parts that are already on his list.
I checked my "Nordic account" for the tracking number - Nordic set the bar way upthere with this groupbuy - outstanding!
After little "research" (using Clusty - 100x better than Google IMHO) I got here: http://oraweb.sapo.co.za/track_trace/owa/item_scans.get_history?mail_id=rd100840555
The package was mailed on December 3rd and it is currently in transit. I guess we will both be clicking this link on a daily basis. I am hopeful the package will be delivered in DC before the 17th..
Well, I need to leave for the office (yes, I know it is Sunday), but I need to catch up with some work delayed by the snow early this week.
Cheers!

This is more than enougth folks..thank you very much
Many circuits and pleasant moments will come because of you folks.
Duda, Nordic and some local friends are already supplying enougth material to run a lot of amplifiers.
The list now is the amplifiers will be tested, the prototypes will be submited to crash tests and so on.
thanks a lot... also the BD139.
Also i will spend 100 dollares, and this will increase the stuff a lot.... as i can buy 2 BD139 by a single dollar here..... Phil is the mark there.... ahahahahah.... maybe Philips, or Philarmonica..... or something alike..
It is OK boys.... you can stop to worry... already supplied...thank you all.
regards,
Carlos
package arrived
Ed,
I went to the Post Office and among the many bits of junk mail was an envelope from you...many thanks to you, Nordic and Uncle Charlie (Obrigadao, Titio Carlos).
Holy S***! Now I have to learn how to build an amp from these little parts...
Ciao, Richard
Ed,
I went to the Post Office and among the many bits of junk mail was an envelope from you...many thanks to you, Nordic and Uncle Charlie (Obrigadao, Titio Carlos).
Holy S***! Now I have to learn how to build an amp from these little parts...
Ciao, Richard
Thank you Richard.... be free to call me into MSN
I can help you, and i will be glad to do it.
I have MSN, and using it daily you will be able to ask everything you need.... also you have my mail.
I am here, full time free, to support my friends, the Dx crew and the ones came more close.
panzertoo@yahoo.com
nanabrother@hotmail.com (MSN)
regards,
Carlos
Ag, its not so hard man...
Install components as per silkscreen...
Small resistors first (install R27 under PCB to leave clearance for large cap), then zeners as you want to leave some air clearance under the zeners...
Install wire links in position marked 'link1' and one from ground to the point marked 'to GND'
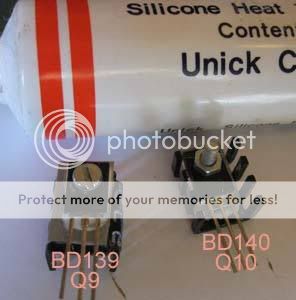
Then prepare the transistors, using the heatshrink tube.
Install heatsinks on driver transistors before soldering into PCB.
I only inlcuded 4 small pieces of insulation with the first kits, only use on the BD140 side incase there is a short with R27 (try to install high enough to leave some clearance), and use the other piece to insulate the bias servo (Vbe multiplyer), If you got six pieces just install them all.
Note orientation of transistors... they dont both go on same side of sinks...
Build the bias servo boards and attach useing the supplied pieces of wire... I will put pictures up a little later...
Install bias servo... use multimeter to measure between the two servo connection points and adjust servo trimpot until meter reads 3k ohms.
then use meter to measure from right leg of R5 (at 12v zener) and the left leg of R11 or 12, adjust R28 to about 6K ohms.
Install caps and prepare for final bias adjustment etc...
Install components as per silkscreen...
Small resistors first (install R27 under PCB to leave clearance for large cap), then zeners as you want to leave some air clearance under the zeners...
Install wire links in position marked 'link1' and one from ground to the point marked 'to GND'
Then prepare the transistors, using the heatshrink tube.
Install heatsinks on driver transistors before soldering into PCB.
I only inlcuded 4 small pieces of insulation with the first kits, only use on the BD140 side incase there is a short with R27 (try to install high enough to leave some clearance), and use the other piece to insulate the bias servo (Vbe multiplyer), If you got six pieces just install them all.
Note orientation of transistors... they dont both go on same side of sinks...
Build the bias servo boards and attach useing the supplied pieces of wire... I will put pictures up a little later...
Install bias servo... use multimeter to measure between the two servo connection points and adjust servo trimpot until meter reads 3k ohms.
then use meter to measure from right leg of R5 (at 12v zener) and the left leg of R11 or 12, adjust R28 to about 6K ohms.
Install caps and prepare for final bias adjustment etc...
PC board+ arrived!
The package with PC boards and other goodies arrived yesterday in Central Illinois.
Everything looked great and I want to add my thanks to Nordic for an impressive job - it clearly was a labor of love. Thanks also for the extra items that I did not even expect.
Of course, thanks very much to Ed for forwarding the US packages and to the man who started it all -- our friend Carlos.
My hat off to all of you -- real gentlemen!
Francois
Finaly got my HRII up and running again, the little protection board was quite particular over its resistor values and I had some issues with one channel clicking on and off until I got that resolved... All working fine, plus I did the mod of replaceing the 330R resistors with 220R ones. And I can recommend that you start off be swapping out those 330Rs for some 220s too, else you might come back and ask where the volume is, if you have a weak source or one that only likes large amp input impendances...
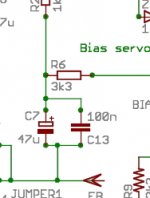
C7 is the bootstrapp condenser...it is very important, the second more important
part into the circuit...the first one is the Miller capacitor, the compensation one.... into the Voltage amplifier, the one i ask to use 150 picofarads, and to descend (reduce) the value if you want to have perfect trebles..... have to go reducing till oscilation starts, and them increase two steps into the standard capacitors value progression.
This condenser, C7 is there working for DC and AC..... one of its work is to stabilize the voltage there, turning the circuit more resistant to supply voltage variations.... the condenser's positive side will hold something alike 20 volts DC.
For AC, observe the condenser negative side goes to the output line.... there, into that line, the voltage will be oscilating, waving, variating, fluctuating, changing.... polarity will change referenced to the ground level..., variations of 50 volts peak to peak can appear there.... in some moments your negative output audio swing will measure 33 volts negative....and the condenser positive side will hold 20 volts positive for a good period of time... this means you will have 53 volts charging the condenser....this will result into a voltage bigger than the 20 volts it uses to have during stand by mode, iddle mode, when have no signal entering.. dinamically, this increase in voltage will affect the output stage performance... the bootstrapp effect.
The condenser will reach bigger voltage when operating... and, of course, will be crossed by audio...... the audio present at the speaker positive terminal will be sent back to the drivers... almost instantaneously.
It will be good idea to use a good brand on that position, also a 64 volts insulating voltage for it..... the condenser can be increased, but tests made shown me that values upper than 220uf are overkill there...not affecting audio reproduced....47uf and 100uf worked excelent in that position.
What the bootstrapp does..... it is a leather ring to hold your boot in place while you push your feet inside the boot..... the circuit does the same...the condenser charged hold the voltage to a value bigger than the normal voltage into the positive side... condensers are resistant to voltage variations...they use to stabilize, to hold voltage, to hold..to keep constant.... also the strapp into the boot hold the boot in place... them the audio will be injected the same way you feet enter the boot...with some energy...with bigger energy..with some violence...the bootstrapp effect.
The voltages informed here, are not precise, just as example...real life you will find plus or minus 20 percent differences on that.
regards,
Carlos
Attachments
- Status
- This old topic is closed. If you want to reopen this topic, contact a moderator using the "Report Post" button.
- Home
- Group Buys
- Destroyer x Amplifier DX HDII version.