The day's weather looks promising, a little cloudy, a little cool.
I get the speakers out to my shop to start prepping them for paint. Sand the baffles smooth with 320 paper in the sander. Mask out the body as this is already finished.
By the time I get this done, it starts to rain.
I get the bright idea to start painting one inside my shop. First coat goes on good. Dries in about 15 minutes. A few tiny specks of dust on the surface, but I figure "that's no big deal" and continue with two more coats.
By this time it's stopped raining, so I move it out. In the sunlight, I can see how much dust has landed in the paint. I'm not happy.
Here's the first astounding event of the day: I decide to take the chance and wet sand it smooth. The paint feels completely dry. Some water and 400 wet/dry paper. I sand it. I sand paint that I sprayed on less than 20 minutes before! Good luck doing that with any other paint (even aerosol spray cans).
Smooth again, I shoot on another coat. It's not hot out so I leave it in the sun. I have said in the past:"don't spray in direct sunlight". It does not apply to this paint. It's bone dry in less than five minutes! Unbelievable.
I finish this one with 3 more coats, then start on the second one. In less than 30 minutes, it's done - 6 coats (it's the one that had the repairs).
Clear goes on just as fast, drying in no time at all.
I'm definitely a convert, no more solvent based paint for me ever.
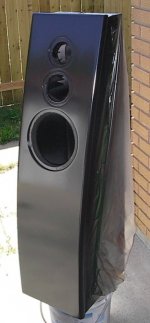
Here's the first after the last coat of black:
I get the speakers out to my shop to start prepping them for paint. Sand the baffles smooth with 320 paper in the sander. Mask out the body as this is already finished.
By the time I get this done, it starts to rain.
I get the bright idea to start painting one inside my shop. First coat goes on good. Dries in about 15 minutes. A few tiny specks of dust on the surface, but I figure "that's no big deal" and continue with two more coats.
By this time it's stopped raining, so I move it out. In the sunlight, I can see how much dust has landed in the paint. I'm not happy.
Here's the first astounding event of the day: I decide to take the chance and wet sand it smooth. The paint feels completely dry. Some water and 400 wet/dry paper. I sand it. I sand paint that I sprayed on less than 20 minutes before! Good luck doing that with any other paint (even aerosol spray cans).
Smooth again, I shoot on another coat. It's not hot out so I leave it in the sun. I have said in the past:"don't spray in direct sunlight". It does not apply to this paint. It's bone dry in less than five minutes! Unbelievable.
I finish this one with 3 more coats, then start on the second one. In less than 30 minutes, it's done - 6 coats (it's the one that had the repairs).
Clear goes on just as fast, drying in no time at all.
I'm definitely a convert, no more solvent based paint for me ever.
Here's the first after the last coat of black:
Attachments
These waterbased finishes dry so fast. The next day I start to colour-sand the baffles. (for those of you that don't know what "colour-sanding" is, it's wet sanding the surface of the paint with very fine sandpaper to make it super smooth, ready to be polished).
It's very hard, even after just a day. Sanding to get rid of the "orange peel" takes quite a while. I'm beginning to believe that it would probably be best to sand this finish as soon as it's dry, like within a couple hours.
I do a quick pass with the buffer, just to see how easy it will be to polish. What I see makes me a little concerned. The clear coat has gone slightly cloudy in sections (not sure why, but I have a few ideas). Also, the parts where the clear was clear, you could see the texture of the previously sprayed black underneath(orange peel, specks of dust).
I can see that the only remedy is to repaint yet again, this time using just the black waterbased urethane paint, and not the clear on top.
Sand the baffles with 320 paper, clean them up and mask out the body. Thin the black with as much as 40% water to get it the proper viscosity for spraying. This gives me 1 litre of paint for both baffles.
This amount of paint gives me 7 coats on each baffle. It takes less than a hour to spray both. It's a nice day, so I leave them out for a hour to dry.
Putting my previous experience to work, I decide to colour-sand only 2 hours after spraying on the last coat. Although waterbased, water will not dissolve this paint after it has dried. It's original purpose is for painting concrete floors in high traffic areas and damp locations. It's tough stuff.
Anyhow, it's a bit easier to sand and I get that done on both baffles. I was going to wait a day before polishing, but once again decided to push my luck.
Nothing to worry about, polished beautifully. Amazing, this is an entire process that would take as much as a month to do with solvent based paint, is done in a few hours with waterbased paint. And from what I can tell, the waterbased is a lot harder.
Closing in on dark outside when I finished, so couldn't get a decent picture (with my camera, the only good pics are ones taken outdoors).
Here's one I had just finished polishing, laying on a cushion on the floor. As usual, white spot are from my camera, not on the speaker.
Attachments
Ok, enough paint already. Time for some sound!
As I am now completely satisfied with the paint finish, I no longer have an excuse not to put the drivers in.
The question of the effectiveness of the midrange chamber treatment will be answered. Will these drivers play well together? Will the bottom end be as responsive as hoped?
Originally, I planned to use a moderate amount of stuffing in the woofer chamber, as the frequency response here is limited to 310Hz and lower. For 2-way speakers, I have had a dislike for total stuffing for a sealed box, in that it sounds to me as though the lower midrange and high bass are muffled, dead. For those, I liked a carpet lined box rather than a stuffed one, but driver response for 2-ways in most cases would be in the 2000Hz to 2500Hz range. Here, the woofer is not working as high.
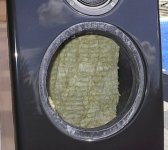
For these, I have a different idea. I have on hand some 4 inch thick "rockwool". I used it for sound deadening in the ceiling of my basement (dang kids make a racket ), so I had some leftover. I thought I'd cut pieces the same width as the inside of the box, and place them in the middle between front and back, thereby cutting the space in two. Worth a try I think.
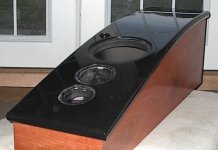
Here it is put in, leaving about 4 inches space in the front. 3inches at the bottom in the back, next to none at the top.
As I am now completely satisfied with the paint finish, I no longer have an excuse not to put the drivers in.
The question of the effectiveness of the midrange chamber treatment will be answered. Will these drivers play well together? Will the bottom end be as responsive as hoped?
Originally, I planned to use a moderate amount of stuffing in the woofer chamber, as the frequency response here is limited to 310Hz and lower. For 2-way speakers, I have had a dislike for total stuffing for a sealed box, in that it sounds to me as though the lower midrange and high bass are muffled, dead. For those, I liked a carpet lined box rather than a stuffed one, but driver response for 2-ways in most cases would be in the 2000Hz to 2500Hz range. Here, the woofer is not working as high.
For these, I have a different idea. I have on hand some 4 inch thick "rockwool". I used it for sound deadening in the ceiling of my basement (dang kids make a racket
), so I had some leftover. I thought I'd cut pieces the same width as the inside of the box, and place them in the middle between front and back, thereby cutting the space in two. Worth a try I think.Here it is put in, leaving about 4 inches space in the front. 3inches at the bottom in the back, next to none at the top.
Attachments
Installing the drivers is a bit of a nerve racking experience, demanding care with screws, screwdrivers and the speakers themselves, not to scratch the hard-gotten finish. Luckily, the Gods are on my side this time and all goes smooth.
I take the time to countersink all of the screw holes in the mounting flanges of the drivers. I like the screws to sit flush with the surface. It also looks more professional IMO.
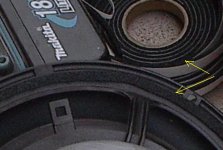
Bit of a tip for gasketing for the drivers. The ones that come with the driver (if any) are useless. I use open celled weatherstripping, the self adhesive kind. Bought at the hardware store (cheap), I get one that's about 3/8 inch wide by 1/8 inch thick. I then cut it down the middle to get pieces that are 3/16 " wide. This I stick to the back of the driver flange to make a beautiful seal.
Here's a pic showing what I mean. Arrows point to the roll of weatherstrip and the back of the woofer that I've put it on:
I take the time to countersink all of the screw holes in the mounting flanges of the drivers. I like the screws to sit flush with the surface. It also looks more professional IMO.
Bit of a tip for gasketing for the drivers. The ones that come with the driver (if any) are useless. I use open celled weatherstripping, the self adhesive kind. Bought at the hardware store (cheap), I get one that's about 3/8 inch wide by 1/8 inch thick. I then cut it down the middle to get pieces that are 3/16 " wide. This I stick to the back of the driver flange to make a beautiful seal.
Here's a pic showing what I mean. Arrows point to the roll of weatherstrip and the back of the woofer that I've put it on:
Attachments
MJL21193 said:I use open celled weatherstripping, the self adhesive kind. Bought at the hardware store (cheap), I get one that's about 3/8 inch wide by 1/8 inch thick. I then cut it down the middle to get pieces that are 3/16 " wide. This I stick to the back of the driver flange to make a beautiful seal.
Here's a pic showing what I mean. Arrows point to the roll of weatherstrip and the back of the woofer that I've put it on:
Looking good John.
I do take a small fraction of pleasure pointing out peoples errors because it makes me feel a little better about the hugh number that I make. So...
You want closed cell types ideally. Open cell = breatheable, closed cell = air tight.
Probably not an issue once in compression but if your gonna do it right and all that.
ShinOBIWAN said:You want closed cell types ideally. Open cell = breatheable, closed cell = air tight.
The black stuff he is using is closed cel (ay least the stuff you get at Home Despot). I've been using it for decades. Do note that some of the gaskets you get (ie the old Kef ones, and the ones that come with the Fostex drivers for example) are just fine.
dave
planet10 said:
The black stuff he is using is closed cel (ay least the stuff you get at Home Despot). I've been using it for decades. Do note that some of the gaskets you get (ie the old Kef ones, and the ones that come with the Fostex drivers for example) are just fine.
dave
I was going by this:
MJL21193 said:I use open celled weatherstripping,
ShinOBIWAN said:
Looking good John.
I do take a small fraction of pleasure pointing out peoples errors because it makes me feel a little better about the hugh number that I make. So...
Why, thank you Ant
Now, you are being too modest - you don't make any mistakes planet10 said:
The black stuff he is using is closed cel (ay least the stuff you get at Home Despot).
You are probably right Dave, though I got this at Canadian Tire. Open, closed, it makes a hellofa seal.
Any thoughts on my stuffing idea for the woofer chamber?
Throw in another pic for good measure. Tweeter and mid installed (with black open/closed weatherstrip for gaskets:
Attachments
MJL21193 said:Any thoughts on my stuffing idea for the woofer chamber?
rockwool -- what they used in dynacos. It works.
dave
planet10 said:
rockwool -- what they used in dynacos. It works.
Thanks Dave, though I specifically meant the arrangement (4" thick piece down the middle).
Lots of different lessons learned on this build, from the placement of the divider, to the smashed up corner. I need to learn to take nothing for granted, spend a little more time planning to ensure things go well.
An example: to run the wires for the tweeter and midrange, I needed to drill holes through the divider. I would have liked to have the wires at the back of the chamber. One problem: I can't fit my drill into the woofer opening. I needed to drill upwards, on an angle, near the front of the speaker to make the holes. Could have been so much easier to do before the front was put on.
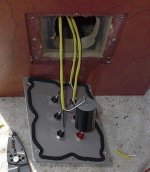
One of the things I did plan was the connection plate. I got my hands an some 3/16" aluminum that I cut into 4"x5.5" pieces to mount the banana jacks on. This mounting plate was really the only decent way to do it and it worked out very well.
Routed a recess in the back panel for the plate to sit flush.
All wired up, weatherstrip gasket in place (see how easy it is to form it into such complex shapes). The cap is an 11uF for tweeter protection. I could have put it here or the amp. Best to go here, that way if the cables get switched, my tweeter doesn't blow up.
Attachments
MJL21193 said:though I specifically meant the arrangement (4" thick piece down the middle). ]
Well the middle is certainly the most effective place for it. And being in the woof part of the box, its reflectrive nature at HF shouldn't be an issue.
dave
I now have these speakers fully assembled. The only thing lacking are appropriate spikes.
Overall, these represent some of the best work I've ever done. I am quite proud of the final result.
But how do they sound? Lagging behind the speakers is the active amps project. I have run into my fair share of problems with that project too. Sometimes, it feels like I'm fighting an uphill battle.
Still, these speakers were built to be actively driven and that means getting the active amp done before I can do any serious listening. To resort to a passive crossover for quick relief, I will not do.
With that said, I did listen to one speaker through the new amps (one channel is finished) and the results are very encouraging. I'll say no more until I can have both speakers operating in stereo.
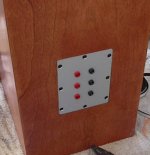
What was that you said? Another picture? Sure, no problem. This is the installed connection plate. Need to get some dry transfer letters to label the bananas.
Overall, these represent some of the best work I've ever done. I am quite proud of the final result.
But how do they sound? Lagging behind the speakers is the active amps project. I have run into my fair share of problems with that project too. Sometimes, it feels like I'm fighting an uphill battle.
Still, these speakers were built to be actively driven and that means getting the active amp done before I can do any serious listening. To resort to a passive crossover for quick relief, I will not do.
With that said, I did listen to one speaker through the new amps (one channel is finished) and the results are very encouraging. I'll say no more until I can have both speakers operating in stereo.
What was that you said? Another picture? Sure, no problem. This is the installed connection plate. Need to get some dry transfer letters to label the bananas.
Attachments
Very Very nice speakers.
I agree with your earlier view, when listening to music I dont see the speakers, the other 80% of the time there a piece of not unsubstancial furniture.
I was pointed here to get some ideas on finishes since the finish I was going to use reacted with my water based MDF sealer.
So thanks for the info, I shall pop by my local DIY supplier and try some water based floor paint. I require somthing that is quick drying, and this seems to fit the bill. I will be applying by brush though
Thanks marce,
The paint I'm using is urethane based, so that's what you should look for. I think Sherwin Williams is world wide (that's the brand).
Brushing or rolling it on can give similar results if time is spent sanding and polishing, if not, this paint has good gloss on it's own.
I wish you luck.
The paint I'm using is urethane based, so that's what you should look for. I think Sherwin Williams is world wide (that's the brand).
Brushing or rolling it on can give similar results if time is spent sanding and polishing, if not, this paint has good gloss on it's own.
I wish you luck.
The plate for the binding posts looks very professional.
Congrats on a quality job. The dedication and attention to detail really shows. Now all we need is some decent outdoor shot from all angles
I like your attitude - no rush. Way I see it is you you've waited this long so a few more weeks isn't going to make much difference. It'll be all the more sweeter.
Thanks John,
If the undercoat is done correctly its hard to get the top coats wrong in my experience (I've got wet'n'dry up to 2500 grit). I tried a MDF based piant with teflon, that gave a beautiful satin finish on bare MDF, butb reacted badley with sealed MDF (water based sealer). I can just imagine walking in with yet another type of finish for speakers ( i promised to do the bedroom sometime and 2 speaker builds past).
Must admit even though I'm a single driver/valve fan, I would love a set of 3-way actives for those mad occasions when I want to RAVE it up (at 40 ++++++) not a pretty sight, I am tempted, but would end up single If I even broached the subject. Maybe if I print some pictures of yours and leave them about she may say, oh darlin they'd look nice in the bedroom!!!
marce said:
I can just imagine walking in with yet another type of finish for speakers ( i promised to do the bedroom sometime and 2 speaker builds past)... she may say, oh darlin they'd look nice in the bedroom!!!
I know where you are coming from with the chores around the house. Most women don't get this obsession with audio. Trying to draw a parallel with some of the things they get obsessed with (such as those nasty Jerry Springer type talk shows, and their incessant need to buy new clothes they'll never wear) doesn't work.
ShinOBIWAN said:
Now all we need is some decent outdoor shot from all angles
I like your attitude - no rush. Way I see it is you you've waited this long so a few more weeks isn't going to make much difference. It'll be all the more sweeter.
The "decent" shots will have to wait till I get that new camera. My girlfriend has a better one, but in every relationship you have these love/hate phases. We in the hate phase right now, so I'll have to wing it.with my ole' reliable HP
I have a couple of shots that are not half bad, lacking in fine detail, due, in part, to the low res capability of the forums upload. I prefer to upload, as they will always be attached to the thread. I don't like looking through an older thread with links to pics that are no longer there.
Funny, I'm not know for my patience. Most who know me say the opposite.
On these, I did have a specific goal in sight, and would prefer not to sully the end result with band-aid half measures. I'll wait till the amps are done before using them.
Attachments
I've been busy with work and other pursuits lately. I have hit a bit of a road block on the active amps which I'm trying to work through.
The speakers sit here, still silent, waiting for a chance to sing.
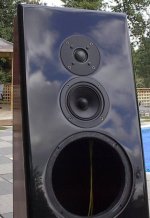
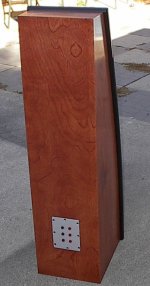
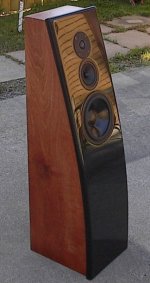
After my last post, I meant to post a pic of the front finished (like the back on the previous post). Here it is:
The speakers sit here, still silent, waiting for a chance to sing.
After my last post, I meant to post a pic of the front finished (like the back on the previous post). Here it is:
Attachments
- Status
- This old topic is closed. If you want to reopen this topic, contact a moderator using the "Report Post" button.
- Home
- Loudspeakers
- Multi-Way
- Construction journey-Active 3-way