Hi Bob,
Ahha, I've been wondering how people get the thumbnail images. It didn't occur to me that you could upload them without attaching them and they would show as thumbnails. A much better way to do things! Thank you!
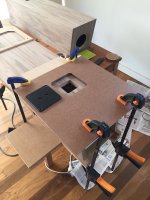
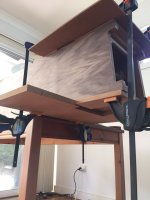
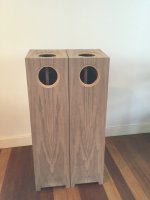
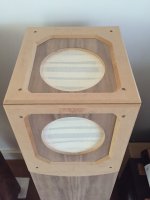
I've been beavering away and have now veneered the whole cabinet, routed out the diver holes. First with a flush trim bit and then with a carbide trimmer bit. One good thing about the deep recess needed for MA drivers is that I didn't have to grind down the tip for it to work!
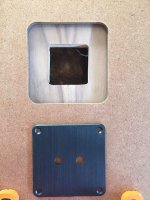
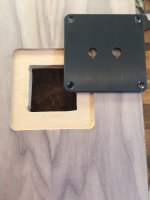
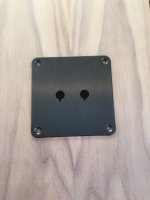
I also used the inlay guide kit to recess the binding post plate. It took a bit of ingenuity to get the clamps to hold the template well enough to keep it from shifting. I got there in the end but I was a little worried. As you can see the top clamps did not have much purchase and I didn't want to damage the cabinet.
Ahha, I've been wondering how people get the thumbnail images. It didn't occur to me that you could upload them without attaching them and they would show as thumbnails. A much better way to do things! Thank you!
I've been beavering away and have now veneered the whole cabinet, routed out the diver holes. First with a flush trim bit and then with a carbide trimmer bit. One good thing about the deep recess needed for MA drivers is that I didn't have to grind down the tip for it to work!
I also used the inlay guide kit to recess the binding post plate. It took a bit of ingenuity to get the clamps to hold the template well enough to keep it from shifting. I got there in the end but I was a little worried. As you can see the top clamps did not have much purchase and I didn't want to damage the cabinet.
Attachments

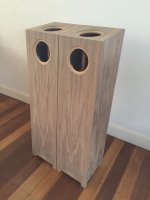
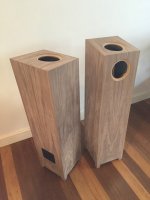
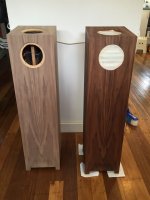
And now some pics of the cabinets with everything done.
I have a few issues that I will need to rectify before finishing.
I have a few issues that I will need to rectify before finishing.
- I managed to get a tiny chip in the veneer down at one of the feet after getting too cocky with how easily the veneer was trimming. That'll teach me! This will have to be fixed prior to finishing. I think I can sort this relatively easily....
- The second and more worrying thing is that I tried the fit of one of the drivers, it slid in all the way and looked good. It was definitely a friction fit on the way in but not tight by any means and looked perfect. It was obviously, however, too tight as it was 'very' hard to get out again. As it came out, with great care and a lot of pressure, the veneer lifted in two places. The veneer is no longer visible as having lifted with the driver removed, i.e. it does not look like a veneer bubble - it is lying flat. I tried using the iron again but it has been too long for the glue to reactivate. I am sure I will need to glue this down properly before finishing. Does anyone have any top tips on the best way to do this? Inject wood glue, press to remove excess, let dry and then re-iron for a good even bond...?
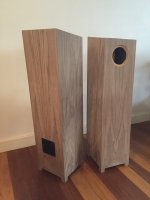
- This brings me to the last question, should I enlarge the driver hole? Can experienced builders let me know if there should be any friction on the side of the driver at all? Should the driver spin freely, have a little friction or a lot is ok as long as it fits? Are there any sonic implications to the way the driver fits?
Attachments
Andy,
IMHO best fit for the driver would be if it falls in and comes out freely, but there is no visible gap between driver basket edge and the hole. This is usually achieved if the driver recess is around 1mm greater in radius vs the driver basket...
For your case, maybe a light sanding on the insides of the recess will help... but be careful - your build material is MDF, and MDF sands down pretty easily - so easy to get the recess out of shape. Maybe a few of the woodworking experts can chime in.")
IMHO best fit for the driver would be if it falls in and comes out freely, but there is no visible gap between driver basket edge and the hole. This is usually achieved if the driver recess is around 1mm greater in radius vs the driver basket...
For your case, maybe a light sanding on the insides of the recess will help... but be careful - your build material is MDF, and MDF sands down pretty easily - so easy to get the recess out of shape. Maybe a few of the woodworking experts can chime in.
as Zia notes - a little tolerance (.5-1mm) is always nice for a recessed driver with this thick a flange - too snug and they can be a bitch to remove.
You could lightly sand the cutout with 80G sandpaper. On occasion I've had to correct for exactly the same situation, With that many holes to adjust, and since they're already veneered, I'd take the time to fabricate a disc approx 1mm smaller than the driver, contact cement a strip of 80G paper to the full perimeter, and attach a small block handle to allow for rotating in the recess. Stuff with newspaper or rags to reduce the dust into the box.
Proceed slowly , test fitting each cut-out until driver can just spin.
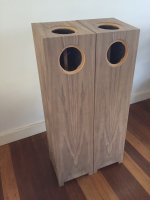
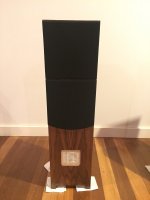
nice work on the grain alignment!
You could lightly sand the cutout with 80G sandpaper. On occasion I've had to correct for exactly the same situation, With that many holes to adjust, and since they're already veneered, I'd take the time to fabricate a disc approx 1mm smaller than the driver, contact cement a strip of 80G paper to the full perimeter, and attach a small block handle to allow for rotating in the recess. Stuff with newspaper or rags to reduce the dust into the box.
Proceed slowly , test fitting each cut-out until driver can just spin.
nice work on the grain alignment!
Chris, really easy to crack out a sanding block as per your directions. It was far more effective and controllable than my previous block which was the cut-off from the center of the hole and so a much smaller diameter block. Also easier to keep the circle completely round as the diameter is almost exactly the same as the driver, easy to see and variation visually with this set up. I also previously used a lower grit sandpaper as I was worried about keeping the hole clean etc. 80 grit worked perfectly! Thank you.
Here are also some pics of the cabinets as the danish oil starts to be applied. Beautiful colours coming out with the oil. As more coats go on it is really starting to look nice. I did a few test blocks and I think 5-6 wet sands will be needed to completely fill the pores and get a flat surface.
Here are also some pics of the cabinets as the danish oil starts to be applied. Beautiful colours coming out with the oil. As more coats go on it is really starting to look nice. I did a few test blocks and I think 5-6 wet sands will be needed to completely fill the pores and get a flat surface.
Attachments
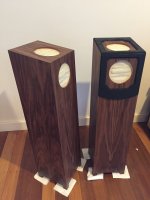
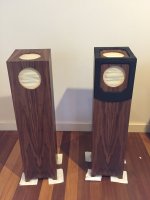

Looking good. I'm a sucker for walnut, and I think the Castle design is pretty cool too.
Filling pores by sanding back isn't the most efficient approach, btw. Do be careful not to sand through your veneer in the process. It's easy to do, and obviously it ruins everything.
Yeah, that's basically it. Dilute the glue a little to make it runny enough to get in there. After squirting it in, mop it up with a damp rag, and let it partially set, then iron. Don't let it fully cure. Personally, I would not recommend CA (krazy) glue for this. It stains things very easily.
I'm a sucker for walnut, and I think the Castle design is pretty cool too. Filling pores by sanding back isn't the most efficient approach, btw. Do be careful not to sand through your veneer in the process. It's easy to do, and obviously it ruins everything.
The veneer is no longer visible as having lifted with the driver removed, i.e. it does not look like a veneer bubble - it is lying flat. I tried using the iron again but it has been too long for the glue to reactivate. I am sure I will need to glue this down properly before finishing. Does anyone have any top tips on the best way to do this? Inject wood glue, press to remove excess, let dry and then re-iron for a good even bond...?
Yeah, that's basically it. Dilute the glue a little to make it runny enough to get in there. After squirting it in, mop it up with a damp rag, and let it partially set, then iron. Don't let it fully cure. Personally, I would not recommend CA (krazy) glue for this. It stains things very easily.
My comment on sanding / filling to "smooth" wasn't so much a concern about sanding through - definitely a risk with paper backed flexible types- the actual wood is a "thin blonde thick", but more my taste for retaining a bit of the open pore structure of species such as Walnut, Beech, the various mahoganies, etc. One extra layer of clear top coat can be enough to spoil the look for me, and render a finished look more like a plastic laminate.
For my money, the ugliest finish I've seen on a commercial product is on the higher end AudioNote E models - some very interesting and rare veneers finished with what looks like an 1/8" thick of clear polyester. Just me, I guess.
For my money, the ugliest finish I've seen on a commercial product is on the higher end AudioNote E models - some very interesting and rare veneers finished with what looks like an 1/8" thick of clear polyester. Just me, I guess.
Yeah, I just thought I'd add that little tip, as it is pretty easy to sand through veneer.
Usually my preference is to keep oil finishes open pore. Gloss lacquer and gloss varnish OTOH must (IMHO) be pore filled or they look really silly. Polyurethane (technically a type of varnish) always looks like plastic to me and I don't use it.
Obviously, the important thing is to do what you like....
Usually my preference is to keep oil finishes open pore. Gloss lacquer and gloss varnish OTOH must (IMHO
) be pore filled or they look really silly. Polyurethane (technically a type of varnish) always looks like plastic to me and I don't use it.Obviously, the important thing is to do what you like....
Greg, FWIW, the duller sheen ( ie. 15 dg) lacquer / conversion finishes I tend to like can look very much like a rubbed in oil finish, and as I've said before, I'm a lazy prik who happens to work in a commercial shop, so spraying is much faster. That might change if I retire before totally loosing the ability to hack a box together.
Yer "obviously" remark is quite right, of course.
Yer "obviously" remark is quite right, of course.
For my money, the ugliest finish I've seen on a commercial product is on the higher end AudioNote E models - some very interesting and rare veneers finished with what looks like an 1/8" thick of clear polyester. Just me, I guess.
Some of the AN-E finishes don't look like wood at all. Those are the one's that bug me. They look more like some kind of arborite laminate, than real wood. Spending big money on something that looks like a kitchen counter-top just doesn't seem right to me. I guess it's just an old geezer thing.
BTW, I kinda like a deep shiny lacquer wood finish.
jeff
I am so close to the line. It would be very easy to drop the drivers in now but I know as soon as I do that I will not get the details sorted!
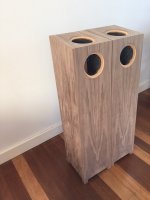
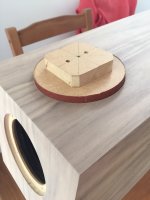
Here are some pics of the grills. They can be stored on the back of the cabinet as well as over the drivers.
Here are some pics of the grills. They can be stored on the back of the cabinet as well as over the drivers.
Attachments
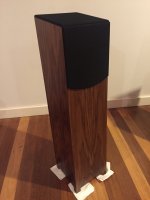
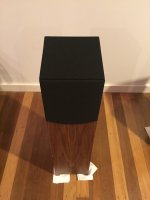
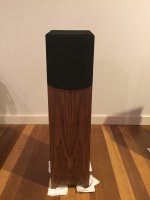
They can be stored on the back of the cabinet as well as over the drivers.
That's a great idea.

jeff
- Status
- This old topic is closed. If you want to reopen this topic, contact a moderator using the "Report Post" button.
- Home
- Loudspeakers
- Full Range
- Castle Microtower Build