mmmm. How're the Z-horns? I have some dirt cheap drivers here I have pondered making a z-horn for but I don't know if it's worthwhile. ")
On subject...
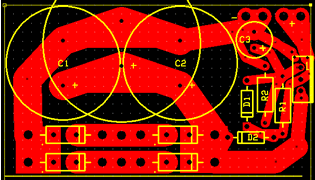
Non-inverted board and inverted board layouts with care to keep all the power, inputs, and outputs in the same spots...
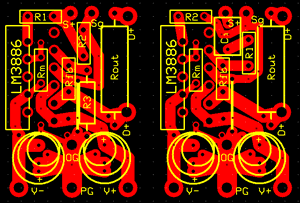
I believe this all has the right schematics. I have holes for a bypass cap if you choose, as well as a zobel. Both of these would "float" above the board, but since they're optional things that most don't use and whatnot...
One of the design goals here was to make these "stackable" so you could bridge or parallel the circuits by running solid core through the inputs and outputs (turn a mess on their side for a standard case). I believe that has been achieved here. R1 on the NI board might get switched to a cap when run bridged, and R2 would get left off the NI if you parallel them, with a resistor run right at the input to ground I think. Maybe.
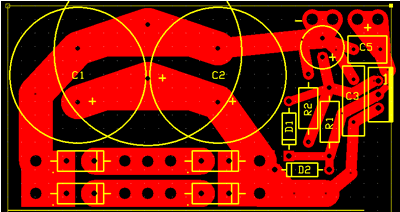
Regulated power, with the reg moved further away and the space used for (optional) additional caps (C3 and C5). This is just one side.
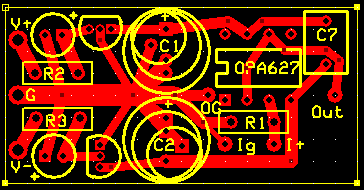
The OPA627 buffer option has had no comments, so I assume (dangerous I know) it's OK. Using schematic by Carlos.
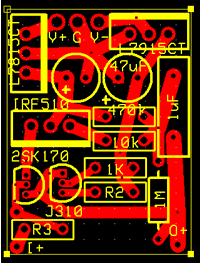
And JFET buffer, first pass, using Pedja's circuit...
I will very likely be looking to etch some of these and try them out in the semi-near future, so any additional feedback would be most welcome - particularly, significant mistakes pointed out would be helpful.
C
On subject...
Non-inverted board and inverted board layouts with care to keep all the power, inputs, and outputs in the same spots...
I believe this all has the right schematics.
I have holes for a bypass cap if you choose, as well as a zobel. Both of these would "float" above the board, but since they're optional things that most don't use and whatnot...One of the design goals here was to make these "stackable" so you could bridge or parallel the circuits by running solid core through the inputs and outputs (turn a mess on their side for a standard case). I believe that has been achieved here. R1 on the NI board might get switched to a cap when run bridged, and R2 would get left off the NI if you parallel them, with a resistor run right at the input to ground I think. Maybe.
Regulated power, with the reg moved further away and the space used for (optional) additional caps (C3 and C5). This is just one side.
The OPA627 buffer option has had no comments, so I assume (dangerous I know) it's OK. Using schematic by Carlos.
And JFET buffer, first pass, using Pedja's circuit...
I will very likely be looking to etch some of these and try them out in the semi-near future, so any additional feedback would be most welcome - particularly, significant mistakes pointed out would be helpful.
C
cjd said:mmmm. How're the Z-horns? I have some dirt cheap drivers here I have pondered making a z-horn for but I don't know if it's worthwhile.
Very nice, actually. The're easy to listen to and have decent bass for such a small driver. I have a slight echo quality, but I did not add any material in the horn to control higher frequency reverb. I suspect a little felt in the comp. chamber and in the mouth will tame that quite well. I found them worthwhile, but it is a bit of work to cut and fit all the pieces. You might find they work will with your drivers, but if not you can always get some better ones for not too much.
Sheldon
CJD:
Some of those boards are like works of art -especially the 3886 boards!I'm talking visually- what do I know about circuits? - the next paragraph will prove it
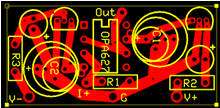
On The OPA 627 Carlos board, the upper regulator has the center lead to ground, the lower doesn't. I assume that's because they are 2 different parts and are wired differently? (Otherwise I assume you'd have them facing in the same direction)
Some of those boards are like works of art -especially the 3886 boards!I'm talking visually- what do I know about circuits? - the next paragraph will prove it
On The OPA 627 Carlos board, the upper regulator has the center lead to ground, the lower doesn't. I assume that's because they are 2 different parts and are wired differently? (Otherwise I assume you'd have them facing in the same direction)
Well Variac, this'll prove it for you. Maybe. I have a degree in Fine Art (drawing). I like solving puzzles, especially visual types. And I can (usually) read a schematic.
Yes, different chips for each of the regs - actually, that's the case on both buffer boards. I do believe that is the usual way, though not an available option on the chip power boards so they use the same reg for both rails.
C
Maybe. I have a degree in Fine Art (drawing). I like solving puzzles, especially visual types. And I can (usually) read a schematic.Yes, different chips for each of the regs - actually, that's the case on both buffer boards. I do believe that is the usual way, though not an available option on the chip power boards so they use the same reg for both rails.
C
Ha! caught you- you visual guy you!!!
I knew they were different parts, I just was wondering if the pins were wired differently. On Carlo's schematic, the leg to ground is the center one, and on your lower reg I didn't think it was, BUT I didn't look up the part....and I don't know the conventions... BUT I did suspect you were wiring the regs differently consiously since one is 90 deg different iorientation than the other.
Actually they I think they could both face the same direction and the traces would work out...
You'd better take a look at that schematic again and read pin numbers on it. At least, that's why I have it the way I do (and I did check the data sheet which, IIRC, checks out as I have it as well).
Yes, I could have them "face" the same way, but the traces wouldn't be as clean. No reason for that with these regs.
C
At least, that's why I have it the way I do (and I did check the data sheet which, IIRC, checks out as I have it as well).Yes, I could have them "face" the same way, but the traces wouldn't be as clean. No reason for that with these regs.
C
pin numbers - that's the ticket!!
When I said "I caught you" I meant the artist part - not that the pins were wrong.
Any way I am visualizing a medium sized board with scoring that can be broken into all your small boards as required. Then everyone can play with inverted with buffer, NI with buffer, regulators. A regular Child's Garden of Chip Amp Topographies!!
Whooeeee!
Variac said:
Any way I am visualizing a medium sized board with scoring that can be broken into all your small boards as required. Then everyone can play with inverted with buffer, NI with buffer, regulators. A regular Child's Garden of Chip Amp Topographies!!
Whooeeee!
That's what I was hoping to sucker (err, entice) someone into doing. Seriously though, it would be pretty cool - the all out (close to all out anyway, cause there's always another tweak waiting in the wings) chip amp for beginners and neat freaks, and those who want design art on the inside of their projects. Oh, and if you want the hassles of dealing with the DIY public, consider this an order for a set (pedja buffer, reg board, amp board, especially if it's for the 3886 (for the mute).
Sheldon
Possible group buy?
Hi All-
I will ask BrianGT where he gets his boards made(best I have seen or worked with so far) and see if I can have some of these made.
Only concern is have these circuits (which look great) been proofed to see if they are ready for mass production in a GB?
Also, can we get a show of hands on how many people would be interested?
A simple post with "I'm in for one" will suffice. If we get a good response we can start an order thread with all the formal details.
Thanks,
Troy
OPA627
Hi CJD,
C2 should be near pin4 on the op-amp, and not on the opposite side.
When I mean near the op-amp's PSU pins, I really mean near .
So, I suggest that you move C2, along with the reg and it's input cap too.
The reason to move the reg is that you should have caps near it's input and output pins. If you just move C2, you should ideally use an extra bypass cap on the reg's output.
Sorry, I know that with my suggestion you will have to make some major changes on that board...
But, believe me, it's worth the trouble.
Oh, btw, you may also find space, really on the op-amp's pins, to use 0.1uf multi-layer ceramic caps (from + to ground, - to ground).
Those caps are very small, just use them before the electrolythics.
Make it as tight as possible!
Re: Possible group buy?
I just sent you a reply about this, and am willing to provide help if you need it. I forgot to mention that Advanced Circuits also has a cheap prototyping service, www.33each.com , where you can get a single 85sq in board made for $33 (min order 3, and lot fee of $50 charged for multiple designs on a single pcb). I used their service for my cdpro2 project:
http://www.briangt.com/gallery/cdpro2-pcb2/uncut_pcbs
The boards are 1 oz copper, but are otherwise fully featured, and you can fit quite a few boards on the 85 sq in. It comes out to $150 shipped for 3 - 85 sq in boards with as many designs as you can fit on them.
As for checking interest in a possible order, a Wiki might be good for this.
As for the boards, I would recommend packaging all the boards together on a single pcb with scoring, much like the LM3875 boards I put together. This should lower the costs a lot, and make shipping much easier, having only a single pcb.
Here is the reply that I sent to Troy, if anyone else wants the board information I sent him:
Also, paypal has a great shopping cart system that is very easy to use for organizing such orders. I could provide help you set one up.
One more thing: for ordering pcbs, there is no real cost difference between single and double sided pcbs, so you shouldn't constrain the designs to a single layer, if the routing would be more optimal on 2 layers. Just a suggestion.
--
Brian
Troy,rabstg said:Hi All-
I will ask BrianGT where he gets his boards made(best I have seen or worked with so far) and see if I can have some of these made.
Only concern is have these circuits (which look great) been proofed to see if they are ready for mass production in a GB?
Also, can we get a show of hands on how many people would be interested?
A simple post with "I'm in for one" will suffice. If we get a good response we can start an order thread with all the formal details.
Thanks,
Troy
I just sent you a reply about this, and am willing to provide help if you need it. I forgot to mention that Advanced Circuits also has a cheap prototyping service, www.33each.com , where you can get a single 85sq in board made for $33 (min order 3, and lot fee of $50 charged for multiple designs on a single pcb). I used their service for my cdpro2 project:
http://www.briangt.com/gallery/cdpro2-pcb2/uncut_pcbs
The boards are 1 oz copper, but are otherwise fully featured, and you can fit quite a few boards on the 85 sq in. It comes out to $150 shipped for 3 - 85 sq in boards with as many designs as you can fit on them.
As for checking interest in a possible order, a Wiki might be good for this.
As for the boards, I would recommend packaging all the boards together on a single pcb with scoring, much like the LM3875 boards I put together. This should lower the costs a lot, and make shipping much easier, having only a single pcb.
Here is the reply that I sent to Troy, if anyone else wants the board information I sent him:
Troy,
I get all my boards made from Advanced Circuits:
www.4pcb.com
They have a great website for checking your design files for free:
www.freedfm.com
You just need to zip up the gerber files and upload them on that website.
As for the red soldermask, it costs an extra $150 for the entire order, but I really like the look it provides. They also have black and blue. Green is standard with no additional cost.
As for the whole idea of a competing project, don't worry about it. These kits are just a hobby to me, and I have a normal, full-time job. I don't make huge profits from the kits, so I am not worried at all about losing money from a competing product. I would rather see more cheap, easy to build kits/projects out there to help people experience the joys of DIY. I wouldn't mind trying new things myself. I never stated that my kits are the best sounding amplifier out there, but they are certainly very easy to build and a great way to get started in a diy amplifier.
As for ordering boards, it should be pretty straight forward, but feel free to let me know if you have any more questions, or need help. If you are organizing the orders, I can provide advice. One thing to consider getting multiple boards on a single pcb, and having scoring on it, like my gainclone boards. It doesn't cost too much more.
Wishing you the best, and good luck with this,
--
Brian
----- Original Message -----
From: Troy St. Germain
To: 'Brian Bell'
Sent: Tuesday, July 20, 2004 8:23 AM
Subject: PCB manufacture for GB on boards.
Hi Brian-
I am looking at doing a group buy for some boards for the forum. I have REALLY liked working with the boards I purchased from you and I would like to have the same manufacturer make these.
So the questions are:
1. Would you share your manufacturer information for products that do NOT compete with yours?
2. If not, would you consider having an order of these boards made for us?
Several of us would like to try the different buffers and the regulated pwr supplies.
Also, paypal has a great shopping cart system that is very easy to use for organizing such orders. I could provide help you set one up.
One more thing: for ordering pcbs, there is no real cost difference between single and double sided pcbs, so you shouldn't constrain the designs to a single layer, if the routing would be more optimal on 2 layers. Just a suggestion.
--
Brian
Franz G said:Carlos
Why do you use ceramics for this purpose? Just because the datasheet mentions ceramics?
O.K., they are small. But don't you think, good film caps are better for this application?
Franz
Forget the datasheets, as they also advice to use tantalums.
You can use films of course.
But they are bigger, and then the electrolythics won't be as near as they shoud.
These op-amps like capacitance near them.
Ceramics bypass to higher frequencies than film caps, but the main point here is to have all the caps as near as possible to the op-amp's PSU pins.
Yes, you can throw away the good sound of the OPA627 by not doing this.
With veroboard I put ceramics inside the socket
, and the electros so close that I have difficulty in changing an op-amp. OPAs will reward you with fantastic sound if you know how do deal with them.

Other op-amps (like AD) work fine with "normal" layouts seen on most commercial products.

But they also like to be well treated.
Carlos: thanks for the tips. Expect another version soon.
I'm trying to allow for close coupling of the bypass caps at/near the chip pins while providing for a more "convenient" spot for the more "lazy" folks. On the amp boards I just allowed for placement without "room" on the top (underside would work - in fact, I think I can place the holes closer in that case! glad you said something. More tweaks.) - I will do this for the bypass caps on the buffer too. As to moving the other caps near the chip, see above - I'm working on it. It makes perfect sense to me now, so that must be a tidbit I picked up without quite ever grasping it fully.
My goal is to etch this stuff myself for trials, make any modifications if needed, then release printable artwork as well as contribute to any group buy effort that may happen. I would want to make sure that the contributors are credited properly (Pedja and Carlos in particular for their schematics, me for the artwork) and a few other things relating to any group-buy effort as well. I think blue PCBs would be pretty slick. Or black. . .
Brian: I had gone the double-sided route at one point and the request was made to go single so people could etch these themselves. I would definitely clean some things up by going double sided if a group-buy does go forward.
C
Expect another version soon.I'm trying to allow for close coupling of the bypass caps at/near the chip pins while providing for a more "convenient" spot for the more "lazy" folks. On the amp boards I just allowed for placement without "room" on the top (underside would work - in fact, I think I can place the holes closer in that case! glad you said something. More tweaks.) - I will do this for the bypass caps on the buffer too. As to moving the other caps near the chip, see above - I'm working on it. It makes perfect sense to me now, so that must be a tidbit I picked up without quite ever grasping it fully.
My goal is to etch this stuff myself for trials, make any modifications if needed, then release printable artwork as well as contribute to any group buy effort that may happen. I would want to make sure that the contributors are credited properly (Pedja and Carlos in particular for their schematics, me for the artwork) and a few other things relating to any group-buy effort as well. I think blue PCBs would be pretty slick.
Or black. . . Brian: I had gone the double-sided route at one point and the request was made to go single so people could etch these themselves. I would definitely clean some things up by going double sided if a group-buy does go forward.
C
C, you are doing excellent work. Have I ever mentioned that, my sister lives in the Windy City too? My nephew too (the best kid in this world...). My sister’s husband works for the firm named Windy City.
I was pretty busy these days, but will look at the layout (which seems quite nice at the first sight) later today.
Pedja
I was pretty busy these days, but will look at the layout (which seems quite nice at the first sight) later today.
Pedja
Ok, looked at it a bit… it still looks nice though I have a few thoughts.
The C3 on the regulator board, if used (if there is need), is good to be close to the regulator but as long as we consider it as an optional component I would give higher priority to R1. Incoming and outgoing traces around the reg itself are narrowing, I guess that is just an oversight.
The JFET buffer board is good and it would probably work well, only gate and source resistors on J310 are swapped. The resistor 1M may be put in raw with (below) these J310’s resistors and 1uF cap may be dragged down, the cascode will became tighter. You can also escape certain wiggle between 2SK170 and J310 if you rotate J310 for 180 degrees.
Do I understand well the amps themselves, inverting amp do has an input cap but non-inverting does not?
Pedja
Here we go again. Bypass caps are not on-board at all, though holes are provided if you choose to mount under the board, or you can mount straight to the pins or whatnot. The 1M resistor is rear-mounted. There's room to slide it over and mount above the two resistors if that would be preferable.
One thing I'm not quite clear on: Pedja said: "Incoming and outgoing traces around the reg itself are narrowing" - if this refers to the traces getting narrow to clear the other reg pins, a question: Is it better to have smaller traces that are consistent in size vs. thicker and narrow right at the reg? My understanding was the latter gave most of the capacity of the thicker traces while still reaching the pins.
I can certainly narrow those traces so they're the same size the whole way.
C
Bypass caps are not on-board at all, though holes are provided if you choose to mount under the board, or you can mount straight to the pins or whatnot. The 1M resistor is rear-mounted. There's room to slide it over and mount above the two resistors if that would be preferable.
An externally hosted image should be here but it was not working when we last tested it.
One thing I'm not quite clear on: Pedja said: "Incoming and outgoing traces around the reg itself are narrowing" - if this refers to the traces getting narrow to clear the other reg pins, a question: Is it better to have smaller traces that are consistent in size vs. thicker and narrow right at the reg? My understanding was the latter gave most of the capacity of the thicker traces while still reaching the pins.
I can certainly narrow those traces so they're the same size the whole way.
C
 away at it....
cjd said:Brian: I had gone the double-sided route at one point and the request was made to go single so people could etch these themselves. I would definitely clean some things up by going double sided if a group-buy does go forward.
C
If boards do not become available, I'll probably try etching some. I know nothing about it, but if you can etch one side, why not two? Aren't the only extra requirements be that one side is protected while the other etched and that the respective patterns be reasonably well mated? Can't be that hard for a small board? I like the idea of compact layouts (just because).
Sheldon
- Status
- This old topic is closed. If you want to reopen this topic, contact a moderator using the "Report Post" button.
- Home
- Amplifiers
- Chip Amps
- Any interest in GC input buffer and power supply regulator pcb's?