Delighted to find this.
I have a pair of the cast 15's in the 5.6 box with one large port.
They're my favorite speaker so far, and my first full range project, I don't think I would be interested in going back to a three way, somehow the three way seems boring in comparison.
I tried them side by side with my Monitor Audio GR60's and the GR60's just sucked the life out of the music.
When they first arrived took them out of the boxes and ran them just sitting on the floor. I can still remember how it sounded, the track was Rebeca Pigeon: Spanish Harlem, it was like she was in the room,,, really open and breathy but no bass of course.
In the boxes they are wonderful with Streisand and almost anything with a beat makes you want to dance,,,,, that's been embarrassing once or twice when you discover you have an audience.
They can be a bit harsh with some things up top Tommy Flemming would bore holes in your brain with these.
Anyway good luck with them, I'm looking forward to seeing how it turns out!
Ray
Member
Joined 2009
Paid Member
If you are attempting a constrained layer, you need something that is resilient. PVA is not the answer. A cheap and good answer is "Liquid Nails" Spread it with a notched trowel. You will need to only apply moderate pressure while the glue is drying. Too much pressure will make the glue layer too thin.
Bob
I checked out the MSDS sheet for the interior projects liquid nails. Looks familiar, it's acrylic polymer and chalk (limestone they call it) and an additional filler of clay.
Bearing in mind that in general, when you see a glue labelled as latex, it's actually synthetic latex, and the really good stuff is made out of acrylic (just like high-end latex paint). So perhaps it's not a stretch to say that liquid nails is yet another 'latex-type' glue loaded with chalk - with the twist that it has some clay in there too.
Silicone looks like another option of course.
I'll use one or the other to make my constrained layer enclosure. The driver is mounted only to the inner baffle and I believe it will be possible to design the box so that the outer layer remains separated from the inner box by only the layer of glue. Worse case it'll be no better than extra thickness of ply, but I'm confident I'm going to get a lot more benefit than that

I was looking at the driver again - the cast basket is really solid, I'm not sure that a plywood brace to the magnet is going to add any value at all although for my other speaker projects I've always included it, those drivers appear to be nowhere near as solid as this beast.
Member
Joined 2009
Paid Member
I was looking at the driver again - the cast basket is really solid, I'm not sure that a plywood brace to the magnet is going to add any value at all although for my other speaker projects I've always included it, those drivers appear to be nowhere near as solid as this beast.
Then you do not yet understand the purpose of that brace. It isn't for the driver it is for the box.
dave
Then you do not yet understand the purpose of that brace. It isn't for the driver it is for the box.
Hey Dave can you talk more about this. If there is a shelf type brace directly below the cut out, is their still benefit in doing this?
holey brace time!!!! Heres dave's own words "The brace's prime purpose is to draw energy away from the driver so that it is shared with the back of the box and not all dissipated by the baffle" http://www.diyaudio.com/forums/full...inet-mark-audio-alpair-7-3-a.html#post2765437
And potentially it could brace the driver to several sides of the cabinet given a large enough holey brace - potentially top, bottom and back at the same. I think dave's preference is for the brace to be offset slightly as well.
Hope that helps
When you say cutout I assume you mean the driver cutout and the brace runs horizontally L to R across the box. If so yes, the brace will make a difference as the vibration that is usually absorbed & radiated by the front panel can be shared with the back of the cabinet too (top & bottom can also be added)
in my Emken build the brace made a massive difference. Its not as large a box as yours but the sidewalls are essentially 2.25" thick and it still made an audible difference
in my Emken build the brace made a massive difference. Its not as large a box as yours but the sidewalls are essentially 2.25" thick and it still made an audible difference
MH,
I know of numerous references where sound improved as a result of bracing the driver from behind. HOw you do it is up to you. I know in his smaller Onken creations, Dave uses a vetical bracer, offset to one side of the center plain, as a way of both bracing the driver and killing standing waves inside the box.
I know of numerous references where sound improved as a result of bracing the driver from behind. HOw you do it is up to you. I know in his smaller Onken creations, Dave uses a vetical bracer, offset to one side of the center plain, as a way of both bracing the driver and killing standing waves inside the box.
What about this one?
What is people's opinion about this type of driver bracing?
As the retaining screws are coming thru the baffle from front to back and that brace is pushing forwards isn't it just trying to dislodge them and bend the frame? especially as its 1 bar fixed on 2 opposing sides of the circle.
I've always fancied a disc of metal on the front the driver to spread the loading. Then very long purpose made stainless threaded bolts countersunk into the metal disc. These pass thru the front baffle and the back of the cabinet. Then another metal disc to spread the load and nice big nuts to be torqued up. Ah the dreams
Member
Joined 2009
Paid Member
So if the cutout has a shelf brace directly below it, is the driver brace still critical?
Is the reward worth the effort (or vice versa)?
this seems just as viable to me - if there's a shelf brace connecting the front panel to the other panels just below the mounting of the driver then it essentially couples the driver to all sides of the box. Perhaps even better than a brace to the magnet since the shelf-brace is glued solidly to the front baffle and the cast frame of the driver is in turn, bolted solidly to the front baffle. A brace on the driver can only press against the smooth surface of the magnet. I was thinking though, that with a heavy magnet a vertical brace could take some of the weight off the frame by supporting the magnet directly and equalizing the force on the drivers mounting bolts a little. Leaving off the driver brace allows an easier upgrade to the AlNiCo version too!
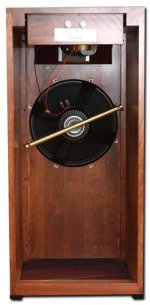
That brass bracing rod on the Yamamoto looks somewhat cosmetic to me.
MH,
I know in his smaller Onken creations, Dave uses a vetical bracer, offset to one side of the center plain, as a way of both bracing the driver and killing standing waves inside the box.
Yes I know, I have the plans.
Probabaly have it built by next weekend.
That brass bracing rod on the Yamamoto looks somewhat cosmetic to me.
Yeah it confuses the hell out of me too.
They dont even have a brace on the cabinet, which is bad for an open backed cabinet
Member
Joined 2009
Paid Member
Yeah it confuses the hell out of me too.
They dont even have a brace on the cabinet, which is bad for an open backed cabinet
I believe the Yamamoto is made to vibrate with the music, it's the opposite if what we're trying to do in making a 'dead' cabinet. The designer chose some special wood too. There are people who's philosophy for cabinets is that they are musical instruments.
Member
Joined 2009
Paid Member
MH,
I know of numerous references where sound improved as a result of bracing the driver from behind. HOw you do it is up to you. I know in his smaller Onken creations, Dave uses a vetical bracer, offset to one side of the center plain, as a way of both bracing the driver and killing standing waves inside the box.
The vertical brace - I assume it's the damping material attached to the brace that works on the standing wave problem, by having damping material at a point where air velocity is high instead of relying on damping material attached to the walls of the box where standing waves have zero velocity ?
I was thinking though, that with a heavy magnet a vertical brace could take some of the weight off the frame by supporting the magnet directly and equalizing the force on the drivers mounting bolts a little.
I am thinking

- Status
- This old topic is closed. If you want to reopen this topic, contact a moderator using the "Report Post" button.
- Home
- Loudspeakers
- Full Range
- A Big'un - the Audio Nirvana Super 15