I am no expert, but have treated all of my drivers with ENABL for past few yrs, so it is clear that to my ear it is worth the effort. See below for my opinion re your questions
1. Dave Dlugos talks about Mod-Podge; Bud uses Micro Scale Micro Gloss. Is there a difference between these materials? Is one preferable to the other? Do I need both? (I ran across a few posts which said an application of Mod-Podge is the first step and an application of Micro Gloss is the last. Is this the correct method?)
You are correct that both are required. Mod-Podge is the first step & micro gloss is the last.
2. Bud recommends flat acrylic paint for the dots. After application, they're coated with Micro Gloss. What difference does it make if the paint is flat or gloss?
I do not think it makes any difference if it is flat or gloss. I choose based on what I think would look best. I personally like a stealth approach and use dark grey or black to match color of the paper and generally use a mat finish. The result is you can see the ENABL pattern up close but it is not obvious from listening distance.
3. Do the Enabl dots lie flat on the cone, or do they make raised bumps?
I think as described by Bud and Planet10, they are pretty flat. I find it useful to use a squeeze container to apply the dots and this results in a raised effect. To my ear it works well and is much easier to apply.
4. Seems like this might be a combination of the Enabl process with the Mamboni process.
I experimented with the Mamboni combined with ENABL on my first drivers. Ultimately I removed the Mamboni as I felt it was detrimental to the sound. My theory is it added too much mass to the paper cone.
Good luck. Hope you have a positive experience.
Hi folks,
Sorry for not going through the 120 pages of info here, and jumping in late.
I'm wondering how consistent changes in the FR and waterfall plots have been for drivers with/without the process applied to them have been?
As I understand the intention, this is where changes should be most readily observed, correct? Has anyone noticed changes in the impedance plot also, or no?
Best,
E
1. Dave Dlugos talks about Mod-Podge; Bud uses Micro Scale Micro Gloss. Is there a difference between these materials? Is one preferable to the other? Do I need both? (I ran across a few posts which said an application of Mod-Podge is the first step and an application of Micro Gloss is the last. Is this the correct method?)
Sorry i missed this post.
The 2 products serve a different purpose. The Mod-Podge/Puzzlekoat is a mod i have been doing since the late 1970s. It is not part of EnABL. I use thinned Mod-Podge as a pretreatment on paper cones. Why is covered in more detail here: Speaker Tweeks -- Puzzlecoat & Ductseal
The ModPodge is before, then i EnABL on top of that — one thing not said in the TLS.org article is that the coating gives you greater error control when you muck up a spot — still not as easily remedied as if you are treating a metal cone. Pre-treat, spots, then gloss.
2. Bud recommends flat acrylic paint for the dots. After application, they're coated with Micro Gloss. What difference does it make if the paint is flat or gloss?
Flat paint has more of the particles that leave a slight bump. I have tried gloss and it makes a mess.
3. Do the Enabl dots lie flat on the cone, or do they make raised bumps?
The bump is there but does not need to be that thick.
4. Has anybody ever tried flocking the Enabl dots? Seems like this might be a combination of the Enabl process with the Mamboni process.
There are lots of experiments yet to be done on how effective dots may be applied, but figuring out a reason EnABL works, and a way to reliabily and clearly measure the effects would make. I figure as long as it adds a tiny bit of mass and leaves a bit of a bump it could well do the same job as the flat-paint.
Lots of schemeing has been done to figure out approaches to automating the approach to adding the dots to a cone.
dave
I'm wondering how consistent changes in the FR and waterfall plots have been for drivers with/without the process applied to them have been?
As I understand the intention, this is where changes should be most readily observed, correct? Has anyone noticed changes in the impedance plot also, or no?
The measurements which measure a time/decay compenent are most likely to yield measurement results. The few measurements that have been done that can be interpreted (or not) of the differences have both been such. More powerful tools (like Microflon) might be needed to get good consistent results.
Changes in impedance response are small and given that you would need to do measurements in a temperature/humidity/pressure constant environment not likely to happen outside of a dedicated lab.
dave
Dave,
I thought I remembered reading (ages ago) that measurable changes in the FR, in the order of 1-2 dB were proof of the efficacy?
As for Z, yes, those things would change the overall curve, but I think it would be really interesting to note significant, frequency dependent changes, if any.")
Best,
E
I thought I remembered reading (ages ago) that measurable changes in the FR, in the order of 1-2 dB were proof of the efficacy?
As for Z, yes, those things would change the overall curve, but I think it would be really interesting to note significant, frequency dependent changes, if any.
Best,
E
This might be what you are referring to:
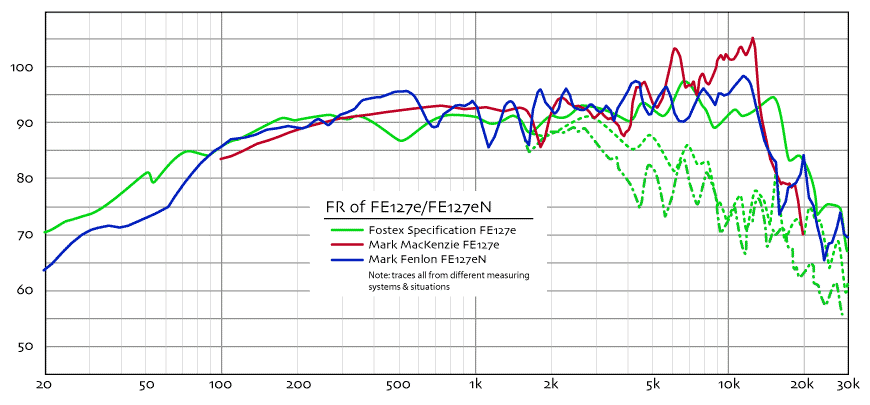
Note that none of the measures were under the same conditions or of the same specific driver, but the factory & the Fenlon were done in an anechoic chamber. The treatments done were not just EnABL, but included my take on MacKenzie’s mod plus my pretreatment & EnABL V1.
dave
Note that none of the measures were under the same conditions or of the same specific driver, but the factory & the Fenlon were done in an anechoic chamber. The treatments done were not just EnABL, but included my take on MacKenzie’s mod plus my pretreatment & EnABL V1.
dave

Tang Band 5" 'full range'
Greetings fellow cone-modders,
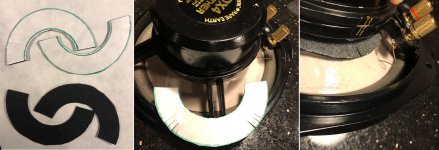
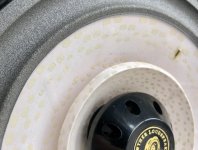
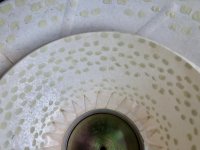
This is a curious speculation about possible modifications to one of our standard procedures. We use Zig adhesive as a damper of surface acoustic waves near a transducer cone's outer surround, painting a stripe on the inside of a cone about 1 cm wide at the surround attachment. I had occasion to examine a burned-out Tang Band W5-2143. It is a full-range 5" driver that is well-reviewed elsewhere on DIY audio. I was impressed with their sound straight from the box.
This driver has a bamboo fiber cone that incorporates numerous coarse strands oriented randomly. These would be expected to provide local stiffening plus variation in the stiffness of the paper - something that the ENABL spots presumably also do from the surface.
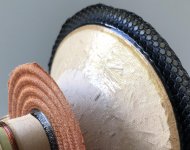
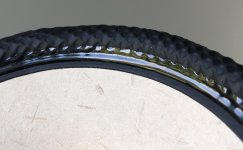
But here is what surprised me. The inside of the cone has a wide band of clear elastic material painted on. It looks like rubber cement and it is slightly tacky to the touch. Also, there is a narrow band of this material on the outside of the cone surround - a narrow band in the groove created by the surround edge.
Would (thinned) rubber cement work as well or better than Zig? It is the 'shiny' material in the photographs.
Greetings fellow cone-modders,
This is a curious speculation about possible modifications to one of our standard procedures. We use Zig adhesive as a damper of surface acoustic waves near a transducer cone's outer surround, painting a stripe on the inside of a cone about 1 cm wide at the surround attachment. I had occasion to examine a burned-out Tang Band W5-2143. It is a full-range 5" driver that is well-reviewed elsewhere on DIY audio. I was impressed with their sound straight from the box.
This driver has a bamboo fiber cone that incorporates numerous coarse strands oriented randomly. These would be expected to provide local stiffening plus variation in the stiffness of the paper - something that the ENABL spots presumably also do from the surface.
But here is what surprised me. The inside of the cone has a wide band of clear elastic material painted on. It looks like rubber cement and it is slightly tacky to the touch. Also, there is a narrow band of this material on the outside of the cone surround - a narrow band in the groove created by the surround edge.
Would (thinned) rubber cement work as well or better than Zig?
It is the 'shiny' material in the photographs.Attachments
Hi everyone,
Just for effect, I am finally seeing the end to this 5 year illness.
Frank, did you try the rubber cement yet? As I understand what is needed this damping material is there to increase resistance and foil the punch through out the opposite side, from Raleigh waves becoming lateral waves.
On a new note. A geologist/volcanologist/earthquake specialist has pointed to what she thinks EnABL is doing. Apparently a printed out pattern guide sheet was seen while investigating / teaching one of our many lurkers here. Her response to seeing the pattern on a flat piece of paper was that it would suppress and disperse S (spherical) waves from emitting energy at right angles to the wave form direction, at any and every discontinuity. And then there are P waves (Plane waves) L waves (Longitudinal waves) and R waves (Raleigh waves) that are also caused by discontinuities. Of course this is all from the science of dirt, but I am told she was adamant about the application of EnABL dispersing S waves. So, I have been reading a bit here and there and now have a pretty good idea of which format of emission or subduction I find when treating driver surfaces.
Nice to have some names besides WTF to hang on what I find too.
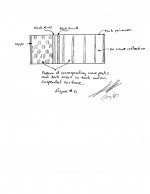
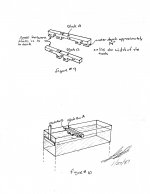
I have attached a water tank test I performed many decades ago, in the presence of a very smart EE who has passed, so we cannot argue with him. He did sign and date the original document as being representative of what he witnessed. The PDF is all of the same pages. The dated signature is from William Gregor, in Elmhurst IL, in my basement.
Bud
Just for effect, I am finally seeing the end to this 5 year illness.
Frank, did you try the rubber cement yet? As I understand what is needed this damping material is there to increase resistance and foil the punch through out the opposite side, from Raleigh waves becoming lateral waves.
On a new note. A geologist/volcanologist/earthquake specialist has pointed to what she thinks EnABL is doing. Apparently a printed out pattern guide sheet was seen while investigating / teaching one of our many lurkers here. Her response to seeing the pattern on a flat piece of paper was that it would suppress and disperse S (spherical) waves from emitting energy at right angles to the wave form direction, at any and every discontinuity. And then there are P waves (Plane waves) L waves (Longitudinal waves) and R waves (Raleigh waves) that are also caused by discontinuities. Of course this is all from the science of dirt, but I am told she was adamant about the application of EnABL dispersing S waves. So, I have been reading a bit here and there and now have a pretty good idea of which format of emission or subduction I find when treating driver surfaces.
Nice to have some names besides WTF to hang on what I find too.
I have attached a water tank test I performed many decades ago, in the presence of a very smart EE who has passed, so we cannot argue with him. He did sign and date the original document as being representative of what he witnessed. The PDF is all of the same pages. The dated signature is from William Gregor, in Elmhurst IL, in my basement.
Bud
Attachments
Frank, did you try the rubber cement yet? As I understand what is needed this damping material is there to increase resistance and foil the punch through out the opposite side, from Raleigh waves becoming lateral waves.
Great to hear from you, Bud!
I have not had occasion to experiment with rubber cement. I'll comment on that below after this mini-update.
I have been gradually tweaking drivers whose cost dictates being conservative - namely Lowther DX4s and SB Acoustics SB34NRXL75-8 12" woofers. The woofers were easy - everything needed on the cones is tap-test obvious after a 1/2"-wide double-coat of Zig next to the back surround joint. The hard paper dust caps did benefit from a base set of rings plus a second set about 2/3 of the cap radius from the center, finished off with a center dot and usual surround pattern. No acrylic after-coating needed IMO with very dense paper and only 10-200 Hz frequencies being played. Its a good speaker made very transparent without much work.
As for the Lowthers, I use them only for midrange in a fairly large room. I am very demanding and those simple cones are SO needy! Without such a great motor they would be a waste of time. As of now, the DX4s have triple zig applications to the back groove of the whizzer free edges and, of course, also to the outer back edge of the main cones (~1/2" wide). As for paired ring patterns, the whizzers are practically "pave"! They have two patterns starting at the tips of the overlapping paper from the main cone mounting joint, and 3.5 patterns from the 'inside' free edge of the whizzer in toward the voice coil. The 'outside' free edge of the whizzer has a full paired pattern. The outer cones have four patterns: one as far under the whizzer as I can reach, one just about even with the free edge of the whizzer, and two on the outer edge opposite the Zig ring on the back-side. I use relatively 'heavy' acrylic paint dots in the ring patterns because the cone is factory-sealed and the aqueous paint doesn't penetrate to help alter the paper's stiffness. With this treatment I now consider the DX4s to be as good as ENABL cone mods will allow. I do imagine that internal spider sound damping would help. I may try that using some 1/8"-thick adhesive-backed felt that I also use on cabinet faces to help with baffle-step. I roll these drivers off at 3.2 kHz in favor of Mundorf AMT tweeters, so no problems with shriek. The DX4s are transparent and 'light' as long as I don't over-drive them, and efficiency is unchanged from pre-treatment. Slightly different cabinets would improve them further, but that is not on the current agenda.
As for rubber cement, I think the main difference from water-based Zig glue is simply the quantity of solids per volume, not really anything else. I have been using multiple applications of aqueous Zig, and I would predict that the same amount of rubber solids coming from rubber cement would perform similarly. ...not sure when I might have an appropriate project to test it... That Tang Band driver pictured above had quite a thick treatment - much more than one might evenly apply with a single application by brush.
All the best,
Frank
That's still no actual evidence your dots are having any audible effect, let alone an improvement. If they were evidence would have easily been presented by now.
The assumption that our hearing works like a microphone and a preamp - so we should be able to graphically describe all sonic parameters - is flat out wrong. Take it from a Ph.D. physiologist: human hearing is a tunable system of neuronal filters. Some people train and use those filters, some apparently do not. I don't judge others based on my own experiences, and I wouldn't waste a moment modding speaker cones if there were no 'audible' effect. Those effects are manifest in the auditory cortex of the brain - not in some equipment hooked to a microphone!
Please present some actual verifiable evidence or don't bother responding.
The verifiable evidence that matters: I like the sound much better after permanently damaging my expensive drivers!
Well, its not really permanent - new cones aren't so costly...
For the record, I have always said that the application(s) make a measurable difference. Measurable differences could make an audible difference, although the representations of dramatic changes is highly questionable, especially given that there is no verifiable support of those changes, i.e. no double blind or similar form of auditioning. It's all sighted by those whose expectations are that the changes will dramatic.Thank you for the lecture, but I'm not really interested in your rationalisations for damaging permanently your drivers. Please present some actual verifiable evidence or don't bother responding.
My continuing disagreement is with the assumed, unproven claims of the technical aspects of the changes. The changes are no different than those that will occur with any application of any material of any kind to the diaphragm of a driver. I can, and have, demonstrated that far more significant changes in a driver's response can be made by application of materials to a diaphragm in an empirically derived, measured and verified method. Any "technical" changes made by the enabl pattern are without doubt also occurring with any other applications. There is no evidence of any kind that supports that the enabl process is uniquely providing changes not occurring with any other application. it is all supposition.
I fully accept that there can be audible differences in the enabl application. That is also true of any other application.
If this post should be in the technical discussion, so be it. But then so should post 1189.
Dave
For the record, I have always said that the application(s) make a measurable difference. Measurable differences could make an audible difference, although the representations of dramatic changes is highly questionable, especially given that there is no verifiable support of those changes, i.e. no double blind or similar form of auditioning.
I have no doubt that (very expensive) techniques exist by which cone behavior pre/post treatment can be observed and compared/contrasted. Your point about the ‘audibility’ of the transformation is well made. I suspect there is not sufficient uniformity among a) design and construction of ”improvable” drivers and b) our ideas of what constitutes an improvement to convince many dogmatic doubters.
None of them will suck the oxygen out of my own small efforts to enhance the enjoyment of music I love.
As Nelson Pass reminded us at Burning Amp, “It’s Entertainment!”
Bud,
I was just thinking about you the other day. I was unaware of your illness. I have had my own issues over the last 3 years. eMail me.
The geo POV is interesting. My brother, who was a top rated mudman for the petrol industry said much the same thing but from his practical based POV.
dave
I was just thinking about you the other day. I was unaware of your illness. I have had my own issues over the last 3 years. eMail me.
The geo POV is interesting. My brother, who was a top rated mudman for the petrol industry said much the same thing but from his practical based POV.
dave
After reading more about Rayleigh waves vs. spherical waves, it inspired me to throw caution to the wind on the current project - the Lowther DX4s. Lowther cones and whizzers are high-quality parchment that have been glued up from flat stock and varnished, but compared to other driver's cones they are very flexible (Qts of 0.22 w/ whizzer has both up and down-sides). With one radial stripe having more than twice the mass and stiffness, it was not hard to imagine how energy into the stiffer zone could generate circularly-radiated waves around the rest of the more flexible cone. Soon, my DX4s were back 'on the bench'.
Step 0. When new, I had sent one of these DX4s back on warranty because of a rattle. The factory (supposedly) re-centered the voice coil (& cone) within the air gap - which is possible because the magnet bolts on to the basket assembly. But this particular driver was still more sensitive to being over-driven. With phase plug unscrewed, the voice coil still wasn't perfectly centered so I scrapped any remaining warranty, loosened the 4 bolts and realigned the voice coil by eye. You can flex the entire cone/coil sideways just by pushing gently on single points. The new alignment (by eye) can now produce contact between magnet and coil (due to cone deformation) using equal pressure anywhere around the cone. Before, only one side of the coil could be made to touch the magnet. ...all gentle and careful here, of course...
Step 1. More Zig! I added two more coats of Zig to the back of the cones. This time, 3.5 to 4 cm in width from the edge of the surround. I also reached as far towards the voice coil as possible and painted Zig about 1 cm wide on either side of the cone joint. Now there are 5 coats about 1.5 cm from the edge, and two coats on the rest of the accessible cone. Again, it doesn't soak in - it remains on the rear surface.
Step 2. This isn't EnABL, but it's a pretty obvious potential source of phase interference. The Lowther basket assembly has an iron mounting plate (to the magnet) between the cone and the spider. It's a big reflective surface right behind the (unusually flexible) cone! Reflections from that plate need to be damped. A new secret weapon for me is adhesive 1/8" felt (from Madisound), so I applied absorptive felt to the basket mounting plate and the basket arms. (photos below) The felt is very sticky and tough to manage so near to the rear side of the cones. IMO, this mod should be ranked "difficult" unless you have good blunt&long surgical forceps and TWO curved periosteal elevators. [I once needed the second elevator to help extract the first from sticky felt!] With these perfect tools the mod isn't too tough.
The latest sound. Now we're really getting somewhere.
First impression: on reference tracks the acoustic *space* in the recordings was more precisely defined. Finally I am getting all of the spatial clarity that I had with the retired EnABL'd JBL 8's, but now its coming via much higher-resolving software, DACs, and balanced amps. That resolution can be demanding. In the past, improving the signal to the drivers sometimes caused the return of bad behaviors that EnABL procedures had cured. Now, at first blush, the soundstage was clearly better.
Second impression: now the volume control only seems to affect energy of the presentation, not the "loudness". Before these last steps there could be a sense of loudness when the system was turned up.
Third impression: significantly improved background detail in challenging recordings. Honestly, my jazz reference tracks sound about the same as before. Those recordings have never caused bad driver behaviors. In contrast, Dame Kiri singing as loud as a whole orchestra, with that orchestra also cranked and the concert hall filling with sound over the top... Now THAT is a lot for a driver to sort out because there are so many potential sources for grunge. I used to maintain that there are 2 kinds of audio systems - those that are good for opera, and all the rest. But thats no longer true. Recently, audio mastering fads are producing seriously compressed tracks that are not palatable with average commercial drivers (you know who you are, Adele, Sam Smith, Pentatonix, etc. etc.). Headphones can mostly manage that stuff, but speakers filling an irregular acoustic space? Good luck.
My point is this: EnABL and any other *subtractive* enhancements are very relevant. Are the effects "dramatic" or are they subtle? I would argue that, to the ear - the analytical listener - the effects are often subtle. To hear the greatest effects you have to really push the boundaries of acoustic reproduction. Then you can hear significantly more, but it's typically not the sonic foreground you can better appreciate. Rather, it may be just a heightened sense of the space in which a performance was recorded. Or maybe you can abide tracks that previously you couldn't because they were too messy. Or maybe you can crank the opera up to live performance energies (and shiver at the sound!). Analytically, those might seem like smallish wave enhancements. BUT, what happens when you take away distractions within music that you really love? For me, the analytical brain shuts off and the emotional brain takes over. That transformation can truly be dramatic, but its an entirely personal response.
My goal in all this is to try to get past attention to the analytical, and fully appreciate the complex emotional aspects built into good music. A subtle vocal nuance that makes a singer seem physically close, a snare drum that sounds like its right in the room, catching a touch of triangle way back with the timpani... Small or large, those are the kinds of effects that make me enthusiastic about 'subtractive' cone modifications.
Cheers,
Frank
Attachment:
left - 1/8" felt easily cuts with scissors
center - edge slashes accommodate bolt heads underneath
right - adhesive side visible as the felt is carefully slid into place
note - basket arms also covered on side facing the cone - easy to do
Attachments
I admire your work, Dave.
A future goal is to actually adjust 2nd and 3rd order signal harmonics using software built into ESS9028/38 DACs. ...something like some factory Pass Amps offer... Nelson said that average listeners adjust the amps to produce about 1% negative 2nd harmonic. My question is, what happens to that harmonic in the average driver? Once I figure out the I2C controls for those registers in the DAC chips, I'll try sending some of that intentional distortion out to the drivers. Will EnABL'd drivers sound better or worse? ...no idea.
F.
Last edited:
DX4 photos posted by request.
I don't worry so much about the shape of the paint dots any more, as long as the same amount of paint is in each one. With these flexible but sealed paper cones, I used heavy dots that are harder to shape into nice rectangles.
Whizzer: 5.5 circle patterns inside, full double row on the outside edge. Multiple coats of Zig on the back side, especially the back-side groove.
Main cone: 4 patterns, 2 as far under the whizzer as I could reach, 2 near the foam. Multiple coats of Zig on the back side - ~ 6 coats within 1.5cm of the surround, 3 coats over the remainder of the entire cone.
Attachments
Last edited:
- Home
- Loudspeakers
- Multi-Way
- EnABL - Listening impressions & techniques