Has anyone ever tried putting the Fostex FF85K in the Buschhorn Mk I enclosure? It looks like a relatively easy build, and the FF85K seems to be approximately the right size. The plans for the enclosure can be found here:
Mini-Basshorn mit VISATON FRS 8
Mini-Basshorn mit VISATON FRS 8
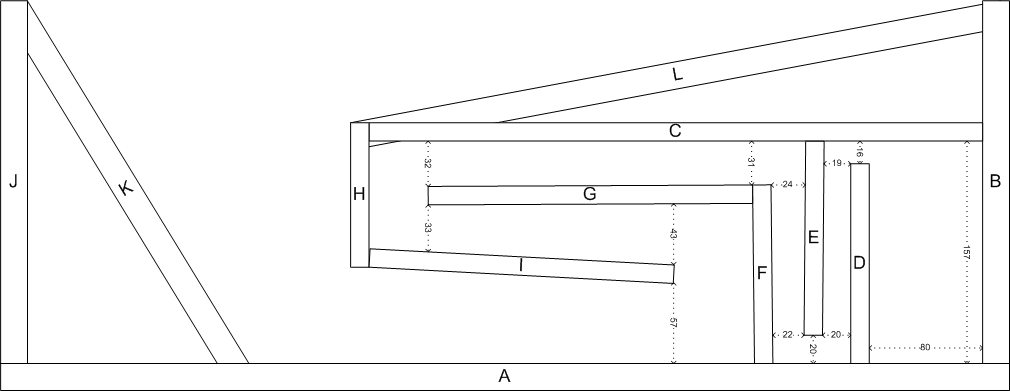
It appears I've gone and cut a bunch of plywood into strips. When I chop the pieces to length on the mitre saw, is it important to try to make some of the smaller angles? For example, pieces E, F and G all have angles of less than one degree. I don't think I can cut that with any kind of accuracy on my saw. The 10.6 degree acute angle at the end of L seems like it will be tricky, too.

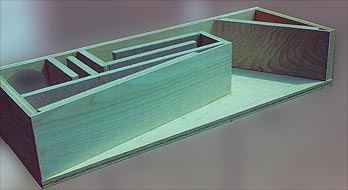
http://i69.photobucket.com/albums/i43/Ty_Bower/Buschhorn/P1140013.jpg
http://i69.photobucket.com/albums/i43/Ty_Bower/Buschhorn/BuschhornMkIv6.gif
http://i69.photobucket.com/albums/i43/Ty_Bower/Buschhorn/P1140013.jpg
http://i69.photobucket.com/albums/i43/Ty_Bower/Buschhorn/BuschhornMkIv6.gif
You'd need a tenon Jig to cut that angle...
Is this a tenon jig?
Miter Saw Acute Angle Jig - bricofleur - American Woodworker
That would be the equivilant for a mitre-saw. I think a tenon jig is for a table saw.
dave
for a quick and safe method of cutting the bevels for the angled deflectors I'd use Delta/Porter Cable 34-184 tenoning jig (let google be your friend and take you to a review / tutorial on this great little gadget.)
OnlineToolReviews.com - Delta 34-184 Universal Tenoning Jig Review
while this tool is designed to firmly hold the workpiece at 90deg to the table saw top, there's no reason the blade can't be tilted
of course for you could build a wooden jig to accomplish the same purpose, but there are some tools on which it just pay to splurge (particularly if you can amortize the expense over hundreds of pairs
 )
)anyway, in this case you set the bevel cut on your table saw to the more obtuse angle needed on the deflector (30deg on the saw's bevel gauge), and make the first cut the "normal" way, then leaving the bevel angle, install the workpiece in the tenoning jig and cut the acute angle.
Even if the blade setting is off a bit, you'll get a perfect fit between the front and bottom panels of the cabinet
Member
Joined 2009
Paid Member
4" drivers instead of 3"?
dave
but of course as we all know, modifying the MkI design to accommodate a 4" (Fostex or otherwise) is not particularly difficult, and could perhaps even be commercially successful
funny thing is that having built both MKI & II, I vastly preferred the "smaller" design
Last edited:
funny thing is that having built both MKI & II, I vastly preferred the "smaller" design
Thanks for the encouragement. I hope I feel the same way when they are done.
There's just something I like about a bunch of wood planks. Dunno what it is. Maybe it's the way the grain fits together like a puzzle.
http://i69.photobucket.com/albums/i43/Ty_Bower/Buschhorn/P1140017.jpg
So, I made the angle jig I found in the previously referenced link. While it isn't completely foolproof, it certainly does work. You need to be scrupulous about keeping everything perfectly square. You also need to be aware of your saw's capacity. For some angles, my 10" saw couldn't cut all the way through the 110mm wide planks, which required flipping them over and finishing the cut from the other side. This is extremely awkward when you're trying to do the 10 degree mitre and you suddenly realize you need a left handed jig.
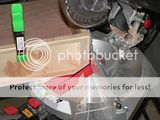
http://i69.photobucket.com/albums/i43/Ty_Bower/Buschhorn/P1140015.jpg
http://i69.photobucket.com/albums/i43/Ty_Bower/Buschhorn/P1140018.jpg
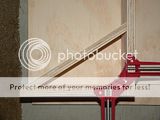
But, it all seems to fit, even better than I expected. I think I can clean up any minor imperfections with the sander. Glue will fill in the rest.
http://i69.photobucket.com/albums/i43/Ty_Bower/Buschhorn/P1140022.jpg
http://i69.photobucket.com/albums/i43/Ty_Bower/Buschhorn/P1140027.jpg
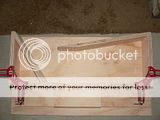
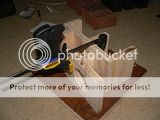
All the pieces are cut. Next I need to make the circle for the speaker cutout and chamfer the back side. I have no router, so I'll do this freehand with the RotoZip for the hole and the Dremel tool for the chamfer.
http://i69.photobucket.com/albums/i43/Ty_Bower/Buschhorn/P1140029.jpg
I printed a couple templates and made the cutouts for the drivers. The CAD department at work has a plotter that can do drawings up to E size, so I also printed a full size template for the whole cabinet. I wish there were some good way to transfer the template directly onto the side panel and then I'd just build it up there. I may try to assemble as many of the internal pieces as I can, before I start to glue them to the side panel.


http://i69.photobucket.com/albums/i43/Ty_Bower/Buschhorn/P1140030.jpg
http://i69.photobucket.com/albums/i43/Ty_Bower/Buschhorn/P1140032.jpg
http://i69.photobucket.com/albums/i43/Ty_Bower/Buschhorn/P1140038.jpg
http://i69.photobucket.com/albums/i43/Ty_Bower/Buschhorn/P1140030.jpg
http://i69.photobucket.com/albums/i43/Ty_Bower/Buschhorn/P1140032.jpg
http://i69.photobucket.com/albums/i43/Ty_Bower/Buschhorn/P1140038.jpg
I wish there were some good way to transfer the template directly onto the side panel and then I'd just build it up there.
don't we all - until such time it's just a matter of spacer blocks at each corner, 3M #203 masking tape (self adjusting / adhesive temporary band clamps - a Terry Cain favorite) and patience
...spacer blocks at each corner,
Spacer blocks? I'm not sure I've seen that trick in action. Are there any photo tutorials out there?
I once cut a spacer when attaching the front of this small enclosure. Do you mean like this?
http://i69.photobucket.com/albums/i43/Ty_Bower/Makizou/P1120560.jpg
Last edited:
Spacer blocks? I'm not sure I've seen that trick in action. Are there any photo tutorials out there?
I once cut a spacer when attaching the front of this small enclosure. Do you mean like this?
http://i69.photobucket.com/albums/i43/Ty_Bower/Makizou/P1120560.jpg
pretty much
- if ambient temperature is cool enough that you've got decent open working time on the wood glue (10-15 minutes), you can try for at least 3 or 4 panels glued up per session
that you've got decent open working time on the wood glue
Titebond III is good here or better yet a hide glue.
Most of the white versus yellow glues also have a longer working time.
Gorilla glue (nasty stuff I would never use again) would also work.
Titebond III is good here or better yet a hide glue.
Most of the white versus yellow glues also have a longer working time.
Gorilla glue (nasty stuff I would never use again) would also work.
some of the newer cabinetmaker adhesives have very quick tack time at ambient temperatures above 70F ( right now it's approx 85F on the upper mezzanine of our production floor) - this can reduce the amount of time you've got to play with adjustment
a lot of white glues (Weldbond, etc) don't have the ultimate strength of yellow, but do have the advantage of drying almost clear and being easier to remove squeeze-out. (actually the newest Titebond III which has great viscosity and tacking characteristics and works very well for iron-one veneering, dries a medium brown)
agree with you on the Gorilla glue- I only use it when its expansion can be helpful in gap filling (just ensure workpieces are well clamped)
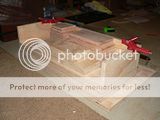
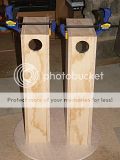
There's nothing inside them yet, but I couldn't resist lightly clamping the four sides in place just to get a feel for how they look when they're standing. To be honest, I thought they were going to be taller than they are.
http://i69.photobucket.com/albums/i43/Ty_Bower/Buschhorn/P1140039_front.jpg
http://i69.photobucket.com/albums/i43/Ty_Bower/Buschhorn/P1140040_back.jpg
http://i69.photobucket.com/albums/i43/Ty_Bower/Buschhorn/P1140039_front.jpg
http://i69.photobucket.com/albums/i43/Ty_Bower/Buschhorn/P1140040_back.jpg
- Status
- This old topic is closed. If you want to reopen this topic, contact a moderator using the "Report Post" button.
- Home
- Loudspeakers
- Full Range
- Fostex FF85K in the Buschhorn Mk I?