The playground sand i start with is pretty dry to start with.
dave
That's what i use.
I've lined the insides with some thin wool. It probably isn't enough damping, but it's a place to start. I suppose I can always figure out how to add some more later. I measured and cut the wool to fit the inside, and used carpenters glue to stick it down. I left plenty of clearance on the top and bottom for the FF85K magnet and I also stayed well clear of the throat at the back of the chamber. Using some of the leftover scraps, I covered the back of the magnet as well. Carpenters glue probably wouldn't stick, so I used some contact adhesive I had around.
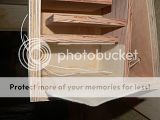
http://i69.photobucket.com/albums/i43/Ty_Bower/Buschhorn/P1140081.jpg
http://i69.photobucket.com/albums/i43/Ty_Bower/Buschhorn/P1140085.jpg
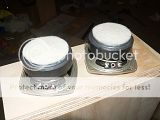
The two voids are 90% filled with kitty litter (Scoop Away, clumping type). I didn't want to get too close to the top edge for fear of getting a piece trapped in the glue. I've had enough trouble getting the side to fit tightly and I don't want another complication. After spreading the glue over all the exposed edges, I clamped the corners and piled the block on top. I noticed the edge still showed a small gap on the front, so I added the aluminum bar clamp in the center. You can never have too many clamps. Honestly, I think the block is a waste of time and they don't seem to do much of anything after the clamps are in place.
http://i69.photobucket.com/albums/i43/Ty_Bower/Buschhorn/P1140089.jpg
http://i69.photobucket.com/albums/i43/Ty_Bower/Buschhorn/P1140090.jpg
http://i69.photobucket.com/albums/i43/Ty_Bower/Buschhorn/P1140081.jpg
http://i69.photobucket.com/albums/i43/Ty_Bower/Buschhorn/P1140085.jpg
The two voids are 90% filled with kitty litter (Scoop Away, clumping type). I didn't want to get too close to the top edge for fear of getting a piece trapped in the glue. I've had enough trouble getting the side to fit tightly and I don't want another complication. After spreading the glue over all the exposed edges, I clamped the corners and piled the block on top. I noticed the edge still showed a small gap on the front, so I added the aluminum bar clamp in the center. You can never have too many clamps. Honestly, I think the block is a waste of time and they don't seem to do much of anything after the clamps are in place.
http://i69.photobucket.com/albums/i43/Ty_Bower/Buschhorn/P1140089.jpg
http://i69.photobucket.com/albums/i43/Ty_Bower/Buschhorn/P1140090.jpg
(this assumes that there will be a finish coat of veneer...)
Dumb question... where does a guy go to buy veneer on the east coast USA? Am I going to find it in the Lowes or Home Depot?
Dumb question... where does a guy go to buy veneer on the east coast USA? Am I going to find it in the Lowes or Home Depot?
Ty - wouldn't it nice if it were that simple? - most likely the only type of "veneer" the big box stores might understand would be what we used to call MacTAc - self adhesive vinyl - wood grained or otherwise.
Veneers are available in several forms - from raw thinly sliced wood with no backing, to the more widely types used in commercial trades - such as paper / phenolic / or wood backed, in sheet sizes of 4x8 or 4x10ft.
These little boxes would take less than a full sheet - as the back and bottom don't need to be finished.
If the same supplier from whom you purchased the plywood for this project doesn't carry veneer, I'd suggest you search for local kitchen cabinet or commercial millwork businesses who consume a lot of these types of materials. They could probably give you names of distributors, or even be willing to add a sheet to one of their orders if you don't mind waiting.
There of course should be on line distributors as well, but the associated shipping costs might be higher.
Nice work on the boxes, you were wise to not initially over-damp the chamber - it can be a huge pain to remove through this small an opening.
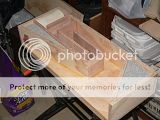
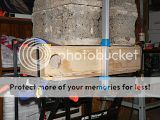
Hmm. I seem to have made a critical error. I started sanding one of the boxes in preparation for applying some kind of finish. I'm not sure exactly how I want them to end up. My paint jobs generally look kinda sloppy. I could use the Watco oil like I did on the little Makizou clones. I've got some dark wood stain, which I would then cover with polyurethane. I did that on the kitchen table and it looked really nice. I'm still interested in veneer - if nothing else it would be a good time to learn something new.
Anyway, the mistake part happened when I got tired of sanding and tired of waiting to hear them. I figured I'd just go ahead and stick the drivers in for a quick test. Oops. Now it'll be months before I put something on the bare wood. These tiny things are really spooky. They've got a touch of the "just doesn't sound quite right", not unlike the FE87E had when they were brand new. I think that will change a fair amount over the next couple hundred hours. Not surprisingly, they're very sensitive to room position. I've already moved them quite a bit farther back (towards the back wall) and farther apart than I'd usually keep my speakers. It seems to help clear things up a lot. The bottom end is the really strange part. I'd swear there is clearly audible output down into the mid 30 Hz range. It's rolled off a lot by this point, but my head keeps telling me a 3" driver shouldn't be playing there at all. The top is as crisp and detailed as any 1" titanium dome tweeter I've heard, or probably even better.
Man, I'm going to be tired tomorrow morning.
Anyway, the mistake part happened when I got tired of sanding and tired of waiting to hear them. I figured I'd just go ahead and stick the drivers in for a quick test. Oops. Now it'll be months before I put something on the bare wood. These tiny things are really spooky... The bottom end is the really strange part. I'd swear there is clearly audible output down into the mid 30 Hz range. It's rolled off a lot by this point, but my head keeps telling me a 3" driver shouldn't be playing there at all. The top is as crisp and detailed as any 1" titanium dome tweeter I've heard, or probably even better.

Deja Vu
dave
Rockler should have some decent stuff both backed and non backed.
Closest one to you looks to be Hunt Valley MD.
Neat store. My wife's family lives around the Ft. Washington area, and we visit often. The Woodworkers Haven in Southampton, PA is only twenty minutes away from them. I might just have to stop by sometime.
Neat store. My wife's family lives around the Ft. Washington area, and we visit often. The Woodworkers Haven in Southampton, PA is only twenty minutes away from them. I might just have to stop by sometime.
Ty, from a quick scan at Rockler's website, it appears that their veneers are either PSA backed or raw wood flitches. While these are great products for the right application, your earlier question implies this would be your first veneering project, and wrapping / grain matching 4 sides of an enclosure with with either of these materials would be a daunting task.
(PSA is pretty much like pre-applied contact cement - no room for trial & error)
I'd suggest you also consider something like a 10mil paper backed flexible veneer from a specialty supplier like Oakwood* and the iron on PVA glue method. Even if you're very confident with your layout skills with contact cement (i.e. per plastic laminate) it is not recommended for use with thinner wood veneers or those without special backing materials.
*Oakwood Veneer Company :: Wood Veneer Maple Oak Wood Veneers Exotic Burl Manufacturer Supplier Custom Wood
While it's now gonna be tough to take the speakers out of the system for the day or so it takes to apply the veneer and finish material to the boxes, it'll be worth it in the long run.
PS: since these are short little boxes with shiny part that present a dare to curious little fingers (or paws), this might also be a time to consider adding grilles, either Fostex's own metal units, or a bit classier DIY in MDF / cloth
Last edited:
PS: since these are short little boxes with shiny part that present a dare to curious little fingers (or paws), this might also be a time to consider adding grilles, either Fostex's own metal units, or a bit classier DIY in MDF / cloth
Absolutely. I've used the Fostex K308 grills on a different project. They fit perfectly and are very sturdy. My only grumble is the $37 price tag for the pair. For this, I'd like to DIY something. I can cut a rectangle of 3/8" thick fiberboard, roughly 108mm tall by 138mm wide. I think I can freehand route out a hole in the center to match the shape of the FF85K frame. I have some fancy black grill cloth leftover from a pair of speaker socks - I can wrap that over the fiberboard. Maybe attach the grille with tiny neo magnets or something.
Does anyone have a convenient print-to-scale drawing of the FF85K frame? Otherwise I'm going to have to trace the ones I've got.
Absolutely. I've used the Fostex K308 grills on a different project. They fit perfectly and are very sturdy. My only grumble is the $37 price tag for the pair. For this, I'd like to DIY something. I can cut a rectangle of 3/8" thick fiberboard, roughly 108mm tall by 138mm wide. I think I can freehand route out a hole in the center to match the shape of the FF85K frame. I have some fancy black grill cloth leftover from a pair of speaker socks - I can wrap that over the fiberboard. Maybe attach the grille with tiny neo magnets or something.
do you have a table saw?
my trick for grille frames is
1) cut the blanks to size;
2) set the blade height to just barely score the MDF, and rip fence to between 18-24mm (OK, let's say 3/4 - 7/8");
3) score all 4 edges of the blanks to establish your markers - the intersections will become the centers for drilling holes for the magnets;
4) use the 45` side of a tri-square to outline a chamfer line inside the cut-out area - this will reinforce the corners and provide lots of margin for the magnets;
5) drill pilot hole and then cut to the outside of scoring line and corner chamfers - jig saw or free-had with a router if you dare, grilles of this size will be too small and dangerous to try a plunge cut on a table saw;
6) drill holes at the intersection of score lines for magnets ( the 1/4'' x 1/4" rod magnets work perfectly for even much larger grilles than these);
7) before installing magnets in the frames, use them as templates for the holes on enclosure baffle - use masking tape to hold the templates in place and drill holes with 1/4" brad point bit slightly deeper than 1/4" deep in the enclosure (if too shallow, good luck trying to get the magnets out);
8) these cabinets are possibly a bit too large for drill press, but if not another simple trick is to set the locking depth stop to score through the first layer of veneer on the plywood (to compensate for the fabric wrap on the grille frames), then place a scrap of material the same thickness of the frames under the cabinet, and Robert is your mother's brother;
9)install the magnets, use a scrap of hard wood to set them flush with the face of the cabinet and frames - taking care to retain the polarity on all 8 per speaker
- guess what happens when you don't?;10) done, ready to apply veneer to the boxes and grille frames.
Sounds a lot more complicated that it is - with the right tools at hand, you should be able to blast together and install magnets in pair of grilles in less than an hour.
if you don't want to spend the time on the above method and this is to cut the holes in the grille frames, an accurately centered 4" hole should clear the surface mounted pin-cushion flange.Does anyone have a convenient print-to-scale drawing of the FF85K frame? Otherwise I'm going to have to trace the ones I've got.
it's pretty cool to see the hidden magnets grip the grilles out of your hand, and automatically center them on the speaker enclosure
Last edited:
my trick for grille frames is...
Thanks for the detailed write-up! I found a sketch of the mounting dimensions in the FF85K datasheet. I'm going to try to cut out a pair of these. I didn't rebate the driver, so I'm hoping to get the grille snug up against the edge of the frame. Do you think 1/4" plywood would be OK for making grille frames, or should I stay with a fiberboard material instead? From the datasheet, the front of the FF85K should stick out 6mm from the face of the cabinet.
I hadn't heard the term "brad point" before, so I went and looked it up. Good stuff. I think I should get me one of those, and start using it for wood projects.
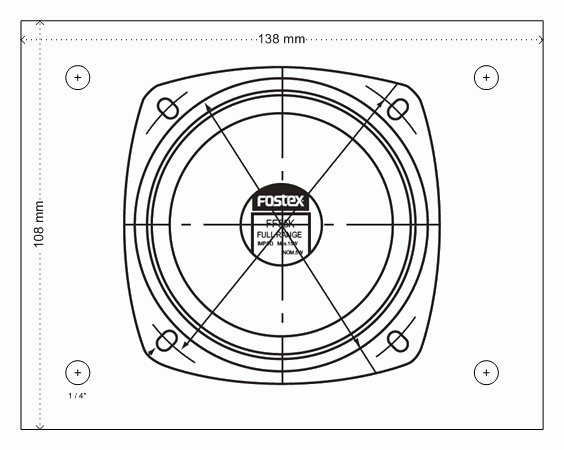
http://i69.photobucket.com/albums/i43/Ty_Bower/Buschhorn/grilletemplate.gif
Last edited:
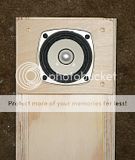
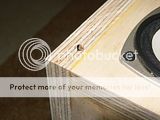
I cut out two grille frames last night. They weren't quite as clean as I'd hoped, but they'll work well enough. The sketch in the Fostex datasheet doesn't exactly match the shape of the actual frame (surprise!). My freehand "routing" skills apparently aren't that good, and besides - the RotoZip is not a router. Anyway, once I cover it with fabric you'll never know any better.
http://i69.photobucket.com/albums/i43/Ty_Bower/Buschhorn/P1140092.jpg
http://i69.photobucket.com/albums/i43/Ty_Bower/Buschhorn/P1140092.jpg
I cut out two grille frames last night. They weren't quite as clean as I'd hoped, but they'll work well enough. The sketch in the Fostex datasheet doesn't exactly match the shape of the actual frame (surprise!). My freehand "routing" skills apparently aren't that good, and besides - the RotoZip is not a router. Anyway, once I cover it with fabric you'll never know any better.
http://i69.photobucket.com/albums/i43/Ty_Bower/Buschhorn/P1140092.jpg
Ty - yes, cloth can certainly disguise a multiple of minor imperfections (I'm certainly glad not to have raised a naturist).
My only comment would be that the holes for magnets appear to span the joint between edge grain of side panels and flat grain of front - that might cause some wandering if you try to drill the holes in the cabinet by hand.
continue the nice work, and don't forget to just enjoy the darn things
My only comment would be that the holes for magnets appear to span the joint between edge grain of side panels and flat grain of front
I noticed that too, after I had drilled and cut everything. I was more concerned about splitting the glued seam (doesn't seem likely) rather than wandering while drilling. I haven't made any holes in the cabinet yet, so I could always make some new grille frames - or just drill different holes in the ones I've already made. We'll see what happens...
Hey Ty,
Looked at the pics of your build and am most impressed. I built a pair of Mark II's with FE103's and baltic birch ply about 3 years back and was quite happy with the result. I've never veneered them or anything - that's one of those " 'round-tuit" projects that I hope I'll actually do someday!
Anyway, nice, work - and I hope you're enjoying them...
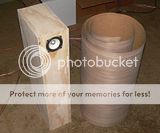
Thanks for the compliments. I've been enjoying them very much, listening to them almost exclusively since I installed the drivers. I bought some walnut veneer, but haven't gotten around to applying it yet. I also cut some grill frames which will be held in place with small NiB magnets. I drilled the holes for the magnets, but the holes aren't tight enough for a press fit. I can't glue the magnets in place since the field from the drivers is so strong it makes the NiBs turn on their side.
So, my Buschhorns sit naked with no grilles and no veneer. Someday I'll get around to finishing them, but I'm happy in the meantime...
http://i69.photobucket.com/albums/i43/Ty_Bower/Buschhorn/P1140097.jpg
http://i69.photobucket.com/albums/i43/Ty_Bower/Buschhorn/P1140103.jpg
So, my Buschhorns sit naked with no grilles and no veneer. Someday I'll get around to finishing them, but I'm happy in the meantime...
http://i69.photobucket.com/albums/i43/Ty_Bower/Buschhorn/P1140097.jpg
http://i69.photobucket.com/albums/i43/Ty_Bower/Buschhorn/P1140103.jpg
Last edited:
Hey Ty,
Here's what I'd do about the magnets: get some paper, an exacto knife (or single-edged razor), a straightedge and some cyanoacrylate adhesive (a.k.a. "Krazy Glue").
Cut a strip of paper to the same width as the depth of your magnets. Cut off a piece, wrap it around the magnet, and check the fit in the hole; if it's too loose, use a longer strip. If it's too tight, cut a little off the strip and check again. You should be able to achieve a tight fit this way.
Since you're going to veneer your cabinets, I would wait until you've done that before fitting the magnets - that way you can be sure to get them to fit flush with the veneer surface.
Once you get the magnets where you want them, apply the cyano sparingly to fix them in place. I'd suggest putting a small puddle of the stuff on a piece of plastic like a yogurt lid, then using a toothpick to place drops in strategic places. This should keep you spewing glue in places you'd rather not spew to!
- Status
- This old topic is closed. If you want to reopen this topic, contact a moderator using the "Report Post" button.
- Home
- Loudspeakers
- Full Range
- Fostex FF85K in the Buschhorn Mk I?