....I can't glue the magnets in place since the field from the drivers is so strong it makes the NiBs turn on their side....
This is what I do. I drill the holes (with a forstner bit or a brad point bit) somewhat deeper than the magnets. Put a dab of hot melt glue in the hole, then press the magnet into place with a piece of scrap wood. Since the hot melt glue does not completely fill the cavity, the magnet will now be flush with the surface. Now you can veneer over the magnets and they will stay in place forever.
I presume that you will be doing this with the drivers removed. And one more note: Make sure that all of the magnets have their poles in the same direction. I leave the magnets stacked up and slide the bottom magnet off of the stack into each hole.
Bob
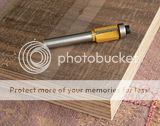
Those are excellent points, Bob. In fact, that's exactly what I would do if I were to build another pair. On my build, I used an extremely sharp brad-point bit of the appropriate size in a drill press, and it worked out fine.
I was assuming Ty had already bored his magnet holes, and that they were somewhat oversized. I pulled the krazy glue trick for a friend whose carpentry skills were - well, let's just say his cabinets won't make it on the cover of Fine Woodworking anytime soon! Then again, neither will mine.")
I was assuming Ty had already bored his magnet holes, and that they were somewhat oversized. I pulled the krazy glue trick for a friend whose carpentry skills were - well, let's just say his cabinets won't make it on the cover of Fine Woodworking anytime soon! Then again, neither will mine.
Member
Joined 2009
Paid Member
Bigun,
Each of mine are placed in a corner, about 2-3 inches from the wall. From what I've read, the corner acts as a defacto extension of the horn, which greatly helps with bass response.
As for the proper listening distance, I would say it all depends on the geometry of your particular arrangement. These little horns would sound quite nice in a computer setup, but bear in mind that they are also quite directional in the mid/high frequencies. It could take a little effort to get them arranged so you're sitting in the "sweet spot".
I'm driving mine with an old Magnavox SE 6BQ5 amp, which is probably good for 3W or so. It's amazing what this little setup can do, considering its limitations!
Last edited:
Member
Joined 2009
Paid Member
Someday I'll get around to finishing them...
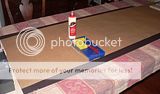
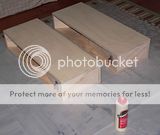
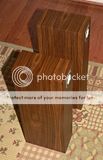
That day is getting closer. It won't be finished this week, but at least there is progress. I have run into a little snag. The sides went on quite nicely, but the fronts are from a different roll of material that doesn't want to lay as flat. I'm getting a fair amount of bubbles and ripples in the veneer, despite nearly 45 minutes trying to iron them out. I gave up for the evening and let them sit overnight. Can I try ironing them again, or has the glue already set for good?


http://i69.photobucket.com/albums/i43/Ty_Bower/Buschhorn/P1150382.jpg
http://i69.photobucket.com/albums/i43/Ty_Bower/Buschhorn/P1150384.jpg
http://i69.photobucket.com/albums/i43/Ty_Bower/Buschhorn/P1150385.jpg
http://i69.photobucket.com/albums/i43/Ty_Bower/Buschhorn/P1150386.jpg
http://i69.photobucket.com/albums/i43/Ty_Bower/Buschhorn/P1150390.jpg
http://i69.photobucket.com/albums/i43/Ty_Bower/Buschhorn/P1150394.jpg
I'd definitely wait until the glue has dried sufficiently before ironing. Veneering is much like hanging wallpaper; if they're only slightly noticeable, the waves that appear beneath the wood could actually be where the glue has pooled a little bit. If that is the case, they should disappear as the glue dries.
Larger bubbles are usually due to insufficient clamping. If you reeeeeeally need to take off the veneer and start again, use your iron's steaming function. Start steaming at one end and s-l-o-w-l-y start working the bad section of veneer off of the plywood. The fact that you used paper-backed veneer should make this a bit easier. Once the veneer is off, let your speaker dry a little, then use a proper sanding block to lightly sand the old glue down a bit.
Before attaching the new veneer, make a clamping caul out of a piece of cheap MDF. It should be the same size as the front of your speaker, or slightly larger. Apply the new piece of veneer like you did before, except this time place the caul on top of the veneer before clamping. The idea here is to evenly distribute the clamping pressure - and avoid the dreaded glue voids.
BTW, beautiful work so far! Mine have yet to be veneered, so they still look like deux-deux.
Ty - I'd give a firm re-ironing at your iron's highest temp a try first - and don't be afraid of a little bit of scorching, as you'll be sanding it out with at least 150 to 220G before applying your finish. Just make sure there's no residual glue on the iron sole plate - I regularly take a RO sander and 220G paper, then green Scotch-rite scouring pads to mine.
Another possible cause of bubbles (as opposed to lumps) is too little glue applied to either / both surfaces. Plywood is especially absorbent and needs more than MDF. I personally have better success with the short pile "velvet" rollers than foam for this application, and always apply 2 thin coats in perpendicular patterns.
Another possible cause of bubbles (as opposed to lumps) is too little glue applied to either / both surfaces. Plywood is especially absorbent and needs more than MDF. I personally have better success with the short pile "velvet" rollers than foam for this application, and always apply 2 thin coats in perpendicular patterns.
Last edited:
I set the iron to its highest setting. It seems I almost can't scorch the wood. I'll leave the iron in place for five seconds, then move it about 1/4". Repeat until the end. I'm using a thin cotton sheet between the iron and the veneer, so no worries about glue on the sole. For the smaller panels, I've switched to using a single sheet of typing paper. The paper does tend to yellow a bit, so I guess the iron is plenty hot.
I hope I've got enough glue. I have one coat on the back of the veneer and another on the cabinet. For the last few pieces I've used two coats on the cabinet. It seems pretty thick to me, but what do I know? The 16 oz bottle of Titebond was brand new when I started the veneering, and now it's all gone.
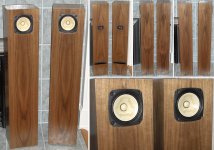
It seems to be turning out well enough. Once again, this project has had plenty of learning experiences. All five sides are now veneered. I'll leave the back naked, since it's too hard to dress the mouth of the horn. The bottom still needs trimming, then I guess I ought to sand everything before I stain and poly.
I was happy to see the magnets seem to be working. They could hold a little tighter, but it'll be good enough. I was concerned the heat from the iron might weaken the magnets on the cabinet. I used 1/4"D x 1/8" in the cabinet, and 1/4"D x 1/16" on the grilles. In hindsight, I wish I had used the thicker magnets for both. Maybe next time.


http://i69.photobucket.com/albums/i43/Ty_Bower/Buschhorn/P1150401.jpg
http://i69.photobucket.com/albums/i43/Ty_Bower/Buschhorn/P1150408.jpg
I hope I've got enough glue. I have one coat on the back of the veneer and another on the cabinet. For the last few pieces I've used two coats on the cabinet. It seems pretty thick to me, but what do I know? The 16 oz bottle of Titebond was brand new when I started the veneering, and now it's all gone.
It seems to be turning out well enough. Once again, this project has had plenty of learning experiences. All five sides are now veneered. I'll leave the back naked, since it's too hard to dress the mouth of the horn. The bottom still needs trimming, then I guess I ought to sand everything before I stain and poly.
I was happy to see the magnets seem to be working. They could hold a little tighter, but it'll be good enough. I was concerned the heat from the iron might weaken the magnets on the cabinet. I used 1/4"D x 1/8" in the cabinet, and 1/4"D x 1/16" on the grilles. In hindsight, I wish I had used the thicker magnets for both. Maybe next time.
http://i69.photobucket.com/albums/i43/Ty_Bower/Buschhorn/P1150401.jpg
http://i69.photobucket.com/albums/i43/Ty_Bower/Buschhorn/P1150408.jpg
Hello there, Ty,
Excellent job! I'm mighty glad you didn't have to follow my suggestion, as it was only meant to be used in a worst-case scenario.
I would like to make one suggestion, and that is to please reconsider the "stain 'n' 'thane" finish.
It's been my experience that regular wood stain doesn't get absorbed evenly by the wood, leaving a spotty appearance that just plain looks bad. Some woods take stain better than others, but still... Besides, walnut veneer usually finishes beautifully without stain. It will gradually darken as it ages - which is one of the reasons it's so d***ed hard to match new to old veneers on antique radios!
If you absolutely insist on a stain, then please consider using a tinted grain sealer, or aniline dye; they go on much more evenly.
Also please reconsider the polyurethane. It works a treat on hardwood floors, but almost always looks like merde on furniture. The finish is so distintive that I can spot a "restored" antique radio that's been polyurethaned from fifty feet away. I'm not kidding.
I would suggest applying several coats of satin-finish nitro lacquer instead. I use the Behlen brand , which is available in spray cans from places like Woodcraft. Start with a coat of sanding sealer to fill in the grain, then sand lightly with 180 or 220 grit. Wipe all that down with a tack cloth (to get rid of the dust), then give 'em a couple of coats of the satin, rubbing between each coat with 0000 steel wool. Give 'em a final rubdown with another piece of 0000 soaked in tung or boiled linseed oil, then wipe them off and look at them glow!
It's not nearly as much work as it sounds, and it goes by quickly. They'll look like a million bucks - I promise! Folks will be asking where you bought them...
I say all of this because I myself have screwed up a lot of stuff with polyurethane - and I think your work deserves much better!
Last edited:
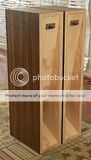
Finished getting a better look at your pics just now. You've done an incredible job of matching and centering the grain!
One obvious option I forgot to mention in my last post is to use a penetrating oil, something like Watco's Danish finishing oil. In fact, I would do this even before considering going the lacquer route. It's cheaper, quicker and easier; success is almost guaranteed, as it's really just a matter of application, buffing, and wiping off the excess.
These really aren't oils per se, but thin varnishes that are applied with rags or steel wool. This stuff will go on even quicker than the lacquer and it will look just as good. The only downside is that you'll have to renew the finish regularly - like once every couple of years - but if you kinda like, er, "buffin' the wood" that shouldn't present a problem, heh heh...
I just bought a pair of Klipsch Cornwalls two weeks ago. They were made in 1980, and the original oiled walnut finish was well-maintained through the years. It still looks spectacular!
Just thought I'd offer a couple of finishing alternatives that are, IMHO, VASTLY better than poly. Whatever you choose to do, I'll be glad to help.
Last edited:
Maybe this: Waterlox original formula (tung oil-based sealer / varnish): Waterlox Tung oil wood sealer finish protection for floors, countertops, furniture, cabinets, outdoor, marine applications
Excellent job!
Thank you! I'm pretty pleased with the way it's turning out. I would never have made it this far without the advice I've found here.
I will give the finish some more thought. Mostly, this project has been a "use what I've got laying around" kind of thing. I have a can of stain and a can of oil based poly, so I figured that would be good enough. But, I'm not opposed to learning a new technique. The lacquer idea is appealing, but I would prefer to avoid anything that requires spraying. It's too cold to spray outside and I don't like getting overspray in the garage. I do have a quart of Watco oil leftover from a previous job. Maybe I'll try a little of that on a scrap and see how I like it. I guess we'll all just have to wait and see what ends up happening.
I couldn't agree more with mr Z on polyurethane (or for that matter water based "lacquer") on any nice veneer. I've done speakers in a variety of species and the polys or water based finishes can make it look like a cheap plastic laminate.
There are several brands of decent "real" (i.e.nitrocellulose) lacquers available in aerosol cans (these would probably take 3 or 4 cans for the required minimum 2 coats), but if you don't want to spray in the garage, a hand rubbed oil/wax finish would definitely be the way to go. Just don't be surprised if it takes as long as the actual veneering.
edit: let me expand / correct the last sentence - I'm talking about a couple of coats of oil, followed by a finishing coat of satin paste wax. Having veneered and finished many pairs of speakers, including horns similar to yours, and sprayed with lacquer in our booth at work, I've found it a much quicker process than oil / wax, so that's an admission of laziness.
Last edited:
So, I start wiping on the first coat of Watco's, and what do you think appears? A bubble! It's about the size of a quarter, and smack dab in the middle of the front. Bah!
OK, now things get interesting - not the time to reapply the iron - those scorch marks would be much harder to sand out.
Try cutting a small slit in the direction of grain with veneer or utility knife and injecting a drop or two of white glue (great for cold pressing your veneers, but I wouldn't use it for structural work) with a syringe, then apply clamping caul and weight, and wait.
Well, for better or worse, I did hit it with the iron. I put a clean piece of white cotton cloth on top and kept the iron moving in a small circle. The Watco's oil, which was still only a few minutes wet, smoked a bit at first. I cautiously lifted the cloth expecting to see a weird mark or just have the cloth permanently stuck. Instead all I saw was that the oil had been dried or driven out. So, I ironed for a little while longer. Then I took off the cloth and pressed down firmly with a small wood block.
There's a weird little divot there now, but it's much smaller than it was before. Hopefully the veneer won't lift again over time. I've since oiled all the other surfaces, and thankfully no more bubbles appeared. I'll get a good look in the morning when the oil is drier and the sun is up.
I will say this much - Mr. Zenith was absolutely correct about the color of walnut. Once it is oiled, it's an absolutely beautiful wood. I can't believe I was considering using a stain on it. Thanks for talking me out of my foolishness!
Well, for better or worse, I did hit it with the iron. I put a clean piece of white cotton cloth on top and kept the iron moving in a small circle. The Watco's oil, which was still only a few minutes wet, smoked a bit at first. I cautiously lifted the cloth expecting to see a weird mark or just have the cloth permanently stuck. Instead all I saw was that the oil had been dried or driven out. So, I ironed for a little while longer. Then I took off the cloth and pressed down firmly with a small wood block.
There's a weird little divot there now, but it's much smaller than it was before. Hopefully the veneer won't lift again over time. I've since oiled all the other surfaces, and thankfully no more bubbles appeared. I'll get a good look in the morning when the oil is drier and the sun is up.
I will say this much - Mr. Zenith was absolutely correct about the color of walnut. Once it is oiled, it's an absolutely beautiful wood. I can't believe I was considering using a stain on it. Thanks for talking me out of my foolishness!
fingers crossed, Ty
lacquer or "spar" varnish can look pretty nice on walnut as well, and doesn't require the periodic maintenance
Attachments
Geez, you guys are makin' me look bad! I guess I'll have to find the time to veneer my Buschorns sometime soon...
Ty, it wasn't foolishness we talked you out of, but inexperience. Guess who used stain 'n' 'thane on a 1937 Zenith 5-S-127? You guessed it!. I spent several gut-wrenching hours stripping the 'new' finish to correct that one. It was nasty stuff to strip; it curdled up and formed a weird goo that kinda reminded me of honeycomb tripe (ugh!). It was no fun...
Don't worry too much about that divot. Chances are you'll be the only one to notice, anyway. Remember: most folks out there are too damned lazy to buy the stinkin' plywood, much less accomplish what you've done. IMHO, you had every right to be proud even before they were veneered. Oh yeah - please post some pics!
Chrisb: yours look great, too. They look like Buschorns from the front, but the lack of a large hole in the rear (there's a joke in there somewhere) leads me to believe otherwise...
I guess I'll have to find the time to veneer my Buschorns sometime soon...Ty, it wasn't foolishness we talked you out of, but inexperience. Guess who used stain 'n' 'thane on a 1937 Zenith 5-S-127? You guessed it!
. I spent several gut-wrenching hours stripping the 'new' finish to correct that one. It was nasty stuff to strip; it curdled up and formed a weird goo that kinda reminded me of honeycomb tripe (ugh!). It was no fun...Don't worry too much about that divot. Chances are you'll be the only one to notice, anyway. Remember: most folks out there are too damned lazy to buy the stinkin' plywood, much less accomplish what you've done. IMHO, you had every right to be proud even before they were veneered. Oh yeah - please post some pics!
Chrisb: yours look great, too. They look like Buschorns from the front, but the lack of a large hole in the rear (there's a joke in there somewhere) leads me to believe otherwise...
Last edited:
Oh yeah - please post some pics!
More pics...


http://i69.photobucket.com/albums/i43/Ty_Bower/Buschhorn/P1150424.jpg
http://i69.photobucket.com/albums/i43/Ty_Bower/Buschhorn/P1150425.jpg
http://i69.photobucket.com/albums/i43/Ty_Bower/Buschhorn/P1150427.jpg
http://i69.photobucket.com/albums/i43/Ty_Bower/Buschhorn/P1150428.jpg
http://i69.photobucket.com/albums/i43/Ty_Bower/Buschhorn/P1150418.jpg
http://i69.photobucket.com/albums/i43/Ty_Bower/Buschhorn/P1150433.jpg
- Status
- This old topic is closed. If you want to reopen this topic, contact a moderator using the "Report Post" button.
- Home
- Loudspeakers
- Full Range
- Fostex FF85K in the Buschhorn Mk I?