What tricks do you use when soldering SMD components. Particularly small resistors and capacitors ?
Humans need three arms. One to hold the component, another the solder and a third for the iron.
Humans need three arms. One to hold the component, another the solder and a third for the iron.
I have using XRK's suggestion of solder paste combined with a flat teflon coated pan using a hot plate. About 90 seconds for the paste to liquify, remove, cool, done.
Use small fiberglass brush for applying flux and then solder with T12-BCM2 tip.
Eternal Tassel Fiberglass - Flux Pen PCB Soldering Solder Tool (2mm) | eBay
T12-BCM2 Replace Soldering Solder Iron Tip For Hakko Shape 2BC PCB Repair | eBay
Usually this kind of tip holds enough solder for even large SMD components. The more valueable it keeps you from applying excessive solder amounts.
Use thin needle-like tweezers like this:
VETUS 6pcs Safe Anti-static Tweezers Maintenance Tools ESD LW | eBay
Last edited:
I posed this question to Linda, who does rework on PCB's at my day job. She is quite frankly amazing in terms of what she can do. I'll just post her answer to the question here:
I’m not sure if you call it tricks or just years of experience. I tin and flux one of the pads then use my tweezers holding the part in place while heating that pad up, then add solder to the other side of the pad and part. Then I touch up the first side just to make sure it isn’t a cold solder joint.
I’ve been told I solder like I have 3 hands, I hold the solder between my finger and the iron with one hand and the tweezers with my other hand.. Here again just lots of practice and years of experience. I hope this helps.
If you are soldering a resistor onto the board, dab a little solder on one pad, set the resistor in place with tweezers and then reheat the solder until the resistor sinks in. Align the resistor while still hot. Once it's straight, do the other connection. IC's can be done the same way, solder one pad only until it's aligned.
A really easy way to do it is with solder paste and a hot air rework station. The part will align itself due to the surface tension of the molten solder.
A really easy way to do it is with solder paste and a hot air rework station. The part will align itself due to the surface tension of the molten solder.
I put some solder on first pad.
Then solder one end of SMD to that pad, then solder other pad.
I have unsteady hands so always rest my hand on the bench when holding SMD component in tweezers.
For IC's I put solder on one corner pad. Then solder IC leg to that pad.
I then solder opposite corner and ensure IC is square and in line.
I then run solder along the legs. I then use copper braid to remove excess solder.
To remove components I have a hot air rework station.
There are loads of tutorials on youtube.
Last edited:
I find the holding part the most difficult, I end up firing the part across the room.
I agree with applying solder to one pad.
I agree with applying solder to one pad.
I find the holding part the most difficult, I end up firing the part across the room.
I agree with applying solder to one pad.
You can buy special tweezers that have grips on them.
They aren't fool proof but better than normal tweezers.
You need a lighted magnifyier no coffee or music playing to distract you, full concentration. Kind of like shooting your best pool game 🙂🍷
Clean pcb pads, lightly apply solder to one end of the solder pad, then place SMD on top of that solder point.
Next get a hemostat and a big needle or I use a tungsten thin rod ground to a needle point and put it on the hemostat and this combination is used to place right on top of the SMD to apply pressue as you lightly solder that previously solder point to fix it in place .
Next, get a flux pen and wet the SMD and solder the other side.
I found it necessary to use the smallest dia. solder (.020") you can get , and use a short needle point soldering tip fully tinned and clean. I used 650 F
Your soldering hand needs to be in a comfortable position and resting tight on the table for jitter free control.
It helps to use a dead board to play with just before you tackle yours to get in the mode
You tube info is very helpful, but consider some are doing this all the time and have expensive setups for their profession unlike us diyers
This is the easiest and cheapest way without the need for those heated blower stations 😬
Regards
David
My tweezers were $65. Cheap ones just launch parts.
For quick removal of passives a pair of soldering irons is quick and easy to pluck a part off.
For quick removal of passives a pair of soldering irons is quick and easy to pluck a part off.
I find the holding part the most difficult, I end up firing the part across the room.
If you have negative tweezers that squeeze to open, they can hold the part without having to
squeeze the tweezers, so it's easier.
Tweezers negative locking squeeze to open steel watchmakers tool,1 Pcs | eBay
For those who want to pay more - Tweezers for Medical Negative-Action Style
Last edited:
Get following:
1. flip up magnifier goggles
2. high quality Swiss made tweezers (anti magnetic and ESD safe)
3. extra small soldering iron tip (0.015in dia) for touch-up work
4. thin rosin core solder (0.5mm dia)
5. solder paste in a syringe with hypo needle
6. small hot plate cooker
7. small teflon coated fry pan
Watch YouTube howto videos
I like solder paste and frypan as it gives the cleanest most reliable results, but only works if you have only 1-side of SMT. If 2 sided - you are out of luck and need to manually do second side.
I used to solder all by hand but that is so slow and ugly, now I avoid that except for touch up (replace part or remove part).
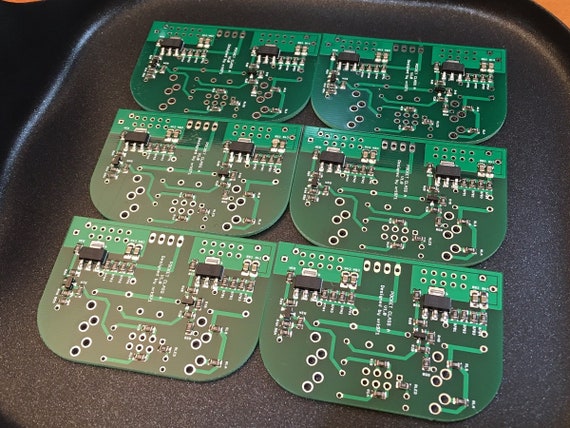
Here are 6 amps getting reflowed on a frypan at once:
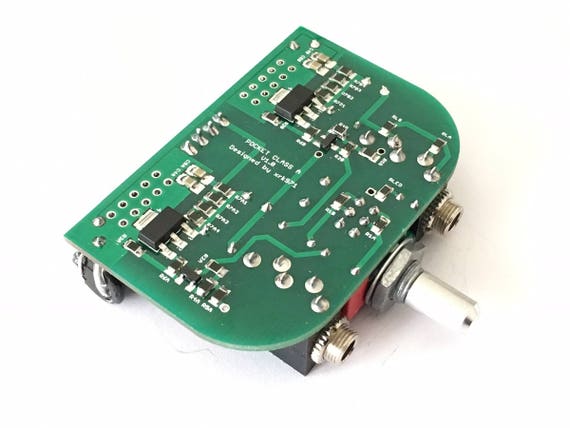
This is the quality you can get with solder paste and a fry pan:
When doing this many, a solder paste stencil makes easy work of the laydown of paste. You still need to manually pick and place parts with a tweezer though. That is why the magnifier goggles and good tweezers are so important.
1. flip up magnifier goggles
2. high quality Swiss made tweezers (anti magnetic and ESD safe)
3. extra small soldering iron tip (0.015in dia) for touch-up work
4. thin rosin core solder (0.5mm dia)
5. solder paste in a syringe with hypo needle
6. small hot plate cooker
7. small teflon coated fry pan
Watch YouTube howto videos
I like solder paste and frypan as it gives the cleanest most reliable results, but only works if you have only 1-side of SMT. If 2 sided - you are out of luck and need to manually do second side.
I used to solder all by hand but that is so slow and ugly, now I avoid that except for touch up (replace part or remove part).
Here are 6 amps getting reflowed on a frypan at once:
This is the quality you can get with solder paste and a fry pan:
When doing this many, a solder paste stencil makes easy work of the laydown of paste. You still need to manually pick and place parts with a tweezer though. That is why the magnifier goggles and good tweezers are so important.
Last edited:
As other people say, you have only two hands.One is for an iron, the other is for an SMD. Solder must be already put on the pad.I can't imagine another solution. What you need to do this correctly are some tips and experience.
The 1st is an iron.Too hot temperature isn't good.As your skill becomes better, You can feel the temperature when you melt solder.I usually use an iron with the intermediate switch to keep the good temperature.An iron also must be clean every time.
The second is a tweezer and head mount magnifier with LED.Both depend on personal likeness. You need to find a good one for your hand and head.Solder is as thin as possible. I use 0.3mm dia for SMD and QFP.Solder is small amount and flux is much.If possible, gold plate pads are preferable. It prevents cold solder joint.Those are my tips for soldering.I hope your success.🙂
The tip of tweezer is also important.Straight type like E is hard to handle an SMD.My favorite is like F slight bending.
Ceramic Tweezer Hear resistance twizer Pointed Tip for building RDARBA wire | eBay
Ceramic Tweezer Hear resistance twizer Pointed Tip for building RDARBA wire | eBay
Whilst I use the tweezers to position and hold most of the time, sometimes I use the fingernail to hold parts that are being annoying. Once the part is tacked in the right spot usually there are no further problems.
For multiple parts, or types that have thermal pads, I use at least a pre-heating hot plate to bring components and board up to about 90 degrees C which makes the soldering process much swifter, but I haven't adopted the soldering paste method in the diy lab.
For multiple parts, or types that have thermal pads, I use at least a pre-heating hot plate to bring components and board up to about 90 degrees C which makes the soldering process much swifter, but I haven't adopted the soldering paste method in the diy lab.
I don't use tweezers, I use a bamboo kebab skewer, one end is a fine point the other a 90 degree notch. Solder one pad, fetch up, heat and press down, do other pad. Some interesting tips here. I find adequate illumination is the key, with enough light no need for magnifiers until you get stupid small.
You MUST use unleaded solder otherwise leaching of the tin will start making the component intermittent in time as the tin is removed and replaced with lead that does not electrically adhere or connect to the component.
Soldering Melfs
Hi,
so good so far, all these advices may work with flat components like SOIC, or resistors, capacitors like 0805, 1206, 1812, 2220 and so on.
How to handle the Melf cases like 0204 , 0207 and melf diodes. they are round and needs usually to be glued on the pcb.
Since it's hard to get the glue, what advices do have for that problem?
BR
Günni
How to handle the Melf cases like 0204 , 0207 and melf diodes. they are round and needs usually to be glued on the pcb.
Since it's hard to get the glue, what advices do have for that problem?
BR
Günni
I just solder them in place. No need for glue.
How about SMD with thermal pad ?
Like LTC6090 or ADA4700, SMD op-amps that need soldering their back onto a PCB pad for power dissipation
Like LTC6090 or ADA4700, SMD op-amps that need soldering their back onto a PCB pad for power dissipation
- Status
- Not open for further replies.
- Home
- Amplifiers
- Solid State
- Soldering SMD components