Guess I'll give this a try. http://p10hifi.net/FAL/downloads/CGR-MarKen103p-plan-040414.pdf
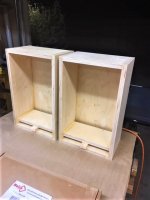
They are in the finish stage now. We did have a listen to them before finishing. They are better than I expected. The Pensil enclosures were good but, the CGR enclosures are great. We tried them in a very large room, about 7' apart and 5' from rear wall. No side walls within 15'. Using a F5/B1 combo the bass was very controlled and was good for a open room. Detail is very good. The off axis quality is really good. Giant sweet spot. You're going to love them.
")

I'm still working on placement. The room I have them in now is a bit more challenging as far as placement goes.Thanks, opa1. What will you be using for stands? I.e. how high above the floor do you plan to keep them?
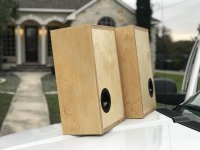
Thanks for posting the pic's and all the help!Some pics as we loaded them up in his truck:
Thanks for posting the pic's and all the help!
Happy to help, it was a fun build for sure!
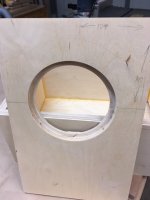
Yes, nice looking build. Looks like they're made of baltic birch plywood? What did you end up doing for the finish?
My pair of CGRs is in baltic birch ply. I'm planning to finish with Watco Golden Oak Danish oil and a coat of satin polyurethane. Need to figure out how to get the color to absorb more evenly, though.
My pair of CGRs is in baltic birch ply. I'm planning to finish with Watco Golden Oak Danish oil and a coat of satin polyurethane. Need to figure out how to get the color to absorb more evenly, though.
Yes, nice looking build. Looks like they're made of baltic birch plywood? What did you end up doing for the finish?
My pair of CGRs is in baltic birch ply. I'm planning to finish with Watco Golden Oak Danish oil and a coat of satin polyurethane. Need to figure out how to get the color to absorb more evenly, though.
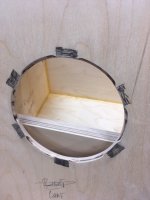
We used watco danish oil, natural. Sanded them 220,320,400, then applied the oil, 3-4 coats, then wiped before they go tacky. A few days later I rubbed them a bit with soft cloth, then added a few more light coats, again wiped before they go tacky.
Adding poly will make them more durable, if that's needed where you are going to use them. Give the danish oil plenty of time to cure before the poly and I bet it will look great.
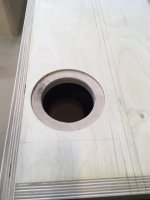
I've noticed baltic birch takes finish well after the sanding process I outlined. I will say the first coat or two gets absorbed quickly. I try to flush the surfaces with oil as quickly as I can, keep it wet for the first 15-30 minutes, depending on weather, and it will usually take pretty evenly.
Sometimes I'll even do a coat or two of finish before I make my final cuts and assembly. It can be easier to get them quickly coated and even initially this way. I let them cure for a day or so, then make the cuts and assemble. Just be careful to not get finish on glue edges, or ensure you sand it off well.
This can help face veneer tear-out as well, which baltic birch can tend to do, especially with cross cuts.
Cheers,
Gable
Cool thanks! For a pair of Woden Shrike, my process was to sand with 80, 120, raise the grain, 220, rub on the Danish oil (Golden Oak), let cure for 24 hours, sand with 400, another coat of oil, let cure for 3 days, then apply the polyurethane.
They look fine from the listening position, which is about 8 feet away. But up close, some surfaces look nice and even while others are uneven or show streaks of the yellow coloring in the wood grain (almost like mac and cheese). I don't have pics on this computer else I'd show you.
Anyway, your process starts with a much finer grit, so I'll try that on scrap. Thanks for detailing it.
Cool thanks! For a pair of Woden Shrike, my process was to sand with 80, 120, raise the grain, 220, rub on the Danish oil (Golden Oak), let cure for 24 hours, sand with 400, another coat of oil, let cure for 3 days, then apply the polyurethane.
They look fine from the listening position, which is about 8 feet away. But up close, some surfaces look nice and even while others are uneven or show streaks of the yellow coloring in the wood grain (almost like mac and cheese). I don't have pics on this computer else I'd show you.
Anyway, your process starts with a much finer grit, so I'll try that on scrap. Thanks for detailing it.
I always start with 120 initially, but in 'finish' stage I start w/ 220. Usually the 220, 320, and 400 sanding passes are slow and with very very little pressure, just trying to clean them up that last little bit.
Sometimes I skip the 320, as it's not always needed. 220 is pretty fine to begin with. The 400 after curing is a great idea, I'll do that too with the sandpaper on a big block and just lightly skim the finish flat.
Gotcha. Do you ever raise the grain?
After 400 the finish is glass-smooth. It's always fun to see how the texture of the wood changes so much.
I've not tried that. I wonder what difference it makes for a danish oil finish?
- Status
- This old topic is closed. If you want to reopen this topic, contact a moderator using the "Report Post" button.
- Home
- More Vendors...
- Planet 10 hifi
- 10p Monitors?