I use a diffuser with lowthers in waveguides
My Lowther DX65s are mounted in 60x90 conical horns and operate 500 hz up to where they roll off in the high frequencies. I have tried the Lowther diffusers but I ended up creating a light bulb base which screws into the Lowther where the diffusers screw in, then I can screw different light bulbs into the light bulb base to act as diffusers.
The winner after listening to different diffusers is funnel type which is large enough such that the entire cone of the Lowther driver is shielded by the diffuser. As an example look at a par 38 light bulb. This does a very nice job improving the power response of the higher frequencies.
Retsel

You can try the JBL lens in cardboard, etc. scale and print the image below to fit the driver120 dispersion - try a Karlson wedge shaped chamber with aperture which overlaps part
of the cone.
JBL style lens - scale as necessary and print:
https://i.imgur.com/E3MneZr.jpg
Thanks Freddy. I see on photos and YouTube videos that the "mid flaps" curve in. Good to note. It looks relatively simple and elegant. Really like to try it on my Fame 15 inch fullrangers!
US9693141B2 - Fluted and elongated aperture for acoustic transducer
- Google Patents
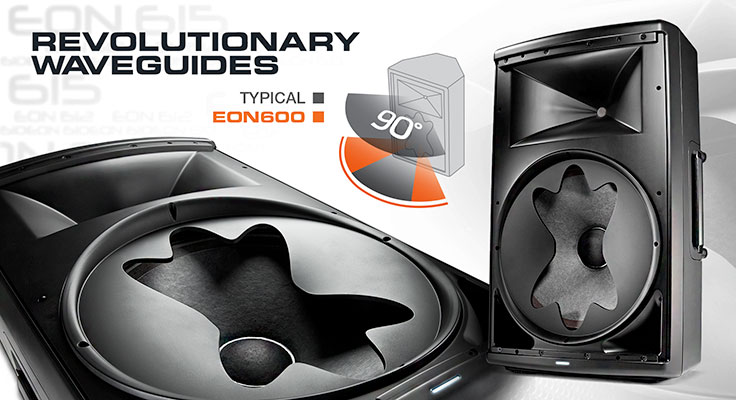
This is the patent for the apertures/baffle/low frequency waveguide Freddy shared. As expected, the width and height of the aperture determine radiation pattern. The elaborate shapes are to spread out reasonances etc, the parts bent inward are an elaboration of that strategy. The patent indicated that the 3D aspect is a choice, dependent on application.
I don't doubt the 3D version is better, but this stimulates my curiosity enough to try a fast 2D version.
I mean, this beats a DIY slanted plate project by far, in terms of simplicity at least.
- Google Patents
This is the patent for the apertures/baffle/low frequency waveguide Freddy shared. As expected, the width and height of the aperture determine radiation pattern. The elaborate shapes are to spread out reasonances etc, the parts bent inward are an elaboration of that strategy. The patent indicated that the 3D aspect is a choice, dependent on application.
I don't doubt the 3D version is better, but this stimulates my curiosity enough to try a fast 2D version.
I mean, this beats a DIY slanted plate project by far, in terms of simplicity at least.
Hahaha, wow, you can buy them as replacement parts:
JBL EON 615 Woofer Cover Plate 5039904 - Speaker Exchange
JBL EON 615 Woofer Cover Plate 5039904 - Speaker Exchange
That particular "JBL EON woofer plate"...if you look closely, it looks very much like a plastic paint-can lid, maybe a 20 liter can, see the slotted side & the round-over on the other side?
-------------------------------------------------------------------Rick.....
-------------------------------------------------------------------Rick.....
Last edited by a moderator:
went to buy one thankyou for the link .... then saw the postage to the UK! I'll wait till I have a little bit more money and get a pair for my fane full rangers. could be the perfect answer . with a bit of eq and this lens makes a good value little projectHahaha, wow, you can buy them as replacement parts:
JBL EON 615 Woofer Cover Plate 5039904 - Speaker Exchange
As a follow up to my previous post, it is useful to review the attached website which shows how different diffusers impact the frequency and power response of different ad hoc diffusers mounted in Lowther drivers.
http://audioprogress.free.fr/
http://audioprogress.free.fr/
wondering if anyone here has mounted one of these lens over a woofer other than the one in the eon? I have a pair of JBL 2226 that I would like to try these on but wonder if they can be mounted as the screw holes on the lens do not line up with the woofer mounting holes of the SR 4627a cabinet. Thanks for any comments.Diffraction slit like this would be easier
3D printed lenses that can be attached using the mounting screws of the driver itself would be very interesting for full rangers.
Are there any resources that would be a good primer for designing lenses?
The other interesting thing I’ve seen is xrk’s 3D print that covered a full ranger and funneled the output down to be able to inject into a CD horn throat. This would then treat the full ranger like a compression driver I guess. That I’m curious to wonder how big a driver you could realistically use this with, with out problems.
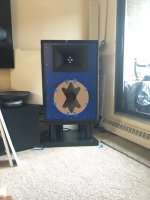
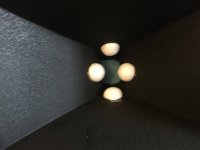
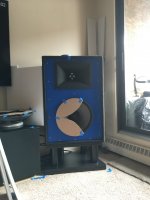
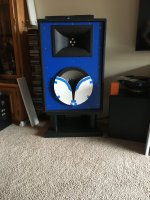
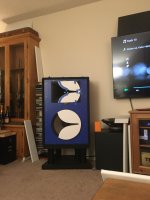
I wanted to let followers know that I just experimented with flat cardboard cutouts of two different lenes fitted to a pair of JBL 2226 woofers in a set of JBL SR 4726a speakers which also use the 2446 compression driver fitted to a 2370a horn. Both the JBL Eon series woofer lens as well as a set of Karlson tapers were auditioned on the SR 4726a two way speakers. The Eon lens made a noticeable improvement to both clarity and image of the speakers. Next we tried the Karlson tapers and there was a further improvement all around. The Karlson tapers were tried with the narrow part of the taper pointing up then next we rotated the tapers 90 degrees with the pointed end of the tapers pointing toward each other in the horizontal plane. This last configuration has proved in the past for me to yield excellent results and did so again. Prior to listening to the Karlson tapers we had been ready to order a set of the Eon lenses but once we listened to the Karlson tapers we decided to stick K-tapers. I will post a photo tomorrow. I also added four 3/4" half round bumps made from white closed cell foam balls cut in half into the horn throats. These were positioned at the end of the coupling tube just where the horn flare begins. This also has made a significant improvement to the depth width and height of the sound stage and improved the spatial quality of sounds within the stage. Tomorrow I plan to open up the 2446 drivers and ad a layer of dynamat to the inside walls of the back cup and also will ad a layer of magic eraser foam to damp the cavity. I hope this is of interest to some of you.
Thanks for the responses. I am still figuring out how to send pictures on my phone to my computer so I can post them here. The photos will give you all the info you need to know what I have done. In the mean time I just wanted to let you know that the Karlson tapers I used are made to fit over the woofer itself just as the JBL Eon lens does. So this is a very simple effective inexpensive and reversible mod to experiment with (so is the use of diffractor balls in the horn).
Yes you could do this sort of mod on just about any speaker. These sort of lenses can be made to fit most any driver. Two way speakers horns especially large format ones like the JBL SR4726a have a hard time in general matching the dispersion of the woofer to the tweeter horn at the crossover frequency and both the Karlson tapers and the diffraction bumps seem to go some way to improve the dispersion of the speaker over this band leading to improved performance probably due to more uniform room reflections. You would need to experiment to determine what works best in any given situation but they are power tools to have in your box of modification and design tricks that cost virtually nothing. On three way passive set ups woofers can be fitted with acoustical filter simply and inexpensively using a 1/4" layer of F11 Acoustical Felt covering the woofer. Bass frequencies pass through unhindered but the felt catches the upper response of the woofer past crossover and that reduces the ears ability to localize these frequencies to the woofer, the felt also adds some additional load to the woofer which is also a good thing. I hope this is of interest and that some of you do some experimenting to see for yourself what can be achieved using some or all of these techniques.You mean like a retrofit on any cab of suitable dimensions?
My previous post is a response to the op regarding the Acoustats with an inference to the inherent beaming issue with flat panels. I have not gotten around to trying it yet but it seems like a pretty straight forward mod. What do you think about the potential success that could be achieved by using a slotted lens as shown on the entire length of each panel? Could it be worthwhile? A relatively easy add on that simply follows the width of the gaps in the louvers..1/2". Seems to be about the right spacing to work?
Here are some photos of assorted experiments. The flat cardboard JBL lens mad a nice improvement so much so I recommended my brother who owns these SR Mkll 4726a speakers to purchase a pair of the finished product as they are available for about $26.00 usd plus shipping. While thinking about ordering I tried some fast cardboard Karlson tapers and the improvement from the first set of tapers was enough to forget about the JBL lens. Here finally are the photos which got trapped on my phone and are now also on my laptop. So far the best configuration is with matching tapers on both the woofer and the horn. The latest experiment was to increase the apparent height of the cabinet using a four sided extension box made from cardboard. The speakers are bolted onto a 12" tall stand and an extra ten inches of cabinet height was added to the to pf the cabinet. Sorry I don't have pictures as this happened the day before a cross country flight. I was suitably impressed wit the improvement too the height width and depth of the sound stage and overall focus of image was also. This was not a smack you in the face difference but one which really stood out with recordings that have very good spatial. This last modification was prompted by listening to a pair of JBL M2 loudspeakers. I hope this is of interest and that it results in some of you doing some Karlson - Taper experiments, if any of you have questions I will be happy to assist as best I can.I wanted to let followers know that I just experimented with flat cardboard cutouts of two different lenes fitted to a pair of JBL 2226 woofers in a set of JBL SR 4726a speakers which also use the 2446 compression driver fitted to a 2370a horn. Both the JBL Eon series woofer lens as well as a set of Karlson tapers were auditioned on the SR 4726a two way speakers. The Eon lens made a noticeable improvement to both clarity and image of the speakers. Next we tried the Karlson tapers and there was a further improvement all around. The Karlson tapers were tried with the narrow part of the taper pointing up then next we rotated the tapers 90 degrees with the pointed end of the tapers pointing toward each other in the horizontal plane. This last configuration has proved in the past for me to yield excellent results and did so again. Prior to listening to the Karlson tapers we had been ready to order a set of the Eon lenses but once we listened to the Karlson tapers we decided to stick K-tapers. I will post a photo tomorrow. I also added four 3/4" half round bumps made from white closed cell foam balls cut in half into the horn throats. These were positioned at the end of the coupling tube just where the horn flare begins. This also has made a significant improvement to the depth width and height of the sound stage and improved the spatial quality of sounds within the stage. Tomorrow I plan to open up the 2446 drivers and ad a layer of dynamat to the inside walls of the back cup and also will ad a layer of magic eraser foam to damp the cavity. I hope this is of interest to some of you.
Attachments
- Home
- Loudspeakers
- Full Range
- Acoustic lens on a full-range?