I'm looking for any experience people have removing old school RCA jacks. They appear to be pressed in, almost like a rivet. Any ideas on the best way to do remove these without damaging the chassis?
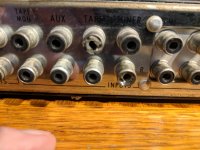
I've also uploaded a picture of the outside to show how they are broken and why I'm replacing them... even though they are still functional.
Is this the best place to post stuff like this?
I'm super pumped that I will be receiving my first amp project in the mail Monday (Amp Camp).
Thanks!
--JBaeckel
Attachments
You're posting in an appropriate place, but posing a difficult challenge!Is this the best place to post stuff like this?
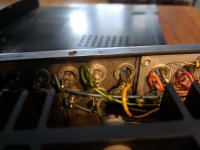
Looks like you'd have to painstakingly fold back the internal flanges in order to push/pull the sockets through to the outside. I wouldn't fancy that task!
Hope someone will come to your rescue with a better idea soon!
If you photograph the wiring to aid reconnecting, remove the wires and cut the the solder connectors off, select a drill about 1/2 as big again to the diameter of the sockets and carefully drill the fixing rivets out from the inside of the connector taking care not to go through the chassis, just the riveted part. This means a replacement can easily be fitted and no marks will be left on the outside or inside chassis,
I'm very hesitant to use a drill but if bending and pushing them out produces no joy I might have to go that route.
I think they are actually grounded to the chassis though, I used a DMM to be sure and there is continuity between the outer shell of the jack and the chassis itself. What makes you think they are not grounded to chassis, I'm newer to this stuff, so likely missing something.
I think they are actually grounded to the chassis though, I used a DMM to be sure and there is continuity between the outer shell of the jack and the chassis itself. What makes you think they are not grounded to chassis, I'm newer to this stuff, so likely missing something.
The outer sleeves of the RCA sockets are most definitely in intimate contact with the chassis.
P.S. It is easier if you drill from the outset and not after you have chewed up the flanges.
Jon's idea of using the larger (metal) drill is to wear away the rear socket flange just enough so that the socket is able to be popped out of its chassis hole.
P.S. It is easier if you drill from the outset and not after you have chewed up the flanges.
Jon's idea of using the larger (metal) drill is to wear away the rear socket flange just enough so that the socket is able to be popped out of its chassis hole.
If you don't want to damage it, how about getting a cable with phono sockets on, cutting them off with about 4 inches of cable, pass the cable through the old socket and solder on the inside. Add a cable tie for strain relief. Leaves you with a flying lead from the case, but will work fine
Something like this https://cpc.farnell.com/pro-signal/psg03261/phono-plug-to-2x-sockets-0-15m/dp/AV18849?st=phono plug
Brian
Something like this https://cpc.farnell.com/pro-signal/psg03261/phono-plug-to-2x-sockets-0-15m/dp/AV18849?st=phono plug
Brian
I can see where you are coming from - that looks like insulating material between the riveted part and the chassis.The jacks in the riveted part also seem to be intentionally not grounded to chassis.
However, it would appear that grounding is taking place via the rivets themselves.
Well... At least they followed the resistor colour code for the wiring. That'll make reconnection a bit easier.
What's the plan after you get the RCAs out? Install new ones, presumably. That'll be quite the chore as well. So... Why not bite the bullet and replace the rear panel? You could just cut around the connectors and add a sheet metal plate to the outside (or inside if the cutout is pretty enough) of the chassis.
Tom
Looks like you'd have to painstakingly fold back the internal flanges in order
to push/pull the sockets through to the outside.
Seems like that's the best way. Snip the inside fold every 90 degrees,
then bend each part inward enough to clear.
Last edited:
I can see where you are coming from - that looks like insulating material between the riveted part and the chassis.
However, it would appear that grounding is taking place via the rivets themselves.
I think the rivets are going through insulating shoulder washers. Im pretty sure I can see the washers on the outside under the heads of the rivs.
I think op risks damaging chassis with any sort of bending action. Pressing may work but you may need to use small c clamps etc and spread the lead properly to make sure it doesn't bend as you apply force. No telling how tight those are in there but prob not too bad.
They make dremel stone wheels like 1/8" by 1" long. Id be temped to try to use that to just grind em out of there. No risk of bending anything then at least but you have to be careful you don't let the tool slip. Same with drill rivets too. Gotta be careful or you'll put a nice gouge in your plating.
Last edited:
I considered that myself. The top rivet cerainly appears to have an insulated washer. Not sure about the bottom one though. A repeat continuity test would confirm or deny.I think the rivets are going through insulating shoulder washers. Im pretty sure I can see the washers on the outside under the heads of the rivs.
Not sure what the component is, but obviously it's worth it to you.
How about drilling them out with a step bit. These are dog cheap, and some of the best I've used:
Steel Step Drill Set - 3 Piece, Titanium Nitride Step Drill Bits
....and maybe install something like these? I'd check first if the plastic shoulder washer is big enough.
Amazon.com: Conwork 6-Pack RCA Female Socket Connector Chassis Panel Mount Adapter for Amplifier Audio Terminal RCA Plug: Home Audio & Theater
Good luck with the ACA!
Seems like that's the best way. Snip the inside fold every 90 degrees,
then bend each part inward enough to clear.
I'm with rayma here.
From experience, No point trying to drill them out, they just end up spinning round...
Give yourself as much space on the inside of the chassis, cut the centre connection off and 'nibble' every 30 or so degrees round the flange using sharp side cutters. Then fold the 'ears' in until you can push the thing out. (Do not try to cut from the front, distorting the outer barrel just locks it up tighter...)
If you want to preserve the nickel colour for the replacements, get some good quality ones that tighten at the rear, with no ugly nut showing, (example https://cpc.farnell.com/deltron-enc...-socket-nickel-black/dp/CN00411?st=RCA socket) the cheaper Chinese ones often shear when you tighten them up.
Ditto good luck with ACA.
They aren't insulated they are serrated washers, look top right.
I'm with Tom, I'd try to remove them, but ultimately that looks like a new back panel.
I see serrated washers on the left side non phono inputs but the phono input plate rivs are through insulated shoulders.
As there is only one wire connected to some jacks they must be chassis grounded.
I would remove the wires, cut off or pull out the center contact and if possible the insulator holding it in. The you can use a dill slightly smaller than the hole to weaken the shell enough that it will easily break out. Or you can use a small hobby grinder to cut through the flange leaving the lock washer, at that point the shell may come out easily.
The no power tool method would be to nip away the pressed flange with a small diaganol cutter until the shell is loose enough to slip out.
But I think the important part is to remove the insides first.
Even a sharp chisel might serve to cut the outside part off flush to allow removal.
Assuming you want to perform this dental surgery from the outside, you’ve got quite a challenge on your hands, particularly if by not damaging the chassis you’re including the painted labelling. Is this intended to be a full restoration, or just a repair of functionality of the two damaged inputs? I also note that there are undamaged auxiliary and tape monitor inputs immediately adjacent, why not just use those?
I’d be very wary of using a stepped drill on material this thin - way too easy for them to get away on you. It’ll definitely be a pain to snip / cold back the internal rolled collars as suggested a couple of times, but I think it’ll pay off in the end. The other issue of course is that you’ll need to be careful in selecting replacements that will fit in the spacing allowed - whether internal or external, tightening the locking nuts could be a while ‘nother world of pain.
I’d be very wary of using a stepped drill on material this thin - way too easy for them to get away on you. It’ll definitely be a pain to snip / cold back the internal rolled collars as suggested a couple of times, but I think it’ll pay off in the end. The other issue of course is that you’ll need to be careful in selecting replacements that will fit in the spacing allowed - whether internal or external, tightening the locking nuts could be a while ‘nother world of pain.
- Status
- This old topic is closed. If you want to reopen this topic, contact a moderator using the "Report Post" button.
- Home
- Design & Build
- Construction Tips
- Removing old style Female RCA Jacks