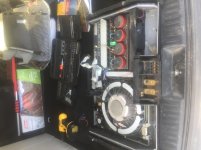
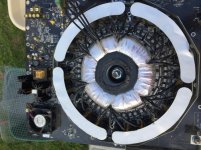
Shout out to Dr Zeus for extending me the chance to own one of these, it’s a holy grail piece for sure even though it’s not totally complete. Good news: all the important bits are there, the board with the status LED’s is missing but I can probably make one since it’s just some lights on a PCB. Bad news: still need a lot of work- the chassis has corrosion, one of the large silver aluminum pieces that goes across the top is broken, and the middle part and plexiglass window is absent as well.
I will electronically restore this, and if all goes well I’ll see about having the missing stuff recast. But it’s gonna take time...
I will electronically restore this, and if all goes well I’ll see about having the missing stuff recast. But it’s gonna take time...
Attachments
A sincere thank you for your purchase, Sir. I took no proceeds in the sale of this one as it was on consignment.
Delighted that it’s gone to a caring home. I wish i/we had the missing parts. If I come across another one I’ll let you know - my understanding is theres about ~3 of these floating around Atlanta and likely not working.
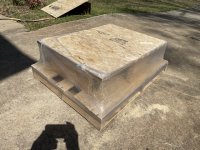
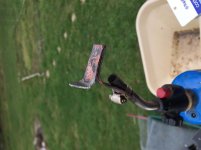
One photo for the books. 131# monster.
Delighted that it’s gone to a caring home. I wish i/we had the missing parts. If I come across another one I’ll let you know - my understanding is theres about ~3 of these floating around Atlanta and likely not working.
One photo for the books. 131# monster.
Attachments
Last edited:

The guy was like “that goes in a car?” when he dropped it off🤣
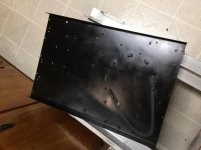
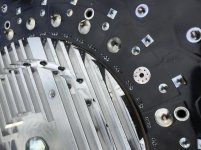
More pics of the process, it’s a real PITA to get apart because there’s red loctite on the power input terminal screws making them hard to get out, and some of the ones on the power supply board are encased in hardened glue but I got it done eventually.
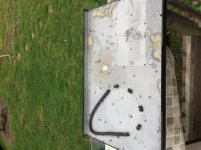
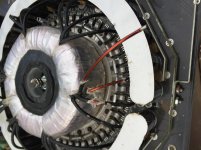
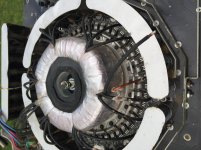
This is the bare chassis, before and after treatment for corrosion. Doesn’t need to be pretty, just has to coat the surface to prevent further damage. No one will see it again once it’s back together.
More pics of the process, it’s a real PITA to get apart because there’s red loctite on the power input terminal screws making them hard to get out, and some of the ones on the power supply board are encased in hardened glue but I got it done eventually.
This is the bare chassis, before and after treatment for corrosion. Doesn’t need to be pretty, just has to coat the surface to prevent further damage. No one will see it again once it’s back together.
Attachments

Pretty sure Crown built these. A friend of mine has 5 of them and a Rockford T15kw and piles of ppi a1200's and I thought I had a problem. Good luck on the restore, I got to use one of these on my 4 15" FI audio's back in 08 and these are unreal!Are those parts unavailable from JBL?
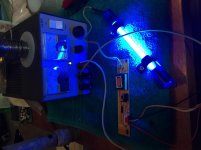
I tested all of the Street Glow tubes, and of course none of them lit up anymore. They have a cheap single transistor relaxation oscillator circuit attached to them which had blown the transistor in each case, but no matter what I did I couldn’t get them to work correctly. Solution is to go on eBay and get a trio of $7 CCFL driver boards, since the tubes themselves were actually OK. Result as seen in the picture. I actually like the boards, 494 chips driving an MT4946 dual FET. Loads better design wise than what came before.
Attachments
Well I was going to put it back together this weekend and make a nice update, but instead I got stiffed by the powdercoating shop so it's gonna have to wait another week. Meanwhile I decided I didn't like the green that was growing on the bussbars on the main power supply- corrosion started attacking the copper, so I removed them from the board to treat it. Made several calls to plating shops in the area inquiring what would be the best solution to stop it from happening, I figured they would tell me either nickel or silver but the consensus was tin/lead (aka solder). So the game plan for the bussbars is sand all the original coating off (whatever it was obviously wasn't good enough anyway), coat them with flux and apply either 63/37 eutectic or possibly silver blended solder to cover up all the copper. Once that's done I'll put them back into the board, and by that time I should have the powdercoated parts in hand.
- Home
- General Interest
- Car Audio
- JBL A6000GTI rebuild