It all started when I decided, just to be a contrarian, to do a hardware simulation of a plugin, ha! I've used 112dB's Redline Monitor for mixing since it came out some fifteen years ago, and I'm sure there are better crossfeed solutions out there, both software and hardware, but it's what I like and am used to, so I thought, why not see if I can make an actual circuit that does the same thing.
Although I've never seen this topology and I arrived at it after lots of trial and error, I'd be surprised if it hasn't been done before, in fact I would assume that the plugin developers based their code on some existing circuit or other, which could be this one or something very similar... In any case, I was delighted that I could pretty much nail the plugin's response with such a simple circuit. So far I've only tested it using LTSpice's awesome WAV processing feature and, although it doesn't null perfectly with the plugin, it's more than close enough and I doubt I'd be able to tell them apart in a blind test.
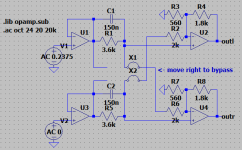
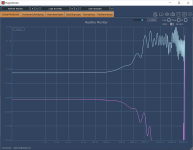
The plugin has three parameters to adjust: a "center level", which adjusts the phantom center from 0 to -3 dB, a "soundstage", with selects the simulated angle between monitors from 30 to 90 degrees, and a self-explanatory "distance" from 0 to 2m. After some experimentation, I settled on, respectively, -1.5dB, 60 degrees and 0m (any other distance introduces FR ripples that I don't care for), so that's how I've always used it and what I've attempted to implement. In the first picture below you can see the left and right response when only the left channel is active, both as shown by Plugin Doctor and as simulated in LTSpice (I don't show the phase responses but they aso match). See also the schematic and two LTSpice circuits, the AC simulation and the WAV processing simulation.
I'll have more to say about component value selection, gain, opamp choice, etc. if there's interest, but in the meantime you can feed it your own WAV file and see how you like it, just change the file name in the voltage sources and place it in the same folder as the .asc file. Note that, as well as attenuating the output by the inverse of the gain, I knock off another 3dB to prevent clipping, which will happen if your WAV goes to full scale, so adjust accordingly when comparing the before and after. You can also adjust the duration in the .tran statement for the output file length (in seconds) you want. Anyway, have fun and let me know what you think!
Although I've never seen this topology and I arrived at it after lots of trial and error, I'd be surprised if it hasn't been done before, in fact I would assume that the plugin developers based their code on some existing circuit or other, which could be this one or something very similar... In any case, I was delighted that I could pretty much nail the plugin's response with such a simple circuit. So far I've only tested it using LTSpice's awesome WAV processing feature and, although it doesn't null perfectly with the plugin, it's more than close enough and I doubt I'd be able to tell them apart in a blind test.
The plugin has three parameters to adjust: a "center level", which adjusts the phantom center from 0 to -3 dB, a "soundstage", with selects the simulated angle between monitors from 30 to 90 degrees, and a self-explanatory "distance" from 0 to 2m. After some experimentation, I settled on, respectively, -1.5dB, 60 degrees and 0m (any other distance introduces FR ripples that I don't care for), so that's how I've always used it and what I've attempted to implement. In the first picture below you can see the left and right response when only the left channel is active, both as shown by Plugin Doctor and as simulated in LTSpice (I don't show the phase responses but they aso match). See also the schematic and two LTSpice circuits, the AC simulation and the WAV processing simulation.
I'll have more to say about component value selection, gain, opamp choice, etc. if there's interest, but in the meantime you can feed it your own WAV file and see how you like it, just change the file name in the voltage sources and place it in the same folder as the .asc file. Note that, as well as attenuating the output by the inverse of the gain, I knock off another 3dB to prevent clipping, which will happen if your WAV goes to full scale, so adjust accordingly when comparing the before and after. You can also adjust the duration in the .tran statement for the output file length (in seconds) you want. Anyway, have fun and let me know what you think!
Attachments

Being earth bound creatures, our hearing evolved to detect sounds emanating from the ground surface and somewhat above. Any sound source at some distance - if it's above that surface some, like something with legs - is going to have ripples in its frequency spectrum introduced by the time it gets to your ears. Of course the type of surface; rock, snow, grass, mulch. is going to effect the amplitude of these ripples, but unless you're birds up in the sky, they are part of naturally hearing something.0m (any other distance introduces FR ripples that I don't care for),
The question to me would be does the distance control introduce these ripples in a natural way; if you kick it out to 2 meters, does it really sound like the sound source is that distance in front of you.
I know that's why they do it, and your question is perfectly valid, and my answer would be "to me it does kinda sound like the source is sorta further away, although the effect isn't exactly dramatic". But the thing is, when I got the plugin for mixing on headphones, my question was a different one: how do I get better mixes, i.e. mixes that translate better to a variety of listening environments, with or without those ripples? In my particular case, after many tests, it turned out that it was without. Horses for courses, YMMV, etc.
Just to illustrate the conversation, see attached the FR with the same center level and soundstage but the distance set to 1m. I guess I'm lucky I didn't have to try to emulate that in hardware...")
Just to illustrate the conversation, see attached the FR with the same center level and soundstage but the distance set to 1m. I guess I'm lucky I didn't have to try to emulate that in hardware...
Attachments
I love seeing another option here. Like the 'original' (non-bass-enhanced) Meier natural crossfeed, yours doesn't add a bass boost. I personally prefer this approach. Most other crossfeed circuits seem to have the bass-boost.
Your setting is a little higher than the original Meier 'high', but not dramatically different. The time-delay associated with yours is a little more than the Meier, but you can adjust the Meier to get pretty close to your circuit. I have attached a .asc file with both yours and the Meier. The screenshot shows the results. There are two noticeable improvements in yours: thelow-frequency group delay and crossfeed extend to higher frequency, and the crossfeed does not continue to fall with frequency.
I am thinking that I would like the response of yours. Have you tried a passive implementation?
Thanks for sharing!
jason
EDIT: by the way, I essentially use the Meier 'high' setting for recordings with hard-panned instruments (old jazz, Beatles, etc.). If I could only have one crossfeed setting on an amp that would be the one I want, just because it allows me to listen to some great recordings that are too annoying otherwise. Maybe I'll breadboard yours this weekend.
Attachments
Last edited:
Thanks for sharing that! My guess is straight delay - easy to do in a computer, harder in hardware replication, yes.see attached the FR with the same center level and soundstage but the distance set to 1m.
Many thanks jasonRF, that's the main difference I noticed when comparing the plugin's response to various other topologies out there. I'm not sure how I'd go about making it passive, given that there's signal subtraction via the inverting inputs of the second opamp... My idea is to use say an TLE2072 for the first one and a NJM4556 for the second and you have a complete system that fits in a tiny PCB.There are two noticeable improvements in yours: thelow-frequency group delay and crossfeed extend to higher frequency, and the crossfeed does not continue to fall with frequency.
I am thinking that I would like the response of yours. Have you tried a passive implementation?
Note that if you wanted to insert it in an existing system without altering the gain structure, you can simply remove R3/R7, make R4/R8 430 ohms and you have unity gain. As long as the parallel of R3 and R4 remains constant at ~420, the response doesn't change, so the one I posted has a gain of ~4.2 but you could go with R3=510 / R4=2k4 for ~5.7 gain, R3=470 / R4=3k9 for ~9.3 gain, etc.
And of course you can change the cap value to whatever you like and scale the resistors accordingly. One thing to watch out for is the load on the first opamp, which worst case (@20kHz) is basically R2/R6, in this case 2k, not a problem for most decent opamps, but you can go higher or lower as you see fit. I worked out the math for the transfer function and have it in a spreadsheet where you can play with the component values and see the resulting response, if anyone is interested, I could tidy it up and post it too.
May I mention an experiment I did, combining xfeed/EQ with headphone geometry:
https://www.diyaudio.com/community/threads/open-wing-headphone-crossfeed-stereo-sound.391630/
Both HF and LF needed attenuation but the latter would depend on how "open-wing" was achieved (amount of bass loss). I really want to try a cross-feed bass-delay of 10-15ms but have not used a mixer or DSP before (miniDSP not sold here). Guess I can experiment with one or two subwoofers 3m away....
I'm more comfortable with passive circuit but that's not enough.
Hi Cabiro,
Thanks for the info on how to make it unity gain - I never need gain with phones and I haven't yet done the math for this circuit. I was thinking the njm4556 for the output too since I have a few laying around and they are happy driving most phones. For a simple breadboard test will probably skip the input buffer and just drive with a low-impedance source.
Cheers!
jason
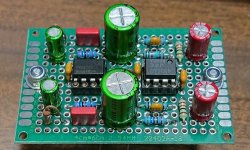
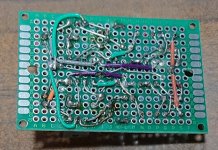
Ok, this is what it looks like in a 6 x 4 cm PCB, including DC blocking, supply bypassing, etc., and I didn't even have to squeeze the components together too much... I'll probably test it like this but I'm toying with the idea of making it unity gain and putting it inside my X-Can v2 as an input buffer (replacing the 4556 of course), I haven't opened it in a while but, from what I remember, I should be able to find room for it in there...
Attachments
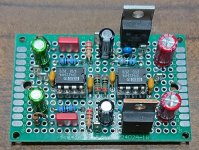
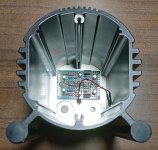
Well, I had a look inside my X-Can and found a perfect spot for the PCB, so I got excited and, before wiring up the one above (it's a royal pita removing components from those double-sided proto-boards and much more so if you've already connected them together), I changed it to unity gain and even managed to include the required step-down regulators (the X-Can supply is ~ +/-26V), so installation was pretty straight-forward. In the end I went with OPA2134 opamps, of which I have a bunch and seem to be pretty robust in terms of stability, always a plus in a proto-board.
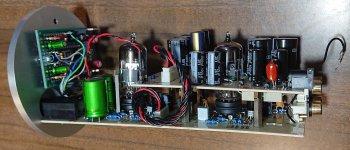
I know the mixing and leisurely listening mindsets are very different and the X-Can is in my main living room system where, to be honest, I hadn't used it much, so I did extensive testing with my favorite test tracks. To sum up, I concluded that I wouldn't even need a bypass switch, which initially I had planned to include. At least for me, once you've experienced crossfeed, its absence sounds positively weird. It's not so much the illusion of the source being in front of you instead of in the middle of your head (for me that's tenuous and I seem to randomly flip it, like a Necker cube) as the hard-panned things not sounding as if someone is shouting them directly at one ear. I love it, I think the X-Can will see a lot more use from now on...
I know the mixing and leisurely listening mindsets are very different and the X-Can is in my main living room system where, to be honest, I hadn't used it much, so I did extensive testing with my favorite test tracks. To sum up, I concluded that I wouldn't even need a bypass switch, which initially I had planned to include. At least for me, once you've experienced crossfeed, its absence sounds positively weird. It's not so much the illusion of the source being in front of you instead of in the middle of your head (for me that's tenuous and I seem to randomly flip it, like a Necker cube) as the hard-panned things not sounding as if someone is shouting them directly at one ear. I love it, I think the X-Can will see a lot more use from now on...
Attachments
- Home
- Amplifiers
- Headphone Systems
- Yet another crossfeed...