Thanks for the quick reply. I've got decent ventilation for my range. Pb isn't a problem when my wife is away...
I am using a 6in square pan that looks like this on a $10 electric hotplate. Works very well - takes 2 minutes, you can see that the middle of the board liquifies first and it spreads out. Within 1 minute the rest of the board is shiny silver solder. I remove the pan and place it on wet paper towels to quickly quench heat and limit exposure parts in case I overheated.

Hot plate looks basically like this:

REFLOWING
Good setup. I was going to get a that of type pan instead of a fry pan with 2-3" sides. I was also thinking about putting the PCB into an Altoids tin to make it easier to remove from the pan and put into a pan with water to cool. There are probably many ways to do this and cool this without encountering painful rework. I've also considered using a gas chromatograph (20K$ oven at my place of employment) to do this, but this oven doesn't permit the operator to view the part and make the decision. I'll do the experiment to see if this chromatographic oven will match the profile recommended by Kester (EP256). The Kester thermal profile looks like ambient (25C) to 150C in 90 seconds (87 degrees C/minute; then 150 to 180 degrees at 20 degrees/minute; then 180 to 230 at 75 degrees/min; the 230 to 150 at ~-70 degrees/minute and presumably down to ambient.
Good setup. I was going to get a that of type pan instead of a fry pan with 2-3" sides. I was also thinking about putting the PCB into an Altoids tin to make it easier to remove from the pan and put into a pan with water to cool. There are probably many ways to do this and cool this without encountering painful rework. I've also considered using a gas chromatograph (20K$ oven at my place of employment) to do this, but this oven doesn't permit the operator to view the part and make the decision. I'll do the experiment to see if this chromatographic oven will match the profile recommended by Kester (EP256). The Kester thermal profile looks like ambient (25C) to 150C in 90 seconds (87 degrees C/minute; then 150 to 180 degrees at 20 degrees/minute; then 180 to 230 at 75 degrees/min; the 230 to 150 at ~-70 degrees/minute and presumably down to ambient.
Don't overthink it. I tried it using a simple square aluminum cup like container from a medicine packaging. It worked ok. The square skillet worked much better - more even. The only problem I had was one of the four parallel resistors got twisted because it got pulled to one side since that side melted first and surface tension pulled it. So keep paste neat at four parallel resistors and don't use excessive paste there. It was easy to rework with an iron. I have had luck making 6 boards this way. No damage to parts. Once I quench the pan on wet paper towels you can pick up the board by hand on the edges in one minute.
How to drill those holes.
I'm drilling those holes in the tin. It's tricky to do right using a drill as the bit grabs and can move the hole center. I have ended up with 3 bad tins because one of the holes keeps drifting during drilling. I use center punch and pilot hole bit. Then successively larger drill bits. Still not perfect. I did a search for CMOY hole methods. Looks like center punch then pilot hole then either Uni-bit or Dremel grinder, or tapered hand reamer. Normal drill bits don't work. Don't forget to put a wooden block behind the metal being drilled.
I'm drilling those holes in the tin. It's tricky to do right using a drill as the bit grabs and can move the hole center. I have ended up with 3 bad tins because one of the holes keeps drifting during drilling. I use center punch and pilot hole bit. Then successively larger drill bits. Still not perfect. I did a search for CMOY hole methods. Looks like center punch then pilot hole then either Uni-bit or Dremel grinder, or tapered hand reamer. Normal drill bits don't work. Don't forget to put a wooden block behind the metal being drilled.
Last edited:
Hi xrk971,
Great, thank you very much to you and the member, my e-mail is tubediy@gmail.com
best regards
wanfai
Great, thank you very much to you and the member, my e-mail is tubediy@gmail.com
best regards
wanfai
Browsing knobs at Digikey. This Alps pot has a 6mm shaft, correct? I also don't want to completely cover the LED. X, did you use a 0.5" diameter knob?
Browsing knobs at Digikey. This Alps pot has a 6mm shaft, correct? I also don't want to completely cover the LED. X, did you use a 0.5" diameter knob?
I use these from Ali. I think they are 15mm dia.
Work fine aluminum alloy knob 15MM * 16.5MM 15MM * 17MM silver half shaft hole D hole potentiometer-in Switch Caps from Home Improvement on Aliexpress.com | Alibaba Group
Thanks. Digikey doesn't seem to have any knobs that are press fit for a D shaft. So I'm just going to get one with a set screw. I found the spec sheet for the Alps pot here: http://www.alps.com/prod/info/E/HTML/Potentiometer/RotaryPotentiometers/RK097/RK0971221Z05.html If I'm reading this diagram correctly, it looks like the shaft is 6mm. Does that seem right?

Don't drill the holes. I used a 6mm/ 0.25" paper hole punch when I did the Super CMOY. I did have to file the center hole a little bit to get the on/off/volume knob through.
Hi dwpeterson, I think you just answered my question on accident, lol. Sounds like the pot shaft is 6mm. Thanks. I'll try your hole punch trick.
Kilo knobs at Digikey are my go to. Here's a sample, but they have many more.
Be sure to get one for a 6mm shaft.
OEJL-50-4-7 Kilo International | Hardware, Fasteners, Accessories | DigiKey
Be sure to get one for a 6mm shaft.
OEJL-50-4-7 Kilo International | Hardware, Fasteners, Accessories | DigiKey
Major serendipity 2x in a row... I actually have the silver version of that exact knob in my cart already! Here is the one with the correct 6mm shaft size:
https://www.digikey.com/scripts/DkSearch/dksus.dll?Detail&itemSeq=219013840&uq=636225301575296198
Looks classy, right? Thanks.
https://www.digikey.com/scripts/DkSearch/dksus.dll?Detail&itemSeq=219013840&uq=636225301575296198
Looks classy, right? Thanks.
Kilo knobs at Digikey are my go to. Here's a sample, but they have many more.
Be sure to get one for a 6mm shaft.
OEJL-50-4-7 Kilo International | Hardware, Fasteners, Accessories | DigiKey
Nice knob but $6 ea!
Ouch 🙂
Hi X,
Are there any more boards left? Id like 2 please if possible.
Thanks
Sorry, no. I guess I need to start GB #2.
Don't drill the holes. I used a 6mm/ 0.25" paper hole punch when I did the Super CMOY. I did have to file the center hole a little bit to get the on/off/volume knob through.
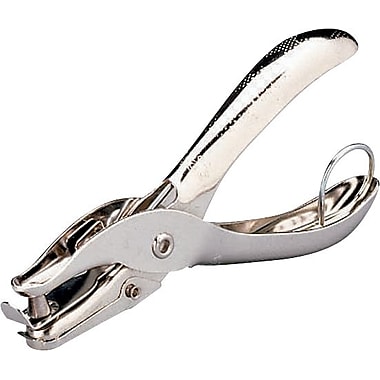
You mean one of these?
If this works, it's brilliant!
Thanks.
I just saw this on Amazon
https://www.amazon.com/gp/aw/d/B00NPZDRD4/
These are machined brass with set screw:
https://www.amazon.com/gp/aw/d/B009DAHPLU/
Machined stainless steel:
https://www.amazon.com/gp/aw/d/B00AO73MFO/
Maybe a class A amp deserves a nice machined brass or stainless knob as opposed to a aluminum plated plastic knob? 🙂
Just be careful of max diameter to fit in between the jacks - especially if your headphone jack is thicker than normal. I just found out the nice machined knobs above are 18mm dia - probably too large.
Last edited:
You mean one of these?
If this works, it's brilliant!
Thanks.
Yes, it was just right for the input/output. I had to enlarge the pot hole to fit with a small round file. It was still tough to punch through the metal, but much better than drilling the metal w/o a good fixture.
The paper punch worked very well. Centering the hole was tricky though. Only drill was small one for LED. I used a conical hand held reamer to enlarge pot hole and that worked well too.
- Home
- Group Buys
- xrk971 Pocket Class A Headamp GB