The wooden case for Raspberry Pi Radio. Created from 1/4" cherry and walnut boards. Sawed on scroll saw, glued together, sanded on spindle sander and manually. It still needs the finish to be applied. The front and back panels have been made of black acrylic glass on a scroll saw as well.
I call it woodware in the same vein as hardware and software because sometimes it needs even more time and effort to complete.
An externally hosted image should be here but it was not working when we last tested it.
An externally hosted image should be here but it was not working when we last tested it.
An externally hosted image should be here but it was not working when we last tested it.
I call it woodware in the same vein as hardware and software because sometimes it needs even more time and effort to complete.
Very nice and beautiful! How it sounds? How did you cut the small square holes? A pic of the rear would be nice too.
Very nice and beautiful!.
Thank you!
How it sounds?
Initially I tried to use switching power supply with two outputs +12V for amplifier
and +5V for Raspberry Pi and DAC. The sound noise was terrible. Then I replaced
that power supply by two separate switching power supplies. The noise level is
much lower now but it's still audible in pauses. So I'm going to replace +12V
switching power supply by a linear one. The problem is to fit it (mostly transformer)
into the limited space which I have inside of the case.
How did you cut the small square holes? A pic of the rear would be nice too.
The square holes were roughly cut on scroll saw and fine tuned manually by small
files. More pictures (including the rare views) you can find in the other thread which
I created for hardware and software rather than woodware 😉
http://www.diyaudio.com/forums/pc-based/273684-another-raspberry-pi-radio.html
Nice!
Thank you guangui!
Here is the next stage - applying boiled linseed oil.
An externally hosted image should be here but it was not working when we last tested it.
An externally hosted image should be here but it was not working when we last tested it.
I'll let it dry for a week and then I'll apply amber shellac.
And finally the image after shellac applied:

An externally hosted image should be here but it was not working when we last tested it.
Last edited:
More details about making process of this wooden case can be found here:
https://github.com/project-owner/Peppy.doc/wiki/Woodware
https://github.com/project-owner/Peppy.doc/wiki/Woodware
Could you recommend better speakers in this size and wattage? These ones are 4" 30W 4Ohm 60-24000 with grill.Very nice wood work. Attention to detail seemed to fall off at the speakers though.
No not off the top of my head. But I would be surprised if there isn't a better choice at a comparable price.
This is an awesome project! A great job btw! thank you for sharing and I didn't know about the "famous french method", is quite good and I'm going to use it on my Open Baffle project.
Kind regards.
Kind regards.
This is an awesome project! A great job btw! thank you for sharing and I didn't know about the "famous french method", is quite good and I'm going to use it on my Open Baffle project.
Kind regards.
Thank you and good luck in your project!
Here is new wooden case made of Sapele. It was created for my new project µPeppy:
https://github.com/project-owner/microPeppy.doc/wiki
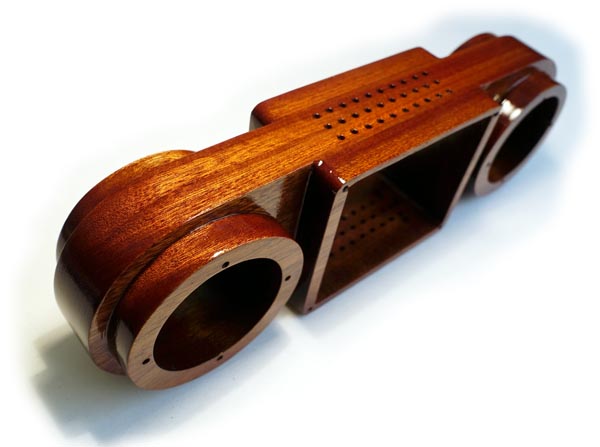
More details can be found on the corresponding wiki page:
https://github.com/project-owner/microPeppy.doc/wiki/Woodware
https://github.com/project-owner/microPeppy.doc/wiki
More details can be found on the corresponding wiki page:
https://github.com/project-owner/microPeppy.doc/wiki/Woodware
- Status
- Not open for further replies.
- Home
- Design & Build
- Construction Tips
- Woodware