finally got the upper cabinets done
Looks good Bob. Nice work so far. That includes the tea towel over on the right in the 2nd pic that looks like tangled bacon.
Hmmm... I must be getting hungry.
So you did absolutely nothing useful? Not even picking up one piece of trash?
wg I am retired AND I am on vacation for a month so even if I had managed to do something productive I would not spoil the vibe by taking credit for it!
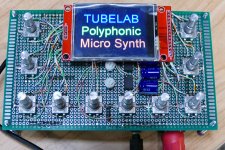
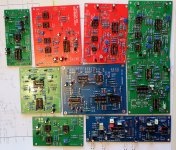
I have been working on this one for a while, and it's obviously far from done, but it made it's first sounds a few minutes ago, so it is now "created." It remains to be seen how it will mature. This is a hand wired breadboard, and several revisions and mistake fixes have been performed already. The final version would be on a PCB, and may even take on a different form factor.
A few months ago PJRC sent me a free sample of their latest and most powerful Teensy board. My mission is to see how many digital music synthesizers it can support running simultaneously. With an ARM Cortex M-7 running at 600MHz (overclockable to 1GHz), I'm aiming for 16, as there are 16 MIDI channels in a cable.
My previous Teensy synthesizers have all been virtual analog synths with 1V/oct voltage control. This one accepts MIDI directly which eliminates a lot of A/D reads, multiplexing, and software conversion.
Right now I'm fumbling with the code writing, which has always been my weakest link.
Attachments

Last edited:

I am making an AC current source (v3, 0-5 Ampere AC). Nothing creative and unusual - AC Howland current source, a couple of Mosfets, a temperature stable shunt (25 ppm rated), four precision resistors and a couple of precision opamps (OP07 as a buffer and OP27 as main opamp). Ordered OPA189 too, will try soon, but the most problematic is termal-EMF (Seebeck effect) of a shunt resistor pins (unequal on both pins), because I want a shunt value as low as possible. And 10 mOhm shunt is unfortunately too low - I have to strugle with termal EMF. I have 25 mOhm shunts too but it is too easy and shunt gets too hot for me - it starts to make thermal distortion higher then I want.
Ordered 15 mOhm resistors to try. Don't want to parallel two 25 mOhm ones.
Ordered 15 mOhm resistors to try. Don't want to parallel two 25 mOhm ones.
Last edited:
WOW!!! I hope you shere schematics and code when you're ready.My previous Teensy synthesizers have all been virtual analog synths with 1V/oct voltage control. This one accepts MIDI directly which eliminates a lot of A/D reads, multiplexing, and software conversion.
Right now I'm fumbling with the code writing, which has always been my weakest link.
Mrs K arrived from Chicago yesterday and I have stored all my stuff away. I have a modular synth and a 32-step sequencer to finish ... 😱
There is no printed schematic as yet. This synth as well as all the other Teensy based synths started with the Teensy module. I added things like pots, encoders, an LCD touch screen, a MIDI input jack, an audio DAC and a pair of LM386 audio amps to drive the headphones. All were wired like the examples given on the Teensy web site. I simply hooked up different combinations of these things until all of the pins on the chip were used up. I have made 4 working synths this way so far, a new one for every new module that they release.
If this thing gets to the "make a PCB" stage, then I will make a real schematic. This has not happened with the first three synths yet, since I have not been satisfied with them enough to make another copy. All are technically quite simple though.
There must be a happy medium between a full blown modular and a simple box with a couple knobs, a screen, and 27 layers of menus to control everything. These synths have been my attempt to find it, at least for me.
The modular has the highest degree of flexibility, but minimal ease of use, and zero "program memory." The best "memory" is lots of different color patch cords and a lot of pictures of where the knobs are set. The high number of controls, and jacks dictate a large size, and high cost for the completed machine. Portability is also very limited.
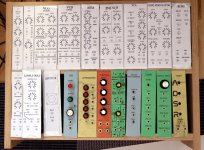
Synth #2 (pictured) had a fixed signal path (no patch cords), but 53 controls. The highest cost in this unit was the 48 pots, followed by the 53 knobs. This synth has limited portability, and signal routing, but it useful. The cost of a PCB for something this size along with the pots and knobs make it prohibitive. A Behringer model D is cheaper than the parts to build this, although this is essentially two D's.
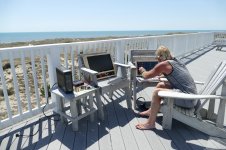
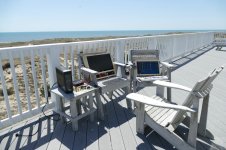
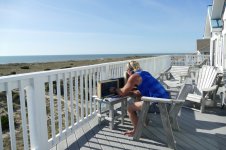
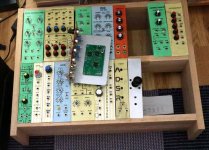
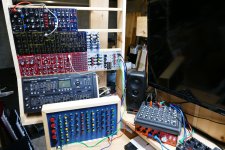
Synth#1 is the light colored board in the 3rd and 4th picture next to the UPS. An Axoloti synth board is to its right. The last 4 pictures were taken on a vacation trip where the UPS was often the only power source. I would charge it overnight, then use it for power during the day. It would run the synths and the portable PC (middle chair) for up to two hours.
Most humans have two hands and two feet. This means that under most use cases only 4 controls can be operated simultaneously. A synthesizer with the capability of a full blown modular could be built with 4 controls, but the methods to multiplex them all would require some serious effort. In any event a serious learning curve would be needed for the end user to figure it all out, which is why a lot of keyboard players never get very far past the build it preset sounds.
This box is an exercise in the other extreme. 10 knobs and an LCD screen. Where it goes from here is yet to be determined.
Right now it runs a simple Karplus-Strong synth that gives a somewhat realistic, but pleasing acoustic guitar sound, especially with strummed chords. That's synth #1.
I am now working on synth #2, a 6 note polyphonic version of the duophonic digital "D" in the blue faced box without 1V/oct control, just MIDI.
Back in the early 1990's Motorola paid for me to go to college and get an "engineering degree" since I had already become an engineer without one. I chose what I thought was the path of least resistance, a computer engineering degree. There were lots of programming classes which I did OK in, but that experience taught me that I didn't want to be a programmer for a living.
I learned enough "C" and "C++" to pass my classes, but ditched all the complex stuff that I didn't understand, or often messed up, to create a language I called "C--" which worked for me. I had two very good teachers in my programming classes. Both would laugh at my code, and tell me that I took the longest, hardest way possible to get something done, but it worked.
Now, 25+ years later the creators of the Arduino have done the same thing. The Arduino "sketch" does not need, or often use pointers, multiple functions, and variable "passing" although the compiler will accept full C++ if you know it. The Teensy modules program in the Arduino environment, and there is a graphical drag and drop GUI for audio stuff with all sorts of synth blocks available.
If there is ever a PCB for one of these synths, or even a duplicatable schematic, I'll post my code......in hopes that someone else can do a better job of it, without too much laughter!
If this thing gets to the "make a PCB" stage, then I will make a real schematic. This has not happened with the first three synths yet, since I have not been satisfied with them enough to make another copy. All are technically quite simple though.
There must be a happy medium between a full blown modular and a simple box with a couple knobs, a screen, and 27 layers of menus to control everything. These synths have been my attempt to find it, at least for me.
The modular has the highest degree of flexibility, but minimal ease of use, and zero "program memory." The best "memory" is lots of different color patch cords and a lot of pictures of where the knobs are set. The high number of controls, and jacks dictate a large size, and high cost for the completed machine. Portability is also very limited.
Synth #2 (pictured) had a fixed signal path (no patch cords), but 53 controls. The highest cost in this unit was the 48 pots, followed by the 53 knobs. This synth has limited portability, and signal routing, but it useful. The cost of a PCB for something this size along with the pots and knobs make it prohibitive. A Behringer model D is cheaper than the parts to build this, although this is essentially two D's.
Synth#1 is the light colored board in the 3rd and 4th picture next to the UPS. An Axoloti synth board is to its right. The last 4 pictures were taken on a vacation trip where the UPS was often the only power source. I would charge it overnight, then use it for power during the day. It would run the synths and the portable PC (middle chair) for up to two hours.
Most humans have two hands and two feet. This means that under most use cases only 4 controls can be operated simultaneously. A synthesizer with the capability of a full blown modular could be built with 4 controls, but the methods to multiplex them all would require some serious effort. In any event a serious learning curve would be needed for the end user to figure it all out, which is why a lot of keyboard players never get very far past the build it preset sounds.
This box is an exercise in the other extreme. 10 knobs and an LCD screen. Where it goes from here is yet to be determined.
Right now it runs a simple Karplus-Strong synth that gives a somewhat realistic, but pleasing acoustic guitar sound, especially with strummed chords. That's synth #1.
I am now working on synth #2, a 6 note polyphonic version of the duophonic digital "D" in the blue faced box without 1V/oct control, just MIDI.
Back in the early 1990's Motorola paid for me to go to college and get an "engineering degree" since I had already become an engineer without one. I chose what I thought was the path of least resistance, a computer engineering degree. There were lots of programming classes which I did OK in, but that experience taught me that I didn't want to be a programmer for a living.
I learned enough "C" and "C++" to pass my classes, but ditched all the complex stuff that I didn't understand, or often messed up, to create a language I called "C--" which worked for me. I had two very good teachers in my programming classes. Both would laugh at my code, and tell me that I took the longest, hardest way possible to get something done, but it worked.
Now, 25+ years later the creators of the Arduino have done the same thing. The Arduino "sketch" does not need, or often use pointers, multiple functions, and variable "passing" although the compiler will accept full C++ if you know it. The Teensy modules program in the Arduino environment, and there is a graphical drag and drop GUI for audio stuff with all sorts of synth blocks available.
If there is ever a PCB for one of these synths, or even a duplicatable schematic, I'll post my code......in hopes that someone else can do a better job of it, without too much laughter!
Attachments


Last edited:
This is more or less what I have achieved this year. However I have problems with the connectors and even if the sheet metal is pretty sturdy, I would probably need something like 2mm aluminium instead.
I have a 32-step sequencer, but plan for a 3x16 step using an Arduino to control the logic and one thing I would find very cool is a way to adjust the three banks si I can have them start independent of eachother, but still the same timing.
(Got myself a Behringer Crave, to have something that is working and is making noises, and I have hooked it up with my Mutable Anishru).
Attachments
Got myself a Behringer Crave, to have something that is working
I had the same idea and got the Behringer D for a starting point. I had it working along with the blue box although it took me quite some time turning pots and tweaking my software to get them both to track over several octaves. Now they can both be played from the Arturia Keystep, of from Ableton Live in the PC.
The Behringer D now has some of its cousins to play with due to some Ebay coupons and sales aligning with each other. I haven't done much with the rest of the modular, and have about as many unfinished modules and half done boards as you.
I did finally finish populating both of my MFOS boards, the Ultimate and Ultimate expander. It only took about 6 years. Some of the individual circuits on the Ultimate have been tested, and a couple mistakes were fixed, I'm sure there are more waiting to be found. The front panels and cabinet are still works in progress.
I have a 32-step sequencer, but plan for a 3x16 step using an Arduino
I have the simple sequencer built into the Keystep which puts out MIDI and Gate / CV so it can feed two synths at once, but it is limited in functionality. I can also use Live to do just about anything, but it takes a lot of thinking, and isn't highly portable. Again, there is a happy medium somewhere, but any commercial sequencer that does most of what I want is out of my budget......
Spending $220 for a Behringer D is OK since I can't build one for $220, or even buy all the parts. Spending $300 to $500 for a sequencer that has $50 to $75 worth of parts in it is a non starter. This means an Arduino / Teensy sequencer project will be in my future. The sequencer world is evolving quickly with some neat new features. The MIDI looper from BASTL is a cool idea for live music production. I downloaded the user manual and would like to figure out how to do some of the features it does.
The little synth I am working on now is one half of a "portable music workstation" and a similar sized sequencer would be the other. If those two get to a useful working state, then they would likely be combined together into one battery powered box that would function stand alone, or as part of a studio system.
Attachments
I bought some recent vintage keyboard at a thrift to sell on ebay. It had a few buttons and a knob. They used the keyboard itself to assign the knob to control different functions. I think the user control sequence was something like "mode, middle c#, adjust control, mode" to make a setting.
Maybe you could pare it down to 4 knobs by associating each with different keyboard octave keys? Anyway - quite inspiring work!
Maybe you could pare it down to 4 knobs by associating each with different keyboard octave keys? Anyway - quite inspiring work!
The white Arturia Keystep seen in some of my pictures does this, as do several others. This isn't hard to do inside the keyboard itself, or whatever box has the buttons, but using an external keyboard for instrument control restricts you to whatever information the keyboard transmits.
This still allows a connected keyboard or other MIDI / USB device to be used for another set of buttons. The issue here becomes one of mapping, which is already an issue with existing controllers.
Again, its going to be a compromise between user friendliness and size / expense. A lot depends on the use case. What's OK in a studio or home environment doesn't work in a live music situation where split second changes are needed without much reliance on thought.
Pre-canned control or music sequences (or both) are the ticket here, something like a guitar players pedal board capable of sending out MIDI data to several "instruments" at once. They exist now, but are expensive and often application or DAW specific.
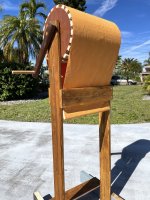
A little wind machine for a radio play. Made from scrap lumber and canvas.
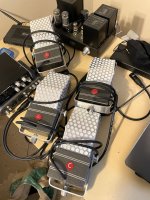
Also a pile of fake RCA mics for the same play. Each has inside of it a working AT2020 mic. That means they are not just props, but the actual mics for the play. They look good 3+ meters away. 🙂
EDIT: Bad photo links replaced with attachments.
Also a pile of fake RCA mics for the same play. Each has inside of it a working AT2020 mic. That means they are not just props, but the actual mics for the play. They look good 3+ meters away. 🙂
EDIT: Bad photo links replaced with attachments.
Attachments
Pano--
Your image links:
forums/attachments/moderator-threads
forums/attachments/moderator-threads
...appear to go to a secret section which most of us can not access. And accuses me of evil-doing:
Your image links:
forums/attachments/moderator-threads
forums/attachments/moderator-threads
...appear to go to a secret section which most of us can not access. And accuses me of evil-doing:
PRR, you do not have permission to access this page. This could be due to one of several reasons:
Your user account may not have sufficient privileges to access this page. Are you trying to edit someone else's post, access administrative features or some other privileged system?
Last edited:
Well, this is bigger than one-day project - I casted pillars for a new guesthouse at our summer island. It will be a hifi-free zone, unlike the main cabin.


Last edited:
Yep, Sonab OA-14L 🙂Is that a pair of Carlsson/Sonab speakers I see?

My latest project was a single channel 2.5 mega samples USB PC oscilloscope.
Front is just bog standard 1m 10pf scope input.
A voltage level changer to change from +/- volts to single end for a a2d converter running over 3v3.
The software basically just triggers (or not ) then sends a2d data to pc via USB bus.
The main intelligence is in the pc C# software for displaying etc
I also added a spectrum analyser screen for displaying frequency content.
I added a data logger to capture data over time to a file.
I think it would be great if something like this could drop into the standard soundcard "socket" of the PC hardware architecture - then we could use REW and/or other softs for waveform capture and analysis. But all the way up to 1 Mhz, instead of this 20k-ish upper limit you get with a typical soundcard doing A->D.My latest project was a single channel 2.5 mega samples USB PC oscilloscope.
Top height reached today! Construction started on June 23, with a little help from my familyWell, this is bigger than one-day project - I casted pillars ---

- Home
- Member Areas
- The Lounge
- What did you create today?