I got a little impatient to practice with this bit and set my eye on my 'beater' workshop speakers hanging from the floor joists. Hmmm. Victims.
Cut a couple of new MDF baffles. Woofer recess and hole with trim router and just glued the cutout scrap circle behind the tweeter for WG depth. 1/2 inch roundover with the trim router. Did the WG on the drill press. Afterward I cutout a recess from behind for the tweeter faceplate using a router bit until the hole was precisely the right size for the 3/4 inch tweeter.
The bit I fabbed has extended profile into the throat beyond Zaph's template posted on his waveguide TMM page. I tried a few french curve stencils on the profile until one nearly matched and then extended the throat line with it. That's probably very close to the original WG and with this extension I have more range for different sized tweeters. The throat therefore may be a little deeper than is optimal when using a smaller dome, but better than nothing. An ideal bit for this WG profile would probably be something that maintained the the taper profile of the throat regardless of opening size since it has proven to be well matched to domes according to Zaph and JonM. That would have required something much more complicated that widened and narrowed both wings with a screw adjustment. Beyond my tooling skills. This willl have to do and is actually only a tiny bit off. I probably wont use it on any other 3/4 tweeters in any case.
These ancient speakers have a Vifa dome and a no name 6.5 inch poly woofer. I noticed that the glue on the dust caps was coming undone (poly don't like glue) so I just took 'em off and made a couple of oak dowel phase plugs to replace them.
I'd never even opened these before (got them at a thrift store years ago). With the WG they seemed comparatively 'shouty'. All that had been on the tweeter was a cap and 2ohm sandcast resistor in series. I removed the 2ohm and replaced it with a 3.2ohm in series and 12ohm parallel. Better. I really don't own any measuring tools yet beyond a radio shack SPL meter. These speakers aren't really worth too much more effort than this anyway.


Listening to some of my favorite "working on a project" music I'm pretty impressed with even this very, very rudimentary application. Even IF some of that is imagined. The WG just looks so cool. And was able to get a little practice in with the new tool. Odd that even with four coats of rattle-can black you can still see the laminate division at the second thickness of mdf in the WG. Odd because it's the same wood. I used the cutout from the woofer. Couple more coats would do it but no big deal on these workshop crew.
You can see my wire nut "thimble" connectors on the back. My favorite speaker terminals are none at all. Nothing else less expensive or lossless.
Cut a couple of new MDF baffles. Woofer recess and hole with trim router and just glued the cutout scrap circle behind the tweeter for WG depth. 1/2 inch roundover with the trim router. Did the WG on the drill press. Afterward I cutout a recess from behind for the tweeter faceplate using a router bit until the hole was precisely the right size for the 3/4 inch tweeter.
The bit I fabbed has extended profile into the throat beyond Zaph's template posted on his waveguide TMM page. I tried a few french curve stencils on the profile until one nearly matched and then extended the throat line with it. That's probably very close to the original WG and with this extension I have more range for different sized tweeters. The throat therefore may be a little deeper than is optimal when using a smaller dome, but better than nothing. An ideal bit for this WG profile would probably be something that maintained the the taper profile of the throat regardless of opening size since it has proven to be well matched to domes according to Zaph and JonM. That would have required something much more complicated that widened and narrowed both wings with a screw adjustment. Beyond my tooling skills. This willl have to do and is actually only a tiny bit off. I probably wont use it on any other 3/4 tweeters in any case.
These ancient speakers have a Vifa dome and a no name 6.5 inch poly woofer. I noticed that the glue on the dust caps was coming undone (poly don't like glue) so I just took 'em off and made a couple of oak dowel phase plugs to replace them.
I'd never even opened these before (got them at a thrift store years ago). With the WG they seemed comparatively 'shouty'. All that had been on the tweeter was a cap and 2ohm sandcast resistor in series. I removed the 2ohm and replaced it with a 3.2ohm in series and 12ohm parallel. Better. I really don't own any measuring tools yet beyond a radio shack SPL meter. These speakers aren't really worth too much more effort than this anyway.
Listening to some of my favorite "working on a project" music I'm pretty impressed with even this very, very rudimentary application. Even IF some of that is imagined. The WG just looks so cool. And was able to get a little practice in with the new tool. Odd that even with four coats of rattle-can black you can still see the laminate division at the second thickness of mdf in the WG. Odd because it's the same wood. I used the cutout from the woofer. Couple more coats would do it but no big deal on these workshop crew.
You can see my wire nut "thimble" connectors on the back. My favorite speaker terminals are none at all. Nothing else less expensive or lossless.
Last edited:

Most excellent. I was thinking of making a sort of spade bit like that except with a much higher frequency cutoff and maybe some tool steel involved, maybe getting all fancy and grinding the cutter with a CNC mill. What material did you use for the cutter? It looks like it may be a bit roundy on the edges already?
Here's a link that describes it better.
Heat treating advice - Miller Welding Discussion Forums
It's just off the shelf low carb angle iron. The edge is actually very sharp, but the mild steel needed rehoning before the end of the second pass. A bit for more frequent use, or for use on a variety of woods, would need to be faced with harder steel, or made out of treatable tool steel. It only took about two hours to make pretty crudely because I did not have any idea if it would work practically at all on a 1/2 hp drill press and was concerned that I just might end up tossing it in the scrap bin eventually. But it worked very well, so I'm going to get some tool steel flat stock and make another.
With soft MDF you really don't need a bit with the precision a CNC mill provides although if you have one there's no sense not using it just for the convenience. At 700 rpm on soft MDF there is barely any chatter at all due to minor imprecision between the match of the two edges, but if you were using it on oak or similar it might be much more important.
Last edited:
I'm the shoddiest "machinist" so I figured if I didn't at least put the bit in a rotary table I'd have no chance of grinding both edges of the cutter evenly. With some silly ideas of eventual production I didn't think regular hot rolled would hold up well. I have a cheap Chinese mini mill that I slapped some steppers onto. It's mostly a joke but makes better accuracy work than anything else with me on the handwheels. Your posts are pretty encouraging.
Andrew,
I realized that with that 1/2 inch rod end guiding it, one flute would be sufficient. That makes fabbing it much, much easier. Just cut the profile you'd like into a piece of angle iron and cut a five inch length of plain steel rod. Take it to a shop and ask them to put a quick and dirty ten dollar stick weld on it (with one flute, accuracy is only dependant on how clean a curve you put on it at home, very easy). Of course there will need to be some weight on the other side for balance. But at <800 rpm it does not need to be perfect.
You can probably rehone the mild steel edge to cut a couple of dozen waveguides (and who's gonna do that?) before the rehoning alters the profile at all significantly.
I was getting something in Home Depot today and got an image in my head of something that anyone could build in order to cut a waveguide into a baffle with a drill press. If you have a jig saw and a drill press, this is very easy. No welding necessary.

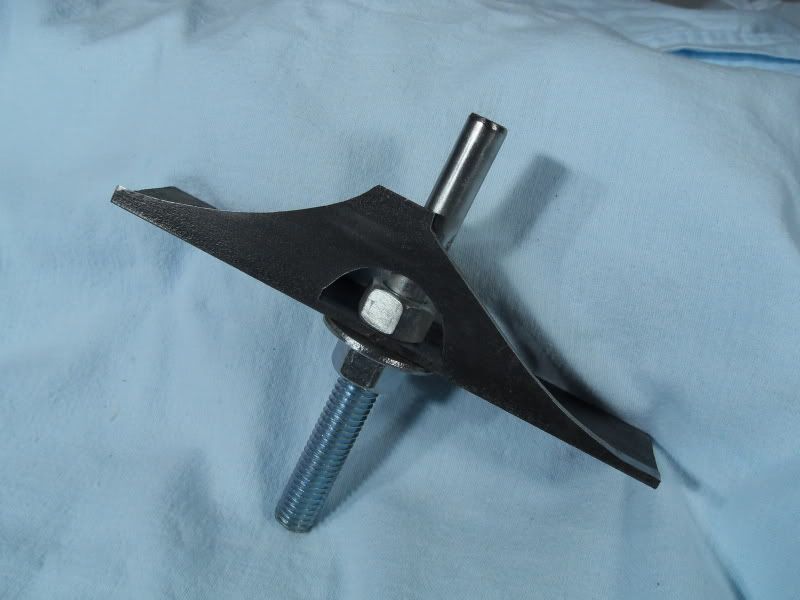
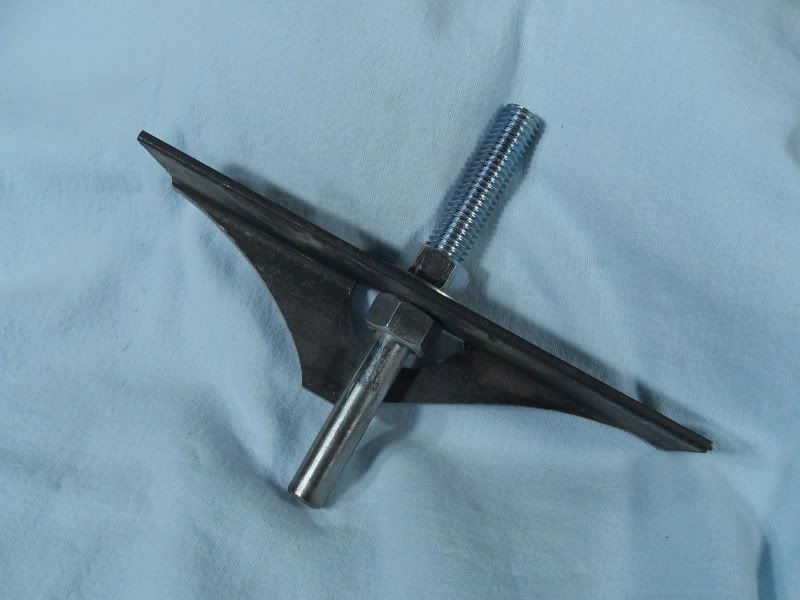
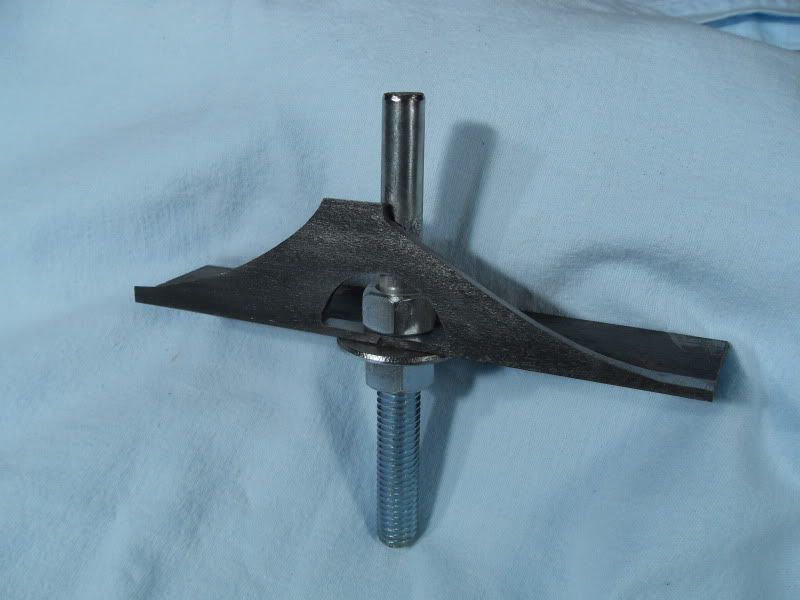
The shaft is 1/2 inch "eye bolt" from Home Depot. It's only nominally 1/2 inch and measures 7/16 diam. That's fine.
The angle iron is just 1 1/2 X 1 1/2 X 1/8 and is available anywhere. They soak you at Home Depot so get it there only if it's your last option.
I got the eye bolt since the 1/2 inch machine bolts at HD only had about an inch of threaded section. As you'll see, we need more.
Cut off the eye of the bolt. Cut the profile in the angle iron using Zaph's template posted on his Waveguide TMM page. Again, for simplicity, I only cut profile in one side. The opposite side is cut about 1/8 inch lower so that it does not contact the workpiece. Drill 7/16 hole. Cut out half moon for the bottom nut to fit. All very simple. It took half an hour with a hand jigsaw.
This was an experiment to see if it would work, and it worked wonderfully in MDF. Only present catch is that the resulting profile is slightly off due to the need to offset the edge from the shaft center. It's likely to be close enough, but a little fine tuning with in CAD would correct the original template for the offset.
This bit takes about an hour to make with common shop tools and did MDF just fine in my smallest drill press (1/2 hp Harbor Freight 39 dollar on sale little wonder).
Last edited:
Very interesting PB.
When I had my round trax horns turned up some years ago, the trouble was finding someone who was willing to do it to the throat accuracy I wanted. He swore he'd never do it again.
Now that I'm more interested in an OS WG, having a bit made for the throat section like you did is a great idea. Then the rest of the conical section could easily be laminated and turned, or cut with a circle jig, router and 45° (assuming a 90° angle is desired) bit. I have in mind something like the WG's in Bouska's Stoplights (post 3) for a 2" driver.
A very great (unforeseen) benefit of this 7/16 shaft version is in rendering it all but impossible to mount in any common high speed router collet. That might be a fatal mistake. This is a poorly balanced 6.5 inch diameter bit. It's intended for use in a drill press at its slowest speed. 600 to 800 RPM. In which case it's as safe as any drill bit if used with respect. About five to ten minutes of patient cutting away to make the waveguide in MDF. (and did I mention dust?)
If anyone is tempted to try this, don't fret over the details. MDF is relatively soft and extremely consistent. No grain or hard/soft sections. As long as the bit ends up looking close to what I've shown above it will work. The leading edge there, that edge nearest to the shaft, just needs to be close enough to perpendicular to the turning axis, and right up against the shaft, and you'll be good to go. But a little ahead or behind that axis is still going to work fine. Tighten the hell out of those nuts. Since this is a single flute, there's no worry about being too precise, as long as you only take care to get the profile scribed correctly on the steel. Mild steel will take a razor sharp edge, but will lose it after one complete shaping of a waveguide. Hone it again with the sanding drum of the dremel.
Offsetting the blade that little bit in order to use unmodified angle iron changes the original profile very slightly once it is 'transferred' to the work. It would be nice if someone more talented than me could tweak the original profile in CAD to account for this. It's a pretty complex geometry problem that would be cake for any decent CAD program.
Last edited:
Wouldn't the bit would have to turn fairly slowly because of the seveer imbalance? Other than that it very clever. Those large bits can get quite expensive.
Last edited:
The threads mount in the chuck. Plenty of land for the jaws to center on. Here's a quick trial on the little harbor fright 😱 drill press at about 650 rpm. (actually it's probably the best 39 dollars I ever spent on tools). Two 3/4 inch pieces of MDF laminated together. Pilot hole pre drilled with 7/16 drill. Then bit is partially inserted and work clamped.


Took a little over five minutes. Important to kind of press, release, press, release, in very small cutting increments to eliminate chatter. Then it works very smoothly. Blade is still quite sharp after this run but should be lightly honed for the next one. Only that edge on the right in the photo is cutting. The other is cut back about 1/8 inch to simply provide balance weight. At 650-800 RPM there is only slight vibration.
Of course, now the back side needs to be taken down with a router (i used a little trim router on those shop speakers above) to arrive at the exact diameter tweeter opening desired. This is the same proceedure you'd use on the MCM waveguide but you don't need to construct a jig for doing it, and now you have a place to mount the tweeter.
Oh, did I say dust? I put a cardboard box behind with the vacuum nozzle shoved in it. That took care of almost all of the finest airborne stuff (still wore a mask of course) but there was still a terrific amount of fine stuff left in the vicinity.
Last edited:
Here's the final version of a bit.
An updated pdf file for instructions.
PDF of Bit Instructions.pdf
And here's a 3d file in scale to play with if you want to rotate the image, take other measurements, or even play with the profile for a different waveguide using the same design.
3d Bit Image.skp
If you don't have a CAD program that imports skp files you'd need to download and install Google Sketchup freeware to see it. It only takes a minute to download and install Sketchup on a cable connection.
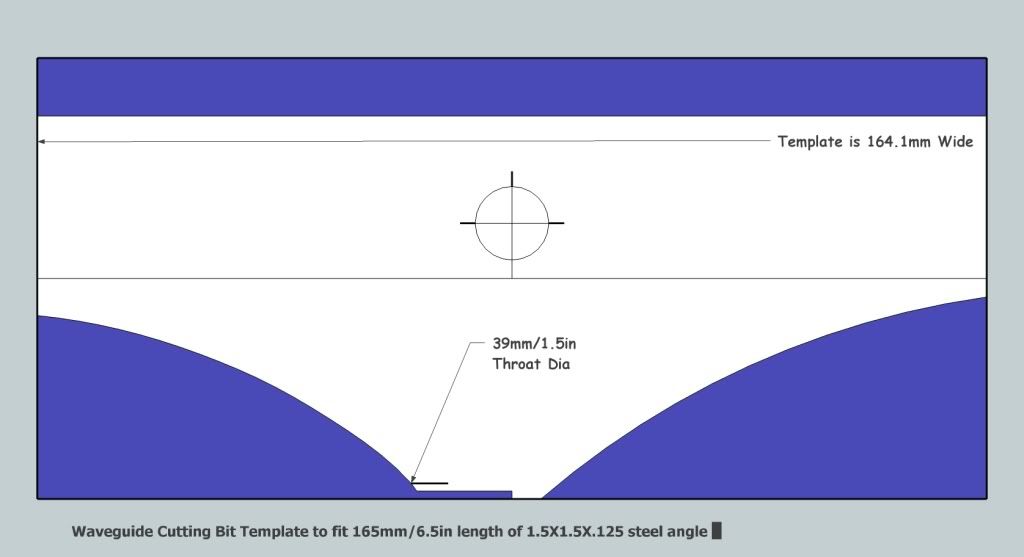
And this is a corrected template in jpg.
An updated pdf file for instructions.
PDF of Bit Instructions.pdf
And here's a 3d file in scale to play with if you want to rotate the image, take other measurements, or even play with the profile for a different waveguide using the same design.
3d Bit Image.skp
If you don't have a CAD program that imports skp files you'd need to download and install Google Sketchup freeware to see it. It only takes a minute to download and install Sketchup on a cable connection.
And this is a corrected template in jpg.
- Home
- Loudspeakers
- Multi-Way
- Waveguide cutting bit. So far, ok