XT25 dissection
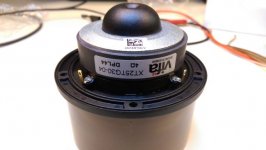
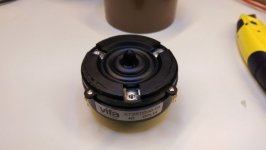
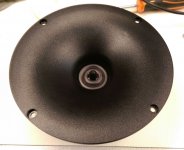
I received a question about getting the faceplate off the XT25 tweeter, because the faceplate of current versions of this tweeter is glued on. Luckily, the glue bond is not strong, and the two are easily separated. Here's how I did it, it is less than five minutes work for a pair.
First, I put the tweeter face-down taking care that the phase plug is not pressed in or pushed sideways. I used a roll of tape to put it on. I then took a Stanley knife and made a cut in the glue all the way around. This doesn't need to be all the way through, just a shallow passing with the knife is enough. This may help the glue to tear off easier, but it will probably also come off fine without cutting.
I then took a small flat bladed screwdriver to pry the glue joint open. Find a weak spot in the glue joint, and gently insert the screwdriver between the tweeter and the faceplate. Wiggle it a bit, and the glue joint should start to tear apart.
When you have opened the glue joint a bit you may try to flip the faceplate off, like you open a book. It helps to bend the faceplate up a bit by cupping your hand over it, and putting your thumb underneath it. Hold the tweeter in your other hand. The glue should now start to tear easily, and the faceplate should come off without excessive force. Most of the glue will remain on the faceplate, a fingernail is the perfect tool for cleaning up the tweeter if you wish.
See the attached pictures. It is really easy, if you can open a can you can do this too.
Attachments
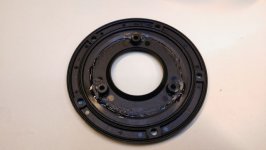
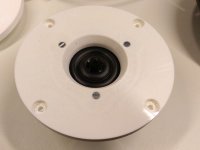
Adapter plates are here!
The adapter plates that XRK971 made have finally arrived. They didn't fit immediately, the throat hole had to be enlarged a bit with sanding cloth, and two nubs from the casting had to be cut off/sanded down from the waveguide in order to fully insert the throat through the plate. But after that was done, they fit nicely, and most importantly, the thickness was right. I will check and update the CAD drawing, and upload it so everyone can have his own 3D printed.
The adapter plates that XRK971 made have finally arrived. They didn't fit immediately, the throat hole had to be enlarged a bit with sanding cloth, and two nubs from the casting had to be cut off/sanded down from the waveguide in order to fully insert the throat through the plate. But after that was done, they fit nicely, and most importantly, the thickness was right. I will check and update the CAD drawing, and upload it so everyone can have his own 3D printed.
Attachments

It's been a while since I last logged in. I need to make a small modification to the CAD file, and then I'll upload it, so you can print it yourself, or have it printed at a 3D printing hub or shop. As it currently is, the throat flare is a tiny bit too narrow, so you need a piece of sanding paper and some elbow grease to make it fit.
Corrected adapter plate STL file
And here it is...
It should be okay now, and if the throat hole is still too small, a light sanding will fix it.
I have used acrylic filler to fill the cavities in the waveguide, and I have used silicone caulk to glue the tweeter to the adapter plate in the same way the tweeter was glued to the original faceplate. This will ensure that there is no air leak from behind the tweeter into the waveguide. Although with my test cases I found out that it is highly recommended to give the tweeters their own compartment, so that the pressure from the woofer does not act on the waveguide.
Attachments
Last edited:
No problem, reminds me that I need to continue working on them. Life's very busy at the moment, so there's a silent pair of speakers in the corner of the room. When I have results, I will post them.
Sorry to bump an old thread, but did you get a chance to take measurements of this combo?
If you`re asking for audio measurements (not the measurements of the adapter) - Heissmann Acoustics have it all published on their website.
The OD of the plate is 116 mm. The original design was done in FreeCAD. If you wish, I can supply you with the file.
Hello
My first post on DIY-Audio ... I am Alexander from Heissmann Acoustics. I just wanted to tell you that I am totaly impressed by this adapter!
Meanwhile I tested another tweeter with my adapter, the D2604/833000 with exceptional results.
kind regards
Alexander
My first post on DIY-Audio ... I am Alexander from Heissmann Acoustics. I just wanted to tell you that I am totaly impressed by this adapter!
Meanwhile I tested another tweeter with my adapter, the D2604/833000 with exceptional results.
kind regards
Alexander
Great posting on the adapter Heisman Acoustics and measurements on your website. Too far for me to order, will have to print it.
Does anyone know what the screw size is for the XT25 faceplate?
The original screw is a pan head type, but the WG is for a flat head type screw.
What screws did you use?
The original screw is a pan head type, but the WG is for a flat head type screw.
What screws did you use?
Member
Joined 2003

- Home
- Loudspeakers
- Multi-Way
- Waveguide adapter for XT25 and WG300, any interest?