Anyboby who knows the schematics of a Vincent PHO-111?
According to a picture in the swedish magazine Hifi & Musik, no 4, 2003, you can see 4 pcs of opamps model JRC 4580 (+ carbon resitors and disc caps, ceramic(?) in the riaa network) but I wonder of the concept.
Isn't it peculiar that the magazine elevates the amp to the sky when they have changed the wallwart to a toroid. What will happen if they change the opamps? Wet their pants?
/P-A
According to a picture in the swedish magazine Hifi & Musik, no 4, 2003, you can see 4 pcs of opamps model JRC 4580 (+ carbon resitors and disc caps, ceramic(?) in the riaa network) but I wonder of the concept.
Isn't it peculiar that the magazine elevates the amp to the sky when they have changed the wallwart to a toroid.
What will happen if they change the opamps? Wet their pants?/P-A
peranders said:
Isn't it peculiar that the magazine elevates the amp to the sky when they have changed the wallwart to a toroid.
/P-A
Are you surprized ?
It´s Svalander who modified it....remember when he used needled in the curtains(the Peter Belt mod)...
Don´t have the schematics,but the circuit board in the pictures does not look that good...
Nicke
😉
Vincent...
peranders,
I'm really surprized to see Vincent with such a crappy design...
Just three weaks ago my brother changed his Rega Mira amp for a Vincent (don't remember the model, but it's one of the cheaper ones - yes, incredible, it's about the same price as the Mira).
A very good deal, no money, just change the amps!
Knowing as I know the Mira insides (oooh so crappy! that volume pot...), the Vincent is clearly another game.
Valve preamp, transistor power amp, huuuuge PSU, everything so well put toguether...
Even the component codes are printed on the circuit!
Vincent claims 100w RMS/8ohm, and 200w RMS/4ohms.
I can't dispute this claim, but it shure drives much better his REGA ELAs...
Everyone with some knowledge that sees the insides of the Vincent gets truly amazed.
I couldn't close my mouth...
So well put together...
What a deal!
And it plays very well.
As for comparizons, two amps like these that cost somewhere around 700-800 Euros, we're comparing a Fiat to a Mercedes.
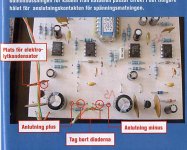
This amp flies 1 meter above the ground but with this advanced PS (with LT317) the amp lifts off a and nearly touch the stars.
Original:
Sonicly neutral, uncoloured, firm bass and good separation
Bigger wall wart:
MUCH better with clear details and better detail sharpness. Less "spretigt"(not tightly together) and less hard sound.
Bigger toroid:
Even better! More power and even more details, airier (more airness), kinder, better flow and timing and stereo sharpness.
The PS at picture:
More of everything, more firmness in the bass.....and it goes on and on.... the author got salvaged.
I wonder what they would think of my stuff with even more parts... Wet their pants 😕
Original:
Sonicly neutral, uncoloured, firm bass and good separation
Bigger wall wart:
MUCH better with clear details and better detail sharpness. Less "spretigt"(not tightly together) and less hard sound.
Bigger toroid:
Even better! More power and even more details, airier (more airness), kinder, better flow and timing and stereo sharpness.
The PS at picture:
More of everything, more firmness in the bass.....and it goes on and on.... the author got salvaged.
I wonder what they would think of my stuff with even more parts...
Wet their pants 😕Attachments
Perhaps they should replace the opamps,resistors & caps....peranders said:What will happen if they change the opamps? Wet their pants?
/P-A
Ahhh...and the circuit board too.......
Then they really wet their pants 😉
'Moded Vincent Pho-111
Hi Everyone,
I realize this is an old thread, but thought some of you might be interested.
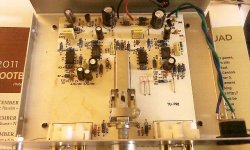
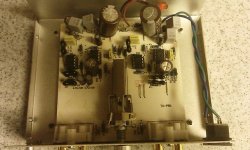
I have upgraded all the Electrolytic with Silmic II caps. The film and ceramic caps were replaced by silver mica and Wima poly caps. I did miss 2 ceramic caps near the switch, but this phono pre is so easy to take apart that replacing them will not be a problem.
I left the 1% metal film resistors alone partially because they are 1% and second, I don't have a schematic and lastly because I didn't want to sit there and read all the color bands.
All four 1N4007 diodes were replaced with Telefunken 1N4007 diodes.
The TL071 single Opamps were replaced by TI LME49710 and the dual 4558's replaced with TI LM4562. I'm pretty sure the TL071 and 4558s were designed in the '70, so I'm hoping the TI audio quality opamps are an improvement. Machined DIP sockets were also installed for quick IC changes.
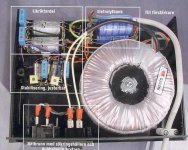
As for the power supply, the transformer is the next thing to be upgraded.
Will probably start with a larger VA wall-wort type, then move on to a toroid.
After 3 hours of unsoldering and soldering, the PHO-111 started up without a problem. It sounded slightly better than the original from a cold start. There was a bit more air and everything sounded bigger in scale, but felt a bit boring and cold. (The power amps were cold also. They need an hour to warm up.) After an hour of warmup, there was a clear improvement. The music was more involving.
Tunrtable used is the AR "Turntable" with Vinyl Nirvana GEM motor, Linn Basik arm and the cartridge is a Denon 103r modified with a Midas aluminum body and Soundsmith synthetic ruby cantilever.
The Phono pre was $200 new. I think the $70 upgrade was worth it. Will know more when everything breaks-in. 🙂
Vince
Hi Everyone,
I realize this is an old thread, but thought some of you might be interested.
I have upgraded all the Electrolytic with Silmic II caps. The film and ceramic caps were replaced by silver mica and Wima poly caps. I did miss 2 ceramic caps near the switch, but this phono pre is so easy to take apart that replacing them will not be a problem.
I left the 1% metal film resistors alone partially because they are 1% and second, I don't have a schematic and lastly because I didn't want to sit there and read all the color bands.
All four 1N4007 diodes were replaced with Telefunken 1N4007 diodes.
The TL071 single Opamps were replaced by TI LME49710 and the dual 4558's replaced with TI LM4562. I'm pretty sure the TL071 and 4558s were designed in the '70, so I'm hoping the TI audio quality opamps are an improvement. Machined DIP sockets were also installed for quick IC changes.
As for the power supply, the transformer is the next thing to be upgraded.
Will probably start with a larger VA wall-wort type, then move on to a toroid.
After 3 hours of unsoldering and soldering, the PHO-111 started up without a problem. It sounded slightly better than the original from a cold start. There was a bit more air and everything sounded bigger in scale, but felt a bit boring and cold. (The power amps were cold also. They need an hour to warm up.) After an hour of warmup, there was a clear improvement. The music was more involving.
Tunrtable used is the AR "Turntable" with Vinyl Nirvana GEM motor, Linn Basik arm and the cartridge is a Denon 103r modified with a Midas aluminum body and Soundsmith synthetic ruby cantilever.
The Phono pre was $200 new. I think the $70 upgrade was worth it. Will know more when everything breaks-in. 🙂
Vince
Attachments


Last edited:
Hello,
I've also a Vincent PHO-111 and had suddenly no output.
Op-amp are changed solong vdi_nenna (thanks for this advice), the amp is working but the LME's are running hot. The + and - voltages are 11v and 14.5v.
Both caps behind the rectifiers are replaced by bigger values even as the caps behind the 15v reg.'s (there was only 1, so now on both sides) with Sanyo OS-CON 68µ/25v.
Input cap,s are now audio-grade 4µ7 film. I removed the reversed diodes and replaced bypass caps by Wima's. Still voltage to low and unbalanced. I will change the external transformer and the regulators. I hope that's the solution. Anybody better ideas?
Phil
Check all solder joints and direction of diodes and electrolytic caps.
Did you use DIP sockets or install opamps directly to board?
Reseat opamps in DIP sockets or check solder on opamp connected directly to the board.
Did you use DIP sockets or install opamps directly to board?
Reseat opamps in DIP sockets or check solder on opamp connected directly to the board.
Thank you vdi_nenna.
As I removed the pcb out of box to replace and upgrade the opamp's, I had to desolder LED and gnd-wire. A few measurements were made like a 1khz sine-wave in and monitoring output, supply lines. On the scope output ok, but noise and rumble on -15v and even more +15v. So I changed the electrolytes and found that there was none on +15v. After caps upgrade (supply, new bypass, input) and removing the protection-diodes after the regulators, looked again and with the ext. transformer (500mA iso 200mA) it's almost perfect (bypassed also the cap's in the feedback circuits). After a while I remarked that the LME's went really warm, so I measured the voltages with a DMM and was desperate about the results. Now I've seen that I referred to the can of the first electrolyte and these was not connected with the - of the cap. After all with the upgrades, it is a beautiful phono-amp. Maybe I'll add a small heatsink to the LME.
Phil
A really good phono amp look like this:
A really really good phono stage ... doesn't use opamps. 😀
Regards,
Andy
HiHi Everyone,
I realize this is an old thread, but thought some of you might be interested.
I have upgraded all the Electrolytic with Silmic II caps. The film and ceramic caps were replaced by silver mica and Wima poly caps. I did miss 2 ceramic caps near the switch, but this phono pre is so easy to take apart that replacing them will not be a problem.
I left the 1% metal film resistors alone partially because they are 1% and second, I don't have a schematic and lastly because I didn't want to sit there and read all the color bands.
All four 1N4007 diodes were replaced with Telefunken 1N4007 diodes.
The TL071 single Opamps were replaced by TI LME49710 and the dual 4558's replaced with TI LM4562. I'm pretty sure the TL071 and 4558s were designed in the '70, so I'm hoping the TI audio quality opamps are an improvement. Machined DIP sockets were also installed for quick IC changes.
As for the power supply, the transformer is the next thing to be upgraded.
Will probably start with a larger VA wall-wort type, then move on to a toroid.
After 3 hours of unsoldering and soldering, the PHO-111 started up without a problem. It sounded slightly better than the original from a cold start. There was a bit more air and everything sounded bigger in scale, but felt a bit boring and cold. (The power amps were cold also. They need an hour to warm up.) After an hour of warmup, there was a clear improvement. The music was more involving.
Tunrtable used is the AR "Turntable" with Vinyl Nirvana GEM motor, Linn Basik arm and the cartridge is a Denon 103r modified with a Midas aluminum body and Soundsmith synthetic ruby cantilever.
The Phono pre was $200 new. I think the $70 upgrade was worth it. Will know more when everything breaks-in. 🙂
Vince
Would it be possible to note which spots on the print plate you have moded eg c6,c7 and so
Would like to do the same mod.
Cheers
- Thomas
Hi Thomas,
I'm not too sure what you mean. What I simply did was note the values of the original parts and replaced them with (what I thought were) better parts.
I also added an external AC toroid power transformer that was at least 1 amp.
Whatever the wall adaptor is rated, I doubled it. Note that the power adaptor for the Pho-111 is AC and not DC.
Double the current rating, not the AC rating. The AC output should match the wall adaptor.
Here are some of my notes, if it helps.
*************************
Burr-Brown OPA604 and OPA134. It is a pin-for-pin substitute for the TL071
NE5532 is compatible to JRC4558D. Dual opAmp
NE5532 is compatible to Op2134. Dual opAmp
OPA627 is compatible to AD797 Single OpAmp
LM4562 dual opAmp
LME49880 dual opamp
LME49710 single OpAmp
LME49810
*************************
Attachments
BTW- If I were to do this all over again, I'd use discrete opamps.
I'd track down some that were pin-for-pin equivalents and drop them in.
Might not be able to get the top put back on, but that's ok. Several people have reported that for some reason, keeping the top off phono preamps is better. Who knows. 😕
Discrete, ready made opamps like Burson and Dexa aren't cheap, but they'll sound real good. DEXA Technologies Discrete Audio Op-Amp
You can also make your own, but it can be tough, if not experienced.
I rolled in a few different monolithic opamps and they all sounded different, better than the next. The Texas Instruments audio grade opamps listed above sounded the best to me. Of course, someone will chime in and say I'm full of $%^, but so what. 😛
buying items
Hi
Thanks for your quick answer, i´m not that experienced so i think i will keep the experiments to a minimum.
Where have you bought your cap etc.?
Some online place you can recommend US or EU.
On your new print plate, the 4 grey boxes in the back is that the Wifa caps, and do they fit straight in?
Are all the values printed on the plate or on the caps so you easily can change them into something similar.
cheers
I bought the parts at Partsconnexion.com. However, since then, Mouser.com has many more Wima caps. The caps didn't exactly drop right in to make some room for the larger electrolytic caps. You might find Wima caps that will drop right in.
The larger electrolytic caps are Elna Silmic II. These can also be had from mouser.com and probably digikey.com.
The 5 odd shaped, black caps are silver mica from partsconnexion.com, but again, you could probably find them at digikey or mouser.com. They are situated toward the front of the circuit board. I missed two near the front of the circuit board near the switches.
The values are printed on the original parts.
As for the opamps, if you want to try different types, use good DIP sockets, so you don't have to solder and unsolder to try different DIP opamps.
- Status
- Not open for further replies.
- Home
- Source & Line
- Analogue Source
- Vincent PHO-111 phono amp