Id like to build a sonotube sub and have it match my
onyx rockets. Im not that familiar with applying veneer but
i was wondering if it would be possible to apply it onto a 20"
diameter sonotube? has anyone done anything similiar?
pictures?
-paul
onyx rockets. Im not that familiar with applying veneer but
i was wondering if it would be possible to apply it onto a 20"
diameter sonotube? has anyone done anything similiar?
pictures?
-paul
Haven't tried veneering sonotube but the paper-backed stuff is very easy to apply to any surface.
I bought a 8 ft x 4 ft sheet of pre-matched paper-backed cherry for £60 (about $US90) and it could be wrapped around a 10mm radius quite easily (assumig you curved with the grain - no better than 100mm going against the grain however).
I'd advise against PVA based glue because the high water content caused slight ripples in the veneer when I tried it. I've since used contact cement without any warping problems.
Regards,
David
Paul
The major problem you will have is that most veneer comes in relatively small sheets, the best you will get will be about 18" by 12" for a decent figured wood!
Application is less of a problem if you are careful, a good solvent based contact adhesive will stick to the cardboard, and will not cause any delamination issues.
If it was my project, I would probably choose a wood effect laminate, as it comes in 8' by 4" sheets and is fairly easy to apply.
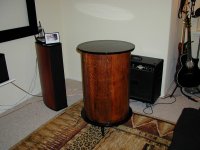
I have veneered sonotube with great success.
Naturally, you don't want to use the tubes that are wax coated on the outside!
I too recommend contact cement, not the water based though - use the solvent based. I allways keep the grain going the length of the tube but this would be a matter of preference for a tube of such large diameter. Check the surface of the tube for protruding imperfections which might force portions of the veneer away from the tubes surface and sand them out. An unwaxed tube is more porus than wood so you may have to apply 3 coats of contact cement. Allow an extra couple of inches for overlap at the seam. After the tube is wrapped you then run a VERY sharp blade along a securely clamped straightedge down the middle of the overlap - this trims both edges at the same time. Do this carefully as blades will tend to follow the grain and you don't want too much wiggle in the seam even if it will be on the backside. I prefer to use a carpet layers knife (often called a "bloody mary") as they are extremely sharp. If you use a utillity knife make sure it has a fresh blade.
Make sure the veneer is longer than the tube in case you don't roll it at a perfect 90 degrees. Trim the ends off later. Since this is your first time, I suggest you try it first with a short length of tube.
Oh, and good luck!
If you have access to a vacuum bag it will make things easier and will make for a superior bond.
I have built end tables for people using this method, if you try it make sure to fill any seams in the Sonotube with spackle.
Tony D.
I have built end tables for people using this method, if you try it make sure to fill any seams in the Sonotube with spackle.
Tony D.
Any reason sonotube wouldn't work for speakers other than subs? It seems like the shape is just about perfect except how to attach the drivers! Alsoquite non-resonant?
Pinkmouse,
I got the veneer from SL Hardwoods in Croyden:
http://www.slhardwoods.co.uk/contents/contents_boards.htm
They also have a shop that stocks a limited amount of raw veneer (ie not paper-backed), but the large sheets I used must be ordered in advance and collected.
Some pics of the veneer on my center speaker can be seen here:
http://www.apcl43.dsl.pipex.com/center.htm
I also used the same stuff for my main MTM speakers but I've just noticed that the pics on my site have dissappeared!
Regards,
David.
David,
I go there all the time, it's just around the corner! I just got some nice figured sycamore from them as it happens, but I never even thought to ask about large sheets of veneer, I always assumed they just had the small sheets of marquettry stuff... DOH
I go there all the time, it's just around the corner! I just got some nice figured sycamore from them as it happens, but I never even thought to ask about large sheets of veneer, I always assumed they just had the small sheets of marquettry stuff... DOH
- Status
- Not open for further replies.
- Home
- Loudspeakers
- Multi-Way
- Veneering sonutube??