Hi folks,
I'm in the process of veneering my Pensil 10.3 speakers with paper-backed Tasmanian Oak veneer. I've tried a sample run on an offset with poor results.
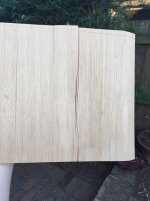
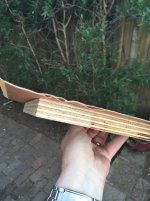
I'm using PVA applied to veneer and substate and allowed to touch dry. Then using a hot iron, going over the veneer. Unfortunately, the veneer seems to shrink and detach from the paper. I've attached a couple of photos.
Any hints on how to get this right? I don't have much spare veneer for testing with!
Cheers,
Jon
I'm in the process of veneering my Pensil 10.3 speakers with paper-backed Tasmanian Oak veneer. I've tried a sample run on an offset with poor results.
I'm using PVA applied to veneer and substate and allowed to touch dry. Then using a hot iron, going over the veneer. Unfortunately, the veneer seems to shrink and detach from the paper. I've attached a couple of photos.
Any hints on how to get this right? I don't have much spare veneer for testing with!
Cheers,
Jon
Attachments
Use a thixotropic glue in the uk called EvoStik. It is petroleum based and is a contact adhesive with about 5minutes of movement time. Apply a very thin layer to the veneer and the wood to be covered, let it almost dry and affix from one edge using a piece of paper as a non stick protector between the layers so the glue will only contact when and where you want it. That stops bubbles and mistakes.
Evo-stik Timebond - Adjustable Contact Adhesive
Evo-stik Timebond - Adjustable Contact Adhesive
I've only experience with blackwood veneer (not paper backed). I used PVA but used a caul and clamps. It was successful. This document http://www.woodweb.com/knowledge_base_images/zp/preparing_and_applying_decorative_wood_veneers.pdf is an excellent source of information on various veneering techniques.
One of the things I did was to spray the veneer with the suggested water and glycerine mix (I think 10% gycerine 90% water, and then dry it (clamped between cauls with absorbent paper) before applying.
link to a picture of the veneer being applied, you can never have too many clamps 😉 http://www.diyaudio.com/forums/gallery/showphoto.php/photo/4380
Tony.
Last edited:
I've veneered a couple of pairs of large floorstanding speakers over the years using PVA. The first were non backed oak (a pain) and the more recent were paper backed Cherry. The first was over chipboard and the second MDF.
I know that PVA isn't normally recommended for veneering but it's worked well for me. I think your problems were firstly letting the PVA partly dry and secondly shrinking the veneer by heating it. I' haven't tried wetting the veneer, just taken the approach of letting it acclimatize to room humidity level.
I used a thin and even layer of glue, with veneer applied immediately, this allows it to slide for good alignment. I then used a pressure roller (read kitchen rolling pin!) running the length and width of the panel from the center outwards to remove any air bubbles and squeeze the PVA to a very thin film. The veneer will no longer slide at this point so keep checking the alignment as you start to roll.
Not having access to cauls I used an oversized board with lots of evenly distributed weight (emptying the bookshelf is ideal!). I found setting time to being able to edge trim about an hour per panel.
Now the important bit!
PVA will soak into veneer given any opportunity and leave marks in rubbed oil finish, even after sanding. Cleanliness is essential - use masking tape and clingfilm (food wrap) to protect right up to the edges of the adjoining panels, the excess PVA will squeeze out at the edges as you roll the veneer. Also use fresh clingfilm between the pressure board and the veneer to prevent possible glue spots. Don't try to wipe off the excess PVA, you'll just get it all over your finger and spread it around the site, it will come off when you peel off the masking tape.
You need to be patient (one panel at a time) and keep glue off your hands, but being able to slide the veneer for alignment is comforting and I've never had a problem with bubbles or the veneer lifting (which is more than I can say for Iron-on glue film!)
Last edited:
I've veneered more than a few boxes over the past decade with the iron-on method, and whilst the occasional bubbling may occur if both faces not adequately covered with glue, or if veneer is not carefully rolled/laid onto substrate, I've only recently had this type of failure of de-lamination of backer fleece from the actual wood veneer. More than a bit frustrating, and resulted in having to completely strip both cabinets as start all over.
The iron- on method allows for wrapping veneer on curved panels, edges radiused at tightly as 1" or so, or even 45dg chamfers - in the long grain direction
I only ever used the same yellow wood-glue ( modified PVA) as in assembly of cabinets, but I must say that the "time adjustable contact" that John mentioned is very intriguing
Last edited:
Thanks guys. I had another go yesterday using a cooler iron and it was much more successful - no shrinkage of the veneer or de laminating from the backer. Neatly trimming the veneer across the grain was a bit tricky, but I think I just need a sharper blade.
I did get a couple of bubbles, but I think that may be because I had applied the glue too thinly. I'm using a short nap paint roller.
This second attempt has given me greater confidence to tackle the boxes. I don't have enough veneer to mess up any of the panels!
I did get a couple of bubbles, but I think that may be because I had applied the glue too thinly. I'm using a short nap paint roller.
This second attempt has given me greater confidence to tackle the boxes. I don't have enough veneer to mess up any of the panels!
I used HeatLock glue on my first project, which included a 3/8" radius on the long edge, and it turned out great. Some tips here that might be useful. I'm no expert!
BK
BK
An externally hosted image should be here but it was not working when we last tested it.
Nice job! I can't find heat lock in Australia, unfortunately.
What's the finish on those boxes? Looks great.
What's the finish on those boxes? Looks great.
Thanks. Wood is Makore and the finish is Waterlox Original - numerous coats with curing/sanding in between. The gloss diminishes a bit after a few months compared to what you see, which was just what I was after. 1.5yrs later I couldn't be happier.
BK
BK
"Neatly trimming the veneer across the grain was a bit tricky, but I think I just need a sharper blade."
I found the easiest way of trimming the end grain is to use a reasonably wide wood chisel. (nice and sharp). Flat side down and sliding on the mating panel in a circular motion so that it trims the veneer on the downward stroke. This leaves the veneer flus with the panel. Obviously you want to cut the veneer fairly close, say 5mm, so you're not having to take too much off with the chisel.
I found the easiest way of trimming the end grain is to use a reasonably wide wood chisel. (nice and sharp). Flat side down and sliding on the mating panel in a circular motion so that it trims the veneer on the downward stroke. This leaves the veneer flus with the panel. Obviously you want to cut the veneer fairly close, say 5mm, so you're not having to take too much off with the chisel.
gyro - my method as well - I find a thick 2" ( Stanley over here) works best. For me the smallest overhang possible is more about following the grain figuring around the box.
Thanks for the tips guys.
I tried a few more test runs last week using varying amounts of glue and heat, but none of them worked out. I had no problem getting the backing to stick to the substrate - the problem was the veneer splitting and separating from the backing.
I abandoned that plan and tried gyro's method, which was much more successful on a test run. I've now moved on to the boxes proper, using the other box and a set of ratchet tie-downs to apply pressure. I put a sheet of cardboard between the boxes to ensure even pressure. The result has been pretty good, although I do have a few wrinkles/bubbles, despite the rolling pin. I've also found that the veneer isn't stuck down at the edge in a couple of places, so I'll have to work out how to get a little glue underneath and re-stick. I found that the veneer has come away from the backing in a couple of places as well - I think this veneer was pretty poor over all.
I'll put up a couple of photos when I'm done.
Cheers,
Jon
Glad you're making progress and have had at least partial success.
It does sound as if your veneer maybe isn't the greatest quality if it keeps coming away from the backing so easily (not actually sure what they use to fix it to the backing paper).
Wrinkles and bubbles sounds as if you have problems with glue spread, quantity and even pressure, either initial spreading or in the rolling (you certainly want to squeeze all the air out and level the glue, but not squeeze it all out, maybe take more time but lighter pressure). You certainly need to assure 100% coverage BEFORE applying the veneer, use a pallet knife or similar (after making sure everything if thoroughly masked off), then there shouldn't be any dry spots at all (think very thin cake icing!). The veneer should certainly feel smooth and flat before you apply the weight.
Cardboard is probably too soft, it would dent on the high spots rather than flattening them, with straps too, the surface pressure (psi) wouldn't actually be that great - I'd still go for the board (maybe 1/2" mdf) no cardboard, just food wrap, and plenty of evenly distributed weight (pile it on!). What you're looking for is a flat veneer surface, even if that means that the glue film thickness is varying slightly with inperfections in the underlying panel. If you don't have excess glue line showing on your masking tape all the way round once the board is on then you don't have enough glue at that point and can rectify that stage.
Maybe spreading some glue on a very thin blade is the best way of curing your current dry edge problems.
Sorry I can't give you more definitive instructions, I can only tell you what's worked for me (hence the board and weight, not cabinet and straps). Maybe try a longer drying time too.
Last edited:
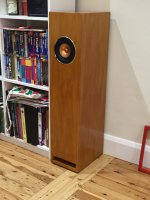
I've finished one speaker - photo attached. I used a few coats of french polish and 400 then 800 wet and dry. I'm please with how it's turned out.
Unfortunately the other speaker's a mess. After applying one of the veneer sheets and leaving for a couple of days, the whole sheet split and separated from the backing, i.e. the backing is fixed to the speaker OK, but the veneer's largely come away from the backing. I suspect this veneer doesn't like the moisture in the PVA. I've complained to the supplier, so we'll see what they say.
Cheers,
Jon
Attachments
That looks really nice, the amount of effort you put in on the finish has clearly paid off!
Sorry to hear about the issue with the other one, that veneer seems to have been giving you grief from the start, with the heat too. It should definitely be fixed onto the backing better than that, the whole point of the backing is to provide a dimensionally stable interface between the veneer and the groundwork. I'll be interested to hear what the supplier has to say. Hopefully you'll be able to stick backing to backing.
Sorry to hear about the issue with the other one, that veneer seems to have been giving you grief from the start, with the heat too. It should definitely be fixed onto the backing better than that, the whole point of the backing is to provide a dimensionally stable interface between the veneer and the groundwork. I'll be interested to hear what the supplier has to say. Hopefully you'll be able to stick backing to backing.
- Status
- Not open for further replies.
- Home
- Design & Build
- Construction Tips
- Veneering help please!