It depends on the final look you are trying to achieve. Oils will give a matte finish without providing much depth. Film building finishes like shellac, lacquer and poly provide a finish with more depth and the ability to select the surface gloss level. I find Minwax Wipe-On Poly in satin to provide a nice built-up finish with a medium gloss level. It is pretty easy to apply with a lint-free cloth. Thin the 1st coat 50% with VMP Naptha then straight coats thereafter. I usually lay down 2 coats, lightly sand with a 600 grit flexpad, then additional coats lightly sanded between until I got the look I am after, typically finishing at about 5 coats.
It depends on the final look you are trying to achieve. Oils will give a matte finish without providing much depth. Film building finishes like shellac, lacquer and poly provide a finish with more depth and the ability to select the surface gloss level. I find Minwax Wipe-On Poly in satin to provide a nice built-up finish with a medium gloss level. It is pretty easy to apply with a lint-free cloth. Thin the 1st coat 50% with VMP Naptha then straight coats thereafter. I usually lay down 2 coats, lightly sand with a 600 grit flexpad, then additional coats lightly sanded between until I got the look I am after, typically finishing at about 5 coats.
Thanks for your advise...This is my first pair of veneered speakers, the others were I have made were just painted. I have a pair of TABAQ that have a nice gray paint, which I will retouch and try to do a piano finish. Lots of elbow grease to do a piano finish, and it will probably take 6-7 coats. I have Poly, but the problem I have with Poly is that it takes so long to dry, even in our tropical climate. I have had pieces with Poly, that 2 weeks after applying they have not totally cured.
Thanks for your advise...This is my first pair of veneered speakers, the others were I have made were just painted. I have a pair of TABAQ that have a nice gray paint, which I will retouch and try to do a piano finish. Lots of elbow grease to do a piano finish, and it will probably take 6-7 coats. I have Poly, but the problem I have with Poly is that it takes so long to dry, even in our tropical climate. I have had pieces with Poly, that 2 weeks after applying they have not totally cured.
Well if drying time is a concern you could use a shellac based finish to build your film thickness. Since the solvent is denatured alcohol it dries very quickly. I have had good results with Zinnser Bullseye Sealcoat and since it is a dewaxed ahellac you can topcoat it with poly for a tougher finish. You should be able to recoat in 15 minutes vs 4 or more hours with poly.
Well if drying time is a concern you could use a shellac based finish to build your film thickness. Since the solvent is denatured alcohol it dries very quickly. I have had good results with Zinnser Bullseye Sealcoat and since it is a dewaxed ahellac you can topcoat it with poly for a tougher finish. You should be able to recoat in 15 minutes vs 4 or more hours with poly.
Thanks for the advice...I will try Shellac, I work a lot, so tend to stay away from process that take a long time, temp here has been in the mid 90's F this week, so adhesives and varnish/shellac/oil dries quickly, which is good. But poly, not even with this high temps dries quickly. I will buy a small can of shellac, and I will practice on a painted board (4"x6") to see how it turns out. For Piano Finish, what grits of sandpaper should I use to sand between shellac coats, and which for the final coat? Do I need to wetsand the last top coat?
I've never done a piano finish. For inter-coat sanding I usually use the thin sanding sponges by 3M *3M? Flexible Foam Sanding Sponge: Industrial Abrasives: 3M United States in grits of 320 to 800, with 320 on the first coat or two and working up to 800 before the last coat. For a piano finish I imagine you might need to go as fine as 1200 grit wet on the final finish, but that's just an educated guess. Like with poly when you lay down the first coat of shellac it wets better if you thin it 50/50 with denatured alcohol.
Last edited:
IMO Shellac is very thin and hard to brush. If you buy canned shellac I would thin it with alcohol and wipe coats on with a neatly folded rag. One quick wipe and let it be a few seconds to dry....another quick wipe wait a few and again and again until a decent finish builds up. Sand a bit with fine paper or 0000 steel wool between every few coats. When you have enough finish applied rub the last coat with the steel wool and some paste wax.
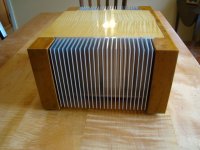
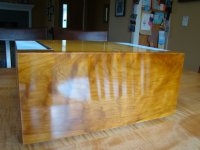
Not veneered but finished with shellac and a rag.
Shellac, Yeah! Really nice
There is 2 ways to use a brush shellac, that I have used.. 1 is easy, 2 can be messed up easy..
1) Dip the tip of brush in the dissolved shellac, lift out and brush, brush back and forth with the grain on the project in small area starting at one end.. Continue this process moving along quickly, blending new strokes into the previous ones... Its important to never have to go back to a missed area, also use very little shellac for a very thin coat.. Repeat, next day..
1/2 pound cut
2) You can load the brush with shellac and flow it out moving in lines in one direction, the next line overlaps the previous line.. Done properly you can create a ridgeless surface.. Build up the surface with several coats.. Now you have material to work with, carefully sanding it down and leveling it, polishing it then finishing the finish by wet sanding.. This method is very time consuming and can mess it up with one mistake..
2 pound cut
Last edited:
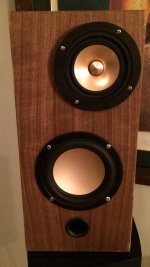
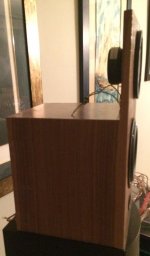
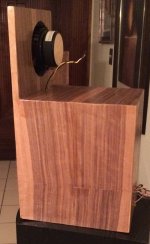
Well, this is how they turned out...As mentioned did 4 coats of waterbased varnish. Light sanding the veneer, then 2 coats of the varnish (applied with foam brush), 20 mins between coats, light 220 Grit sanding after the second coat, then 2 more coats. Pretty happy for my first ever veneering job, especially taking in consideration veneer was 5"x8" pieces put together, and that it was also a no-backing (raw) veneer.
You cannot see it in the pics, but the base were veneered just like the top, and the back were veneered just like the front.
You cannot see it in the pics, but the base were veneered just like the top, and the back were veneered just like the front.
Attachments

- Status
- Not open for further replies.
- Home
- Design & Build
- Construction Tips
- Veneer: What is the easiest way to finish it???