I bought a bunch of 1/32" raw veneer on ebay (stupid me) and am having issues applying it.
I did the normal glue to both sides let sit for 20 min and boom it stuck but then 5 hours later I have about 50 bubbles and wrinkles showing up . It was 75 degrees here in Tucson yesterday so I dont think weather was the problem.
I tried to keep rolling and tried the 2x4 trick but the veneer is pretty brittle and it started cracking.
Do I need to let the glue sit longer ?
Is there a better method I should try ?
thanks for any help guys
Jason
raw veneer is challenging. Especially heavily figured raw veneer.
My preferred method of applying veneer is the PVA iron on method. Where you apply two coats of glue to both surfaces. After they are dry, put them together and add heat from an iron. Works great. Unless you have raw veneer.
The first thing I would do is buy or make veneer softener. This will save you a lot of hassles. Second, I would use a system of cauls and clamps to glue the veneer on. Instead of using the iron on method. I've found that with heat on raw veneer you tend to get a lot of cracking.
Raw veneer is great cause it's cheap. But you pay for it in the application process.
What's your gluing method? There are several, from neoprene contact cement to regular wood glue. Contact cement adheres almost instantly, but I know that with regular wood glue it helps to keep pressure for many hours to a day or more. You might also consider veneer softener to make the veneer flatter before gluing it up - check out something like http://www.veneersupplies.com/product_info.php?cPath=37&products_id=616 or http://www.joewoodworker.com/veneering/flattening.htm for a little more info. Good luck,
The glue I'm using is Dap solvent based contact cement.
I did find that letting it sit for 30+ minutes seems to be helping so far.
The speakers its going on are not square unfortunately and are built somewhat like the Sonus Faber Stradavari's (Pain in the butt to build)
so clamping is kinda out of the question unless I find something flexible
but then the pressure may not remain even.
The veneer seems surprisingly soft but is still a little "brittle" or maybe the better term is "weak" and apparently the iron idea is out since I'm using raw veneer (although its figured maple which is pretty tough right ?)
well Ill keep going here and see what happens
thanks for the ideas and links
Jason
I guess my next question is should I use water base clear or solvent based ?
Im not doing any staining either.
thanks
Im not doing any staining either.
thanks
Raw Veneer
I have been working with large sheet raw veneers for many years. Many of my speaker projects are curved -- so clamping would be problematic. I use premium grade Le Page's contact cement. (NOT WATRER BASED) Here is the method I use:
1) Cut your veneer sheets 2 inches larger (on both dimensions) than the area they are required to cover.
2) If the veneer is heavily figured (burl, knotty or birds-eye), you MUST use veneer softener. Mix up this stuff according to the manufacturers instructions in a spray bottle. Spray both sides of the veneers -- let it sit until the veneer becomes pliable. GENTLY attempt to flatten the veneer. If you hear any "crackly" sound STOP -- this is the veneer cracking. Apply more softener and wait (maybe an hour). Repeat until the veneer is pliable.
3) Using 3/4" MDF (cut at least 2" larger then the veneer on both dimensions) as a press, lay down 2 sheets of brown kraft paper the same size or bigger than the MDF. Lay down the wet veneer sheet on the brown kraft paper sheet.
4) Cover the wet veneer with another 2 sheets of brown kraft paper. Then cover the brown Kraft paper with the second piece of 3/4" MDF. Depending upon the temperature and humidity in your shop, the drying time could take up to 24 hrs.
5) If you are applying then veneer to curved items you should not let the veneer COMPLETELY dry -- it should remain somewhat moist and flexible. If you are applying it to flat surfaces dry it out completely.
6) On an other piece of MDF, lay down the veneer with side you want to glue facing up. Use masking tape to hold down the corners. Using Le Pages premium contact cement and Le Pages contact cement thinner (use only this stuff to reduce the cement viscosity) make a 50% mix of cement and thinner. Put this in an air powered paint sprayer. (A cheap Chinese model will do nicely here).
7) Working in a WELL VENTILATED AREA and wearing a CHEMICAL RESPIRATOR (s simple dust mask WONT DO) apply a coat of thinned contact cement with the sprayer. Let it dry completely -- the must be NO TACKINESS. Repeat this procedure until you have THREE COATS.
8) While you are spraying the veneer, you can spray the box (?) you want to cover.
9) When the veneer and box (one face) are covered with contact cement (3 coats) monitor their surface tackiness with your hand and a brown kraft paper drag test. If the cement coat looks dull, it is on the way to being dry. Test it with the palm of your hand. if it is not tacky, LIGHTLY drag a piece of brown kraft paper over the complete surface of the cement (both veneer and the box face). If it doesn't snag, you are ready to join the veneer with the box face.
10) Lay a piece of brown kraft paper on top of the box face that has the dried contact cement on it. Make sure the kraft paper is 4" bigger than the box face on both dimensions. Lay the veneer, glue face down on to the brown kraft paper.
11) Center the veneer as best you can in relation to the face of the box. With a helper, slowly SLIDE the brown Kraft paper OUT on one dimension do that about 1/2" of the veneer comes into contact with the box face, DO NOT PRESS DOWN..
12) Check alignment of the veneer and the box face -- make your minor adjustments NOW -- and make them correctly -- ONCE the the two faces with contact cement join they ARE NOT MOVABLE.
13) Once you are satisfied with the alignment rub the veneer with a LARGE ROLLER or a piece of 2 x 4 that has been sanded smooth.
14) Repeat the brown kraft paper incremental removal / press down process until the face has been completely veneered.
The reason most veneering projects with contact cement fail is due to the fact that most folks don't allow the cement to COMPLETELY DRY before joining the veneer to the substrate. Making this mistake will ensure bubbles, peeling and project failure. LET the contact cement DRY COMPLETELY (NO STICKINESS) before you join the veneer to the item you are covering.
Hope this helps...
WOW
your definitely a pro at this lol
so I'm thinking its safe to say that I would be much better off from now on with paperbacked veneer for an "easier" application ?
I also had a guy tell me that putting the veneer in a room with a humidifier over night would help make it pliable does that sound right ?
Re: Raw Veneer
Good reply? No Great reply. I've use contact cement on same veneers, as long as they are good and flat.
I think what happens to so many is the drying time. I used to build old street rods, every aspect. The piant took some time to learn, not because it was tough to do, but because of patience, allowing the coats to fully "flash". The flashing is to allow the solvents in the coat to fully dissipate before applying the next coat. If not, the solvents will try and push there way to the surface, ie the bubbles and I'm sure veneers do the same.
tt398 said:I have been working with large sheet raw veneers for many years. Many of my speaker projects are curved -- so clamping would be problematic. I use premium grade Le Page's contact cement. (NOT WATRER BASED) Here is the method I use:
1) Cut your veneer sheets 2 inches larger (on both dimensions) than the area they are required to cover.
2) If the veneer is heavily figured (burl, knotty or birds-eye), you MUST use veneer softener. Mix up this stuff according to the manufacturers instructions in a spray bottle. Spray both sides of the veneers -- let it sit until the veneer becomes pliable. GENTLY attempt to flatten the veneer. If you hear any "crackly" sound STOP -- this is the veneer cracking. Apply more softener and wait (maybe an hour). Repeat until the veneer is pliable.
3) Using 3/4" MDF (cut at least 2" larger then the veneer on both dimensions) as a press, lay down 2 sheets of brown kraft paper the same size or bigger than the MDF. Lay down the wet veneer sheet on the brown kraft paper sheet.
4) Cover the wet veneer with another 2 sheets of brown kraft paper. Then cover the brown Kraft paper with the second piece of 3/4" MDF. Depending upon the temperature and humidity in your shop, the drying time could take up to 24 hrs.
5) If you are applying then veneer to curved items you should not let the veneer COMPLETELY dry -- it should remain somewhat moist and flexible. If you are applying it to flat surfaces dry it out completely.
6) On an other piece of MDF, lay down the veneer with side you want to glue facing up. Use masking tape to hold down the corners. Using Le Pages premium contact cement and Le Pages contact cement thinner (use only this stuff to reduce the cement viscosity) make a 50% mix of cement and thinner. Put this in an air powered paint sprayer. (A cheap Chinese model will do nicely here).
7) Working in a WELL VENTILATED AREA and wearing a CHEMICAL RESPIRATOR (s simple dust mask WONT DO) apply a coat of thinned contact cement with the sprayer. Let it dry completely -- the must be NO TACKINESS. Repeat this procedure until you have THREE COATS.
8) While you are spraying the veneer, you can spray the box (?) you want to cover.
9) When the veneer and box (one face) are covered with contact cement (3 coats) monitor their surface tackiness with your hand and a brown kraft paper drag test. If the cement coat looks dull, it is on the way to being dry. Test it with the palm of your hand. if it is not tacky, LIGHTLY drag a piece of brown kraft paper over the complete surface of the cement (both veneer and the box face). If it doesn't snag, you are ready to join the veneer with the box face.
10) Lay a piece of brown kraft paper on top of the box face that has the dried contact cement on it. Make sure the kraft paper is 4" bigger than the box face on both dimensions. Lay the veneer, glue face down on to the brown kraft paper.
11) Center the veneer as best you can in relation to the face of the box. With a helper, slowly SLIDE the brown Kraft paper OUT on one dimension do that about 1/2" of the veneer comes into contact with the box face, DO NOT PRESS DOWN..
12) Check alignment of the veneer and the box face -- make your minor adjustments NOW -- and make them correctly -- ONCE the the two faces with contact cement join they ARE NOT MOVABLE.
13) Once you are satisfied with the alignment rub the veneer with a LARGE ROLLER or a piece of 2 x 4 that has been sanded smooth.
14) Repeat the brown kraft paper incremental removal / press down process until the face has been completely veneered.
The reason most veneering projects with contact cement fail is due to the fact that most folks don't allow the cement to COMPLETELY DRY before joining the veneer to the substrate. Making this mistake will ensure bubbles, peeling and project failure. LET the contact cement DRY COMPLETELY (NO STICKINESS) before you join the veneer to the item you are covering.
Hope this helps...
Good reply? No Great reply. I've use contact cement on same veneers, as long as they are good and flat.
I think what happens to so many is the drying time. I used to build old street rods, every aspect. The piant took some time to learn, not because it was tough to do, but because of patience, allowing the coats to fully "flash". The flashing is to allow the solvents in the coat to fully dissipate before applying the next coat. If not, the solvents will try and push there way to the surface, ie the bubbles and I'm sure veneers do the same.
We got into this very thing over on the bendable plywood thread, and it really caused a row with some. Personally, if you absolutely, positively have to use contact cement do it on paper backed veneer, IMO. The rest should be laid down with a more substantial adhesive.
I have almost always used PVA glue, titebond II being the best. Then I use a piece of plywood, sitting on the veneer, and also use cross boards to apply pressure as they are clamped on tightly. Then I use lots of clamps to push the veneer evenly against the substrate. That way, when it dries, it will be flat and hard. If there is a bubble, you can always come back with an iron and heat the glue until it remelts an rebonds, but this is not usually necessary.
Taking the advice of two professional veneerers here, using Catalyzed adhesives, such as Unibond 800 are the best way to glue the veneer. You mix the catylist and then apply it to the substrate, before either clamping it, or placing it into a veneer vacuum press.
This is the route I am going to go next, as I am getting ready to construct my own veneer press from Joe Woodworker. You can learn a lot from that site.
Contact cement is the least usable glue, because it allows the wood to move around. PVA glues are more rigid in nature and tend to keep the veneer in one place. And I watched a demonstration of Unibond 800, and it is without a doubt the strongest at holding veneer in place.
If you are just using a single sheet per side, and it is not a crotch mahagony, burl, or oily wood like Santos, you can easily get along with regular PVA glues and lots of clamping. If you are going to bookmatch two pieces together, you will definately need veneer tape, and a means of clamping the material, using either PVA or Unibond 800, or best of all, a veneer press.
I know that this is going to cause a firestorm, but my advice is to stay away from Contact Cement for wood veneers. What else can I say without some people calling me arrogant here.
Here on my latest project, I did something brand new, using PVA and taking an iron to adhering the veneer on a six sided enclosure. I'm not finished with the project, but mostly through with the cabinets. As you can see, while it is not perfect, it does manage to adhere the veneer flat to the surface. Next time, and I will definately do a second hexagon project, I will adhere the veneer differently, probably use a veneer press that allows me to insert the entire hexagon enclosure.
tt398 has it nailed. One of the best single posts I've read on this forum.
Following his step by step instructions will give excellent results.
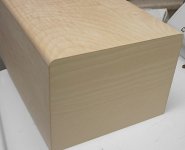
Here's a recent veneer job using paperback veneer and contact cement (Lepage's ). This looks good to me, it's not going anywhere either. More here
Following his step by step instructions will give excellent results.
Here's a recent veneer job using paperback veneer and contact cement (Lepage's
). This looks good to me, it's not going anywhere either. More hereAttachments
Ok Once I have the veneer on how long do I have to wait before clearing it ?
and should I use oil base or water base clear ?
thanks
Jason
and should I use oil base or water base clear ?
thanks
Jason
Veneer Finishing
I don't like to get water in contact with the veneer -- it gets into the wood cells and causing swelling, bubbles and delamination. I wait for one day (dry & warm weather) for the last little bit of the volatile organics to flash off before I begin finishing.
When I color the veneer I use "WATER SOLUBLE" aniline dye powders. I dissolve them into 100% (no water) alcohol. I use the same formula as if I was using water as the solvent. (Remember I don't want water in contact with the veneer).
I am assuming you are going to use Danish oil, tung oil or linseed oil as the topcoat. I prefer PURE TUNG OIL -- it is the most durable of the three. Sand down the veneer surface with 120, 220 then 320 grit sandpaper. Do this by hand with a sanding block. Follow the grain when sanding and be careful -- veneer is THIN -- you don't want to sand through it.
Using the same spray gun set-up as in my previous posting, I liberally spray on multiple coats of the alcohol-aniline dye mix until the color is about twice as dark As I desire. The alcohol-aniline dye mix dries very quickly -- you only need to wait 15 minutes between coats. You should still be able to see the woodgrain -- but the highlighting / figuring should be fairly obscured by the dye. This sounds silly at first but there is a method to this madness.
Once the last coat of aniline dye - alcohol mix is dry (about 1/2 hour to be safe), you can now get onto the the oil application. Wearing some NITRILE GLOVES, and using 000 (XXXtra FINE) steel wool gently rub in you choice of oil finish into the veneer. Follow the grain with your application -- you don't want cross-grain scratches! Do this on all the faces of the box. Make sure this is a liberal application.... Leave this to dry for approximately an hour. Come back and wipe off with a clean, (DRY - no water) rag.
You'll notice the oil and the wood dust raised by the steel wool has made a sort of colored paste.... This is good. This acts a sealer and a surface leveler. This is also the reason we used water soluble dye --- this dye is less soluble in the oil than an oil based stain. You will still lose dye color during this process (remember when we applied TOO MUCH DYE in the first place?) but you will still arrive at the base color you want during the multiple applications of the oil.
Repeat the oil application process SIX times in one day. On the final application of the day, and after 15 minutes of drying, wipe completely dry with a clean and dry rag. You will start to notice that subtle luster of a hand-rubbed oil finish.
As for using varathane, varnish or lacquer -- DON'T. They are used in shops and are very unforgiving of hobbyist-level mistakes. The other bonus with oil finishes is that minor scratch repair is the same procedure as the application of the oil. Normal maintenance involves dusting and the application of a good wax like Formby's. A final note -- don't use "furniture oil" for routine maintenance -- it will cause damage to the hand rubbed luster that you worked so hard to produce.
With all DRYING OILS, remove the used rags from your house and place them for disposal in a WATER FILLED bucket -- outdoors. The oily rags are a FIRE HAZARD.
Hope this helps. 😎
P.S. -- Jason, seeing as you are in Arizona, humidity levels should be low -- that will add to the likelihood of a successful veneering and finishing project.😀
I should have been more specific .
I'm looking to finish these in their natural color and was hoping not to have to use oil so it doesn't change the color of the wood.
This "Non Yellowing" characteristics of the water based clear is the only reason I bought it.
am I screwed ?
Maybe I should leave it dry ?
I'm looking to finish these in their natural color and was hoping not to have to use oil so it doesn't change the color of the wood.
This "Non Yellowing" characteristics of the water based clear is the only reason I bought it.
am I screwed ?
Maybe I should leave it dry ?
Veneer
What type of veneer are you using? Maple, oak, birch? It makes no real difference if you use paperbacked, wood backed or non-backed veneer. The backed veneer is SLIGHTLY more tolerant of operator mis-handling, but it is still fragile. You still need to be really careful no matter what type of veneer you use.
Don't leave the veneers dry "non-sealed" - the first spilled water or drink and the veneers will swell, bubble crack or de-laminate.
Water-based top coats could spell disaster for an unsealed veneer application. (remember water and unsealed veneers don't mix!)
If you use Behr's Tung Oil Finish only (no dyes) the surface should not significantly darken. I don't recommend any varathane, lacquer or varnish for the hobbyist. To get a truly smooth, pro finish with these products you need a dust-free, power filtered spay painting booth -- like those you see in an auto body shop. I have one, and I use it when a customer demands a piano-lacquer finish. The oil method is ideally aligned for the equipment and expertise of a home-based hobbyist. The oil finish does not hide the grain and figuring like a varnish or lacquer can.
The veneer is raw (non backed) Figured maple 1/32" thick
I'm also using a figured Makore non backed 1/32" thick veneer on the same project.
The veneer has been dry for 22 hours now but when I put a very light bit of the water based clear coat on the bottom it wanted to bubble
although it has only been 60 degrees here the last few days
I'm also using a figured Makore non backed 1/32" thick veneer on the same project.
The veneer has been dry for 22 hours now but when I put a very light bit of the water based clear coat on the bottom it wanted to bubble
although it has only been 60 degrees here the last few days
veneer
Expensive veneers.
Re-read my previous post -- it should answer you queries.
Lee Valley tools has Pure Tung Oil and Aniline dyes, and most building supply store stock Behr's Tung oil Finish.
Another option is shellac. Have you worked with it before? It is available at Lee Valley Tools in solid form -- you dissolve it in alcohol and spray it on. But this still requires a filtered spray booth for professional, smooth results.
Re: Veneer Finishing
A mantra I remember from my woodwork teacher at school - once an hour for a day, once a day for a week, once a week for a month, and once a month for a year. 🙂
tt398 said:Repeat the oil application process SIX times in one day.
A mantra I remember from my woodwork teacher at school - once an hour for a day, once a day for a week, once a week for a month, and once a month for a year. 🙂
Re: Re: Veneer Finishing
That mantra is correct. It is a real joy to see that hand rubbed luster grow over time -- it produces a quality of finish like no other. Some times the old way is the best way...
As hobbyists we have the time to spend on a hand rubbed oil finish -- why use the quick methods used by the commercial shops?
Hey PINKMOUSE -- fly the UNION JACK !
pinkmouse said:
A mantra I remember from my woodwork teacher at school - once an hour for a day, once a day for a week, once a week for a month, and once a month for a year. 🙂
That mantra is correct. It is a real joy to see that hand rubbed luster grow over time -- it produces a quality of finish like no other. Some times the old way is the best way...
As hobbyists we have the time to spend on a hand rubbed oil finish -- why use the quick methods used by the commercial shops?
Hey PINKMOUSE -- fly the UNION JACK !
Re: Re: Re: Veneer Finishing
Nah. Well, I might change if I could have the White Rose of Yorkshire, but I'm not supporting those &**^%^^& Lancastrians. 😉
tt398 said:Hey PINKMOUSE -- fly the UNION JACK !
Nah. Well, I might change if I could have the White Rose of Yorkshire, but I'm not supporting those &**^%^^& Lancastrians. 😉
- Status
- Not open for further replies.
- Home
- Loudspeakers
- Multi-Way
- Veneer issues