I had a read of Patrick Bateman's Tapped Horn for Dummies thread recently
https://www.diyaudio.com/forums/subwoofers/114340-tapped-horn-dummies.html
and decided there had to be a better way.
In short, he used cardboard cylinders that are normally used for making concrete columns. Examples include the brand that shall not be named but includes most of the word Sonos and combines it with a 'tube' suffix. Rhymes with Phonotube.
Now his tubes were around 8 feet long and he encountered problems with sealing the internal divider. So what should have been an afternoon build turned into something much more time consuming, cutting the tube into sections, sealing the divider and brace into place and then gluing the whole mess back together.
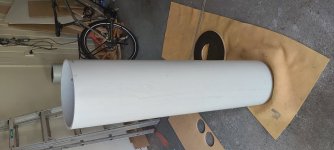
I figured sod that for a game of soldiers and simmed up a shorter tube made out of solid PVC instead. This is much more rigid and internally more uniform. Also, by using a pipe with a 300mm internal diameter I only needed something about 4 feet long (actually 1.25m) meaning I could much more easily seal it up without having to cut it into sections.
Truth be told I haven't needed to seal it, though may just do that eventually to see if it improves things. Anyhow, I measured up the internal diameter and cut a section of MDF to fit - it is slightly shorter because there must be space at the top for the rear wave to fold and return back down the pipe.
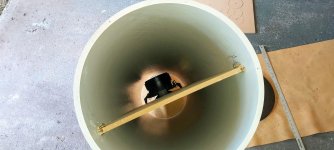
I made the divider an ever so slightly loose fit because that way once in place I could smash it up hard to one side and create a taper ie, the upward side has a bit more volume than the exiting side. I then bored a few shallow holes both ends and fitted a few small retaining screws to keep the divider in place.
I chose a 300mm section of pipe so that my 10-inch driver would fit at the bottom of the divider - it is centred 20cm from the bottom where it simmed best. It's a bit tight but it fits in okay. Then I filled the larger section of the cylinder with stuffing because it simmed best that way.
Then it's a simple matter of making an end cap for the top - I just screwed this into the PVC because it is a completely flush cut. Same at the bottom only this has feet, and on one half I cut out a semicircular hole for the merged wave to exit.
I haven't even bothered with terminals because the wires exit straight from the driver out through the bottom and direct to the amp.
So a simple tapped horn that takes only a half afternoon using RSS265HO-44 that gets to about 32Hz with horn length of 250cm and volume of 179L.
A thing of beauty it isnt but I intend to apply carpet. This is easy to do with industrial double sided tape rather than gluing everything in place. At least it worked well with the last cylinder sub I built.
It doesn't dig quite as low as my 15-inch cylinder sub TL but it pressurises the room just as well, there's no external pipeline either, and it can be laid on its side behind a sofa easily enough.
https://www.diyaudio.com/forums/subwoofers/114340-tapped-horn-dummies.html
and decided there had to be a better way.
In short, he used cardboard cylinders that are normally used for making concrete columns. Examples include the brand that shall not be named but includes most of the word Sonos and combines it with a 'tube' suffix. Rhymes with Phonotube.
Now his tubes were around 8 feet long and he encountered problems with sealing the internal divider. So what should have been an afternoon build turned into something much more time consuming, cutting the tube into sections, sealing the divider and brace into place and then gluing the whole mess back together.
I figured sod that for a game of soldiers and simmed up a shorter tube made out of solid PVC instead. This is much more rigid and internally more uniform. Also, by using a pipe with a 300mm internal diameter I only needed something about 4 feet long (actually 1.25m) meaning I could much more easily seal it up without having to cut it into sections.
Truth be told I haven't needed to seal it, though may just do that eventually to see if it improves things. Anyhow, I measured up the internal diameter and cut a section of MDF to fit - it is slightly shorter because there must be space at the top for the rear wave to fold and return back down the pipe.
I made the divider an ever so slightly loose fit because that way once in place I could smash it up hard to one side and create a taper ie, the upward side has a bit more volume than the exiting side. I then bored a few shallow holes both ends and fitted a few small retaining screws to keep the divider in place.
I chose a 300mm section of pipe so that my 10-inch driver would fit at the bottom of the divider - it is centred 20cm from the bottom where it simmed best. It's a bit tight but it fits in okay. Then I filled the larger section of the cylinder with stuffing because it simmed best that way.
Then it's a simple matter of making an end cap for the top - I just screwed this into the PVC because it is a completely flush cut. Same at the bottom only this has feet, and on one half I cut out a semicircular hole for the merged wave to exit.
I haven't even bothered with terminals because the wires exit straight from the driver out through the bottom and direct to the amp.
So a simple tapped horn that takes only a half afternoon using RSS265HO-44 that gets to about 32Hz with horn length of 250cm and volume of 179L.
A thing of beauty it isnt but I intend to apply carpet. This is easy to do with industrial double sided tape rather than gluing everything in place. At least it worked well with the last cylinder sub I built.
It doesn't dig quite as low as my 15-inch cylinder sub TL but it pressurises the room just as well, there's no external pipeline either, and it can be laid on its side behind a sofa easily enough.
Attachments
Thanks to you, I just got done reading all 25 pages of that thread! Lots of great info. Funny how it took Earl until page 16 to eventually realize what a tapped horn was.
The main problem John (Patrick) faced with his design was that he shifted his baffle to have a step in his TH. He first started with one in the middle like yours (easy) and then struggled quite a bit with the shifted baffle.
So in his design, you have to somehow seal the baffle but you can't just wedge it in the middle. All of his struggles were with sealing the baffle.
I'm with you, though, I'd use PVC and 1/2" baltic birch baffle but I'd bevel the edge of the baffle to match the angle of the PVC then screw through the PVC into the baffle all the way down the length to hold a seal.
But I'm not personally attached to a tube design and would build a box design myself.
Good points you raise, and I was thinking of doing a similar thing regarding a bevel on the edge.
Only instead I pulled it to bits and stuck the driver back on the end of a 250 tube, motor out, inserted that into the 300 tube and made a TL with taper that way. It sounded slightly better I thought. Only took half an hour to change from one to the other too.
However, I've settled on the tapered TL using a 15 Dayton instead. I will need to conjure something with the pair of 10s I have to perform as well as the RSS390 sub (which is also a smaller enclosure with a line of hidden pipe and the S.O. prefers that because the pipe is down at floor level behind the equipment rack).
Anyhow, down in the Southern Hemisphere we are now on holiday so I'm just going to forget about everything other than golf for the next fortnight or so.
I had a read of Patrick Bateman's Tapped Horn for Dummies thread recently
Tapped Horn for Dummies
and decided there had to be a better way.
In short, he used cardboard cylinders that are normally used for making concrete columns. Examples include the brand that shall not be named but includes most of the word Sonos and combines it with a 'tube' suffix. Rhymes with Phonotube.
Now his tubes were around 8 feet long and he encountered problems with sealing the internal divider. So what should have been an afternoon build turned into something much more time consuming, cutting the tube into sections, sealing the divider and brace into place and then gluing the whole mess back together.
I figured sod that for a game of soldiers and simmed up a shorter tube made out of solid PVC instead. This is much more rigid and internally more uniform. Also, by using a pipe with a 300mm internal diameter I only needed something about 4 feet long (actually 1.25m) meaning I could much more easily seal it up without having to cut it into sections.
Truth be told I haven't needed to seal it, though may just do that eventually to see if it improves things. Anyhow, I measured up the internal diameter and cut a section of MDF to fit - it is slightly shorter because there must be space at the top for the rear wave to fold and return back down the pipe.
I made the divider an ever so slightly loose fit because that way once in place I could smash it up hard to one side and create a taper ie, the upward side has a bit more volume than the exiting side. I then bored a few shallow holes both ends and fitted a few small retaining screws to keep the divider in place.
I chose a 300mm section of pipe so that my 10-inch driver would fit at the bottom of the divider - it is centred 20cm from the bottom where it simmed best. It's a bit tight but it fits in okay. Then I filled the larger section of the cylinder with stuffing because it simmed best that way.
Then it's a simple matter of making an end cap for the top - I just screwed this into the PVC because it is a completely flush cut. Same at the bottom only this has feet, and on one half I cut out a semicircular hole for the merged wave to exit.
I haven't even bothered with terminals because the wires exit straight from the driver out through the bottom and direct to the amp.
So a simple tapped horn that takes only a half afternoon using RSS265HO-44 that gets to about 32Hz with horn length of 250cm and volume of 179L.
A thing of beauty it isnt but I intend to apply carpet. This is easy to do with industrial double sided tape rather than gluing everything in place. At least it worked well with the last cylinder sub I built.
It doesn't dig quite as low as my 15-inch cylinder sub TL but it pressurises the room just as well, there's no external pipeline either, and it can be laid on its side behind a sofa easily enough.
Dang it!!! I got an rss265-4.... i thought maybe we would have the same one when i saw it and jumped on the deal...