You got the 10$ model ...Hey those are sweet, very cool!
The outside diameter is ~11 1/4". The inside "tray" area is ~7 3/4".
An externally hosted image should be here but it was not working when we last tested it.
It cost less than a cheap steel or aluminium frame ! 😀
Not all the times ...SE transformers need gaps to prevent saturation due to the dc component of the plate current and hence the sections are not interleaved as they would be in a PP transformer.
Some very good and expensive Lundahl output transformers are gapped to prevent the DC current saturation and are highly interleaved. The C-Core LL1520, LL1623, LL1627 and LL9202 can be used for push-pull or single end.
All those models have 4 primary windings and 8 secondary windings to get the desired impedance ratio series/parallel combinations. The ones for push-pull have a 25u air gap and the ones for single end have a 125u, 190u or 250u air gap depending on the maximum DC current ...
http://www.lundahl.se/pdfs/datash/1620_3_7_9202.pdf
Alain. 🙂
That' the one!
You know, the glass might actually fit over the tubes. I was not really thinking of the glass when I was laying it out, otherwise I could have moved them towards center a bit more.
I think I will pick one or two up next time I am in there, for the glass or a future project.
You know, the glass might actually fit over the tubes. I was not really thinking of the glass when I was laying it out, otherwise I could have moved them towards center a bit more.
I think I will pick one or two up next time I am in there, for the glass or a future project.
You can cover transformers by glass, but how far will be their temperature from temperature of anodes of output tubes?
That's a test to do, don't forget there is a 3/8" hole on top of the dome for the retaining bolt, this hole will act as a chimney to let the heat out as long there is also some holes in the base for the cold the air intake ... Also, the glass is a very good heat conductor and the dome will act as a heatsink. 😛You can cover transformers by glass, but how far will be their temperature from temperature of anodes of output tubes?
If you got a ceiling light with a fan.....
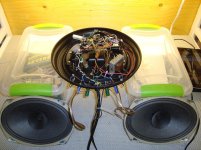
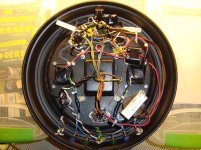
So the amp is pretty much complete. One snag I have is those cheap gold plated RCA jacks. They are too small, broke the tip off of one of my cables and everything. I can't say where they are from, I got them free with some parts I ordered off eBay. I have more, maybe I can drill it out a bit, I would rather find something different to go in the same holes. So for now I just tacked the RCA cable to the jacks on the inside. I also need to make up a base when I get some wood next.
I am a little over 300B+ so I upped the 6V6 cathode resistors to 330ohm from 270ohm.
The 12AT7 has a slightly cathode higher resistor, 270ohm rather then 250, this appears to be at 6ma.
As far as I can tell the 6V6 are running at 44ma, so I might have to address that?
Now I might be able adjust the B+ down a bit by adding around 150ohm to the power supply.
Right now it is just a basic pi, consisting of 22u-1.5H/53ohm-80u.
I was not sure on how much of a negative effect having a resistor added, but I'm sure it would be fine. If I did add the 150ohm I could add more capacitance after the choke as well.
Thoughts?
Attachments
Last edited:
I think my 6V6 are running at about 44mA and 300V. Seems a good choice.
Nice to see the amp coming along.
I was at the store looking for cheap light fixtures and found a few, but could not tell if the center was flat, like yours. The middle part appeared curved, tho maybe it flattens out in the center. Didn't want to unpack them from the boxes to find out.
Any thoughts?
I would imagine most would be flat in the middle. Maybe check another store with displays or tear one open. Just tell 'em the wife said so.
I'm like you, I don't like to open things in a store.
I'm like you, I don't like to open things in a store.
I wanted to add that I do get a bit of hum from the PT.
When I did the test, I did not have the center tap on the OPT secondaries connected, that's why I got no hum.
It's not bad at all, I can certainly live with it. I am using pretty efficient speakers too.
Just something to consider with this small of a chassis, now mind you if you spin the OPT's 90 degrees or flip them upright you could likely get rid of it all together.
I did not have the room or the option with the Telefunken OPT's.
What a fun project.
Ya it's pretty thin steel.
It stiffens up fine when the transformers are bolted to it.
I have a set of chassis punches. I bought some used ones off eBay. Fast and clean holes, although I have done it the slow and dirty way too.
A happy medium might be buying a step bit at your hardware store. I have not tried one, but I hear they work decent.
Yes, a "Unibit Step Drill" also make very nice and precise holes in thin steel but also in up to 1/4" thick steel or any soft metal (1/2" if you drill from both sides). I got a original one home since about 30 years, I use it thousands of times and it still cut like a new one ... I start the hole with a normal 1/16" drill bit follow by a 3/16" one to get it right in the spot and use steel cutting oil (kerosene or rubbing alcohol for aluminium).Ya it's pretty thin steel.
It stiffens up fine when the transformers are bolted to it.
I have a set of chassis punches. I bought some used ones off eBay. Fast and clean holes, although I have done it the slow and dirty way too.
A happy medium might be buying a step bit at your hardware store. I have not tried one, but I hear they work decent.
There is some for sale on eBay, a very handy tool better than "Greenlee knockout punchs" because you don't need big muscles to turn it ... They have 1/16" steps, the small one go from 3/16" to 7/8" and have a 3/8" shank, the big one to finish the job go from 3/4" to 1 3/8" but have a 1/2" shank, so you need a big drill or a pressdrill with a 1/2" chuck to use it ...
Alain.

Be careful with big drill bits on thin metal, they can tear it apart, and turn your dish into a dangerous flying courser.
That's why you have to start with a very small drill bit, but when finishing with the unibit, there is no danger to tear it apart and the hole will be really perfect even on very thin metal. The best way is to put a piece of 1/4" plywood, soft wood like pine or just "styrofoam" under so the metal don't not bend when you drill it.Be careful with big drill bits on thin metal, they can tear it apart, and turn your dish into a dangerous flying courser.
It is very hard to make a nice and centered hole with a big drill bit even in thick metal unless you are a skilled machinist and your drill bit is perfectly grinded. But it is almost impossible to do it in a thin metal like this lamp base unless you have special working tricks ... 😉
Last edited:
For cutting socket holes in a chassis I use high speed steel hole saws, I have one for octal sockets and a smaller one for B9a's. I also clamp 1/4" plywood underneath the hole as it gives a cleaner edge as well as support.
Hole saw - Wikipedia, the free encyclopedia
As the hole saw comes with a pilot drill, the holes can be cut precisely where you want them.
Just to clarify, although the hole saw is made of high speed steel (HSS) the hole is best cut slowly and lubricated as mentioned above.
Hole saw - Wikipedia, the free encyclopedia
As the hole saw comes with a pilot drill, the holes can be cut precisely where you want them.
Just to clarify, although the hole saw is made of high speed steel (HSS) the hole is best cut slowly and lubricated as mentioned above.
Last edited:
Good idea, I will try that too.For cutting socket holes in a chassis I use high speed steel hole saws, I have one for octal sockets and a smaller one for B9a's. I also clamp 1/4" plywood underneath the hole as it gives a cleaner edge as well as support.
Hole saw - Wikipedia, the free encyclopedia
As the hole saw comes with a pilot drill, the holes can be cut precisely where you want them.
Just to clarify, although the hole saw is made of high speed steel (HSS) the hole is best cut slowly and lubricated as mentioned above.
There are some from 9/16" to 6" diameter ... 🙂
- Status
- Not open for further replies.