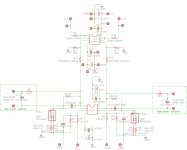
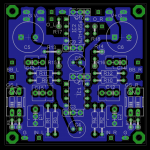
Hi, I am trying to make two stage opamp PCB, non-inverting amp followed by buffer.
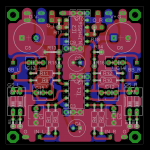
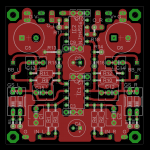
I plan to use very small PCB,5x5 cm, and order from Seeed studio, Itead studio or similar.
Features:
• 2-layer board
• Local feedback
• All thru hole components
• Selectable gain via dipswitch
• Input&feedback low pass filters ala O2
• Switchable Bass boost ala AGDR O2
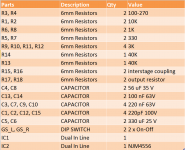
• Caps in signal path (LPF and BB) – multi-footprint 2.5, 5mm Ls, available width 5-6 mm (MLCC or Film Caps possible)
• No power supply on board only rail-to-ground caps
• No jacks or pots on board, pcb connectors possible on some positions
• Component values are like O2
This PCB can be useful as:
• Headphone amplifier
• Preamplifier
• First stage of headphone amplifier for current hungry headphones
I am newbie in Eagle&PCB design, could someone please review this PCB, check for errors and provide tips/suggestions to improve it.
Please, first check schematics and board layout, ignore for the moment component values (not important for board production).
I plan to use very small PCB,5x5 cm, and order from Seeed studio, Itead studio or similar.
Features:
• 2-layer board
• Local feedback
• All thru hole components
• Selectable gain via dipswitch
• Input&feedback low pass filters ala O2
• Switchable Bass boost ala AGDR O2
• Caps in signal path (LPF and BB) – multi-footprint 2.5, 5mm Ls, available width 5-6 mm (MLCC or Film Caps possible)
• No power supply on board only rail-to-ground caps
• No jacks or pots on board, pcb connectors possible on some positions
• Component values are like O2
This PCB can be useful as:
• Headphone amplifier
• Preamplifier
• First stage of headphone amplifier for current hungry headphones
I am newbie in Eagle&PCB design, could someone please review this PCB, check for errors and provide tips/suggestions to improve it.
Please, first check schematics and board layout, ignore for the moment component values (not important for board production).
Attachments
-
 Schematics.jpg421.1 KB · Views: 432
 -
 BOM.png52.2 KB · Views: 414
 -
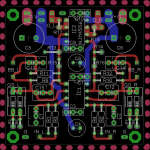
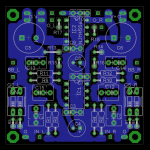
 Full1.png154.3 KB · Views: 367
 -
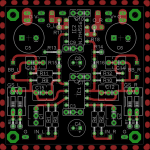
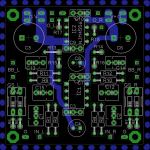
 Top1.png134.2 KB · Views: 361
 -
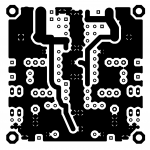
 Bottom1.png134.2 KB · Views: 340
 -
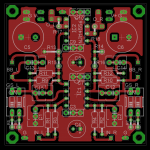
 Full2.png136.7 KB · Views: 95
 -
 Top2.png125.5 KB · Views: 90
 -
 Bottom2.png125.5 KB · Views: 88
 -
 Bottom3d.png270.5 KB · Views: 143
 -
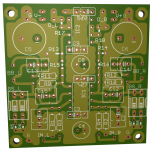 Top3d.png425.9 KB · Views: 140
Last edited:
You saved me tons of PCB designing work, I'm still trying to get my feet wet with Eagle. I hope mistakes, if any will be noticed by more exp. diy members
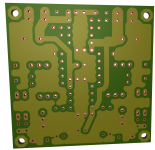
Silly question- How do I get only PCB track layout minus all the components, silk screen,e.t.c. so I can use it for toner transfer method from your attch.?
Silly question- How do I get only PCB track layout minus all the components, silk screen,e.t.c. so I can use it for toner transfer method from your attch.?
Last edited:
Hi availlyrics,
I can do it for You from Eagle, only top&bottom PCB traces, I will do it tomorow if You want.
You know for Seeed studio? 10 pieces 5x5cm PCBs with shipping for 14$.
Who needs toner transfer with that prices 🙂.
I will attach gerber files in case You want to order.
I can do it for You from Eagle, only top&bottom PCB traces, I will do it tomorow if You want.
You know for Seeed studio? 10 pieces 5x5cm PCBs with shipping for 14$.
Who needs toner transfer with that prices 🙂.
I will attach gerber files in case You want to order.

Sorry I was unavailable last weekend, thanks a lot!. Toner transfer is useful for one off project, I'm just learning it as a hobby.Though I have to admit, Seeed studio deal is a steal.
Last edited:
- Status
- Not open for further replies.
- Home
- Amplifiers
- Headphone Systems
- Two stage opamp amplifier PCB 5x5cm