( * * * Note to admins => feel free to move this thread to another forum section , if you think it would be more appropriate. * * *)
Introduction:
I know that this is a long shot, but I am checking if there is any interest with open baffle crew, to purchase fully transparent, curved open-baffle frames, made from single piece 10mm cast acrylic.
Making such frames requires expensive mould which is typically outside DIY budget, and couldn't be justified for one stereo pair, but as I already invested in mould, the cost will be considerably lower.
Short description of process:
1. Frame was designed in CAD, then it was cut from single sheet of acrylic glass on CNC machine.
2. After CNC cutting, two side panels were gently curved by thermoforming on the special mould.
3. Finally, all edges & curved surfaces were polished.
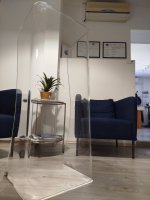
Looking form the side, the frame is slightly slanted backward, purely for aesthetical reasons, here are few pics of two sample pieces:


IMPORTANT NOTES:
1. Approx. dimensions:
2. Please note that front panels are intact (no holes pre drilled/cut) so you can install any driver combination.
3. Due size & weight, ideally I would prefer shipping inside EU.
Introduction:
I know that this is a long shot, but I am checking if there is any interest with open baffle crew, to purchase fully transparent, curved open-baffle frames, made from single piece 10mm cast acrylic.
Making such frames requires expensive mould which is typically outside DIY budget, and couldn't be justified for one stereo pair, but as I already invested in mould, the cost will be considerably lower.
Short description of process:
1. Frame was designed in CAD, then it was cut from single sheet of acrylic glass on CNC machine.
2. After CNC cutting, two side panels were gently curved by thermoforming on the special mould.
3. Finally, all edges & curved surfaces were polished.
Looking form the side, the frame is slightly slanted backward, purely for aesthetical reasons, here are few pics of two sample pieces:
IMPORTANT NOTES:
1. Approx. dimensions:
- Width: 500mm
- Height: 1200mm
- Depth: 360mm
2. Please note that front panels are intact (no holes pre drilled/cut) so you can install any driver combination.
3. Due size & weight, ideally I would prefer shipping inside EU.
Attachments

2 silverprout:
You can of course do drilling & cutting with laser, but due side panels, you'll require open-frame CNC laser, that could be securely placed on front panel.
Here are the more conventional approaches:
a) Drilling (i.e. mounting holes for drivers):
You can drill acrylic with sharp drill bit - but you have to use relatively slow speed (to avoid melting), and you have to be careful when exiting with drill bit, to avoid edge cracks.
Here is one guide for drilling acrylic:
https://www.weetect.com/drilling-acrylic/
b) Cutting circles:
For cutting large circles, if you want nice and clear edge, I would use single flute router bit (upward spiral) , with hand held router & jig.
Single flute router is preferred bit as it has only one cutting edge, which will avoid acrylic overheating/melting with typical high-speed routers,
Here is one guide for machining 15mm thick acrylic with hand held router.
https://www.cnczone.com/forums/glass-plastic-and-stone/100613-cnc-forum.html
In any case, I would always try drilling & cutting on scrap acrylic 10mm sheet, until I get satisfactory results, before I attempt something with finished frame!
Thanks for your answer, i've done it in the past with a 15€ hand router.

Have you any advice for the bolt tighening on this material ?
Have you any advice for the bolt tighening on this material ?
I personally drill holes in acrylic by using a "backed off" drill bit. By this I mean one were the clearance behind the cutting edge is minimal or non-existent (you can often use a shitty old drill bit). I run a small pilot hole then run the backed off drill bit at medium to fast speed. If it melts a tiny bit it's not that much of an issue to me. You get a feel if it's cutting vs melting from the shae of the chips. The issue with sharp drill bits is that they'll pull through and crack on breaking through the other side.
Alternatively clamp and use a pillar drill.
I drill and machine lots of acrylic and polycarbonate at work and I've never had a crack.
Alternatively clamp and use a pillar drill.
I drill and machine lots of acrylic and polycarbonate at work and I've never had a crack.

2 silverprout:
Great that you have experience with machining acrylic with router 👍
Regarding bolt tightening with acrylic:
There are couple of standard ways to attach driver to baffle:
1.) Self-tapping screws in acrylic,
2.) Tapped metric holes in acrylic,
3.) Bolt & nut,
4.) Other solutions (threaded inserts, etc.)
With acrylic, I would like to avoid stress cracks, so I would use different method:
a) I would machine one disk (aluminum or steel) , about 15-20 mm thick, with about same outer diameter as the speaker, and with the hole same size as the speaker driver hole.
b) Then I would drill & tap metric threads on that disk, as per required driver pattern,
c) And finally, I would assemble everything like this:
Driver => driver gasket => front surface of acrylic baffle => metal disk (mounted behind front baffle).
d) then I would carefully tighten all bolts, and that would be it => this way, you avoid tapping into acrylic, and you avoid stress concentration as the whole force is spread around large surface of the metal disk and not concentrated on small surface underneath each bolt.
Hope that you understand me correctly, if required I can make simple sketch.
Disclaimer, you've forgot to recommend to use a dynamometric wrench for those who tightens too much their screws. It will never crack ONLY with a reasonable torque.
- Home
- Loudspeakers
- Multi-Way
- Transparent & curved open baffle frames (10mm acrylic) - anyone interested?