the problem is the paper, that definetely WON'T go through the printer.
I'm not sure which paper you're referring to, but, indeed, the very light catalogue paper that I use for silk screens can't be handled by my laser printer(s) either. For that reason I tape the thin paper to a sheet of normal paper to run it thru my printer.
Do you know if the NOT GLOSSY photo paper is good for this method?
I have no such experience, as I've never used anything else than catalogue or smooth, shiny magazine paper, like I had been advised by fellow DIY people. I would assume, though, that matte inkjet paper has a surface that might still be too rough to give the toner free, but I haven't tried it.
The Kodak inkjet paper I use is semi-gloss, it doesn't have the very shiny "sticky" surface like high gloss paper. I would assume there has to be an equivalent photo paper available locally. If not, you could mail order a 100 pack of paper and it should last a very long time.
Just remember, once you find a suitable paper prepping the board is the MOST IMPORTANT step. If you don't do this step correctly you will become bitter with the process and post hate filled replies here about how awful toner transfer is.😉
Just remember, once you find a suitable paper prepping the board is the MOST IMPORTANT step. If you don't do this step correctly you will become bitter with the process and post hate filled replies here about how awful toner transfer is.😉
jpg said:Practically any UV source works well for a hobbyist's needs (in fact, any light source that emits a certain amount of light around 400nm wavelength) and you don't need to spend more than a couple of bucks: a face tanner (with 4 UV tubes) already makes a great exposure unit and can be found really cheap on ebay, but you can go even simpler. In fact, you can even put the PCB out in the sun, if your climate allows.
Yes, NaOH. You can go as easy as dissolving a dishwasher detergent tab in water if you can't find or afford the tiny dose of pure sodium hydroxide, a substance that costs next to nothing - certainly less than glossy inkjet paper - and that you can flush down the drain once it's exhausted. (Granted, the printable transparency sheets don't come for free, either, but, as I mentioned, even oil soaked copier paper can give decent results.)
Thanks for the info.
Problem for me is that I would need to buy photoresist too, as I already have a bunch of bare pcbs. and I have about 80 sheets (~$12) of staples paper left to use up as well.
As you can see I am a cheap bastard 🙂
SUCCESS!
So after trying for quite some time i found the paper i was looking for. The name of it (in spanish) is "Papel de Ilustracion", translated, illustration paper. It's a quite thin, shiny paper, which doesn't have the sticky layer on it but it's still glossy. It's also very very cheap at least here. I did Quasi's amp PCB with it and it came out just perfect, and i had to iron it just for 10 minutes.
I want to thank everyone for their interest and help in the subject, i couldn't have done it without your expert help.
Again, THANKS GUYS!! 😀
So after trying for quite some time i found the paper i was looking for. The name of it (in spanish) is "Papel de Ilustracion", translated, illustration paper. It's a quite thin, shiny paper, which doesn't have the sticky layer on it but it's still glossy. It's also very very cheap at least here. I did Quasi's amp PCB with it and it came out just perfect, and i had to iron it just for 10 minutes.
I want to thank everyone for their interest and help in the subject, i couldn't have done it without your expert help.
Again, THANKS GUYS!!
😀
Why, oh why, does everyone insist on mucking about with various types of inkjet paper, when there is a product designed expressly for toner-tranfser pcb making?
Go and get some "Press'n'Peel Blue". It is mylar based for better dimensional stabilty, and it has a special coating that not only assists in transfer, but also seals up the pin-holes in the toner.
Also get a pcb scrubbing block - its a chunk of rubber with a light abrasive filler, intended for cleaning contacts.
Rub your board with that, then clean with alcohol. Keep fingers and dust off.
I use a hotplate and vacuum setup - we do a lot of little 1-offs this way. Got to get the board up to 125-130C, for a HP laserjet printer.
With my setup I get perfect boards. I can get 6mil track/space easily, and I've done 5mil/5mil on Kapton flex (90% success rate)
The biggest causes of failure for toner transfer are: dirty board, insufficient heat, dust, printer not set to high density.
And crap paper
TwoSpoons said:Why, oh why, does everyone insist on mucking about with various types of inkjet paper, when there is a product designed expressly for toner-tranfser pcb making?
In the UK, I can get 100 sheets of glossy paper for the same price as 5 sheets of Press and Peel. 😉
I have read some of the comments about the photo paper and laser printer method and I am surprised.
I just did a little project with 15 Scouts in my unit. I had never done it before so I was anxious to try it.
I DOUBLE printed images through the laser printer for a real heavy coating. The transfer was VERY black and heavy. On a "six up" image, the fallout was about 40% on registration of the double image. So, I had to print twice the real requirement. The other critical factor is a laser that has a straight paper path. The photo papers won't go around rollers!
I think some of the best technique is to make sure that the initial application of the iron is fast & flat. Let the iron sit for 15 or 20 secondsm then burnish for a couple of minutes with the iron tip.
Our results were nothing short of outstanding with 3 or 4 of the 15 boards perfect and a couple with a little fading in the corners. (Kids don't do well when the requirement is "entirety".)
Never heard of, but looks interesting.
1) "Press'n'Peel" doesn't seem to be well-known (at least not here in Germany where you'd think there'd be a market; I've found one single source for Press'n'Peel and that's a guy who imports it from the US and whose website looks like he's selling it as a sideline).
2) Press'n'Peel is expensive: $6.50 for a letter size sheet from above source, enough for four to six (if you work very accurately and efficiently) 4x3" PCBs. If it gives great results, it may be worth the price, though.
Why, oh why
1) "Press'n'Peel" doesn't seem to be well-known (at least not here in Germany where you'd think there'd be a market; I've found one single source for Press'n'Peel and that's a guy who imports it from the US and whose website looks like he's selling it as a sideline).
2) Press'n'Peel is expensive: $6.50 for a letter size sheet from above source, enough for four to six (if you work very accurately and efficiently) 4x3" PCBs. If it gives great results, it may be worth the price, though.
if you get pinholes, you can cover them with magic marker (aka etch resist pen). another method for covering holes and gaps i have used in the past (even used it for covering ground plane areas) is what's called "machinist's setup compound", which is a dark blue liquid that dries as a very thin plastic layer that can easily be scratched through with a small metal scribe. it's like an ink, but a little bit thicker than an ink, and works great as an etch resist. if i had a way of creating silkscreens, i would use that.
Guys! Don't forget that the method you use is not available EVERYWHERE in the world. The optic method, the press n' peel sheets are not available here, and if they're (not that i know of and i've searched A LOT), they're very VERY expensive. Of course i could buy it on the net, but send one of those from USA to here would be ridicously expensive too. The iron/toner method using the "illustration paper" or the photo paper works fine; of course, you won't get a pcb with a computer motherboard quality, but it'll do the job for homemade applications; and, IT WORKS, not necessarily with the blue press n' peel paper; of course with that paper it'd be better but it's not NECESSARY.
Cheers!!
Cheers!!
For the benefit of desperates... Post #13
I made a PCB for my friend using laser printing method.
BUT I did not follow the method in-toto.
The method says soak the paper and keep removing the paper material leaving the plastic on the PCB. Instead I just pulled the paper off slowly and the print remained on the copper. Worked like press and peel.
It was a trial and was quite good for the 1st attempt, and I used ferric chloride solution for etching.
Some practice is needed for better results.
The paper used was Desmat Premium.
.....
Above is what I posted in another thread.
In fact, i made a trial PCB for Symasym and the required 4780 pcb.
I made some undesirable things which u could understand only after the results.
One - printing two designs on a single piece of laminate.
two - rocking the laminate on the thin tracks side
three - Itching the total board without inspecing, in between
four - Not noticed that the tray had a crack, so I wanted to get it done in one go.
This paper as the thread starter mentioned was stuck to the copper and did not give any signs of soaking, softening in water.
I have another method-improvement to try
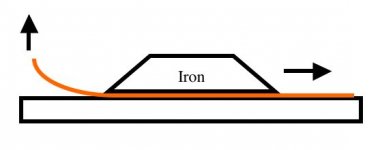
After u iron the board, with the iron still on the paper, start peeling the paper from one side till u peel it to the edge of the iron. Keep peeling and keep moving the iron
My paper stuck to the iron, so I used cotton cloth in between.
Enjoy
Gajanan Phadte
I made a PCB for my friend using laser printing method.
BUT I did not follow the method in-toto.
The method says soak the paper and keep removing the paper material leaving the plastic on the PCB. Instead I just pulled the paper off slowly and the print remained on the copper. Worked like press and peel.
It was a trial and was quite good for the 1st attempt, and I used ferric chloride solution for etching.
Some practice is needed for better results.
The paper used was Desmat Premium.
.....
Above is what I posted in another thread.
In fact, i made a trial PCB for Symasym and the required 4780 pcb.
I made some undesirable things which u could understand only after the results.
One - printing two designs on a single piece of laminate.
two - rocking the laminate on the thin tracks side
three - Itching the total board without inspecing, in between
four - Not noticed that the tray had a crack, so I wanted to get it done in one go.
This paper as the thread starter mentioned was stuck to the copper and did not give any signs of soaking, softening in water.
I have another method-improvement to try
After u iron the board, with the iron still on the paper, start peeling the paper from one side till u peel it to the edge of the iron. Keep peeling and keep moving the iron
My paper stuck to the iron, so I used cotton cloth in between.
Enjoy
Gajanan Phadte
Attachments
Yes, P'n'P costs more than photopaper (not much more - good photopaper can be $1 a sheet), but to my mind it is worth it to avoid all the frustration and time wasting, and get a top notch result. Do it once - do it right!
The pin-holeing I'm referring to is micro holes in the toner, so unless you are going to go over the entire pcb with a marker or a microscope then you will miss some of them.
The pin-holeing I'm referring to is micro holes in the toner, so unless you are going to go over the entire pcb with a marker or a microscope then you will miss some of them.
Yes, P'n'P costs more than photopaper (not much more - good photopaper can be $1 a sheet
For me, $6.50 is much more than $1. 😉
How much is a sheet of P'n'P on (literally) the other side of the earth?
I don't buy it locally, I buy direct from the US manufacturer. http://www.techniks.com/
20 sheets is only US$33
100 sheets is just over $100 (lucky me got the 100 sheet pack)
My local supplier (like yours) charges like a wounded bull.
20 sheets is only US$33
100 sheets is just over $100 (lucky me got the 100 sheet pack)
My local supplier (like yours) charges like a wounded bull.
Hi Gajanan,
Where did you get the Desmat Premium paper.
Who makes it and how much does it cost ?
Thanks.
Ashok.
Where did you get the Desmat Premium paper.
Who makes it and how much does it cost ?
Thanks.
Ashok.
About the pin hole thing...
I solved this problem by sending the paper through twice. The second time through is only about 50% successful but the image is VERY BLACK.
I solved this problem by sending the paper through twice. The second time through is only about 50% successful but the image is VERY BLACK.
Ashok,
The paper costs Rs.900 for 50 sheets.
This paper is the last paper u would use with water since it is clearly marked Water Proof. I didn't see the details before using, but now since u asked, I went to our DTP section and found out. The paper is quite thick as compared to the other one they had
The details of the paper
Inkjet photoglossy Paper
Water Proof
50 sheets, 254gsm
Gajanan Phadte
- Status
- Not open for further replies.
- Home
- General Interest
- Everything Else
- toner/iron method problem