There is hole on the male part and a small pin on the female part. The key is to undo the pin at disconnecting the spade (Faston) connector. I looked around the web, and some recommend a special thin blade tool, others recommend to push it up with a flat blade screwdriver.
The locking version should have a release tab...
165536-1 | TE Connectivity, PIDG Positive Lock .250 EX Blue Insulated Spade Connector, 6.35 x 0.81mm Tab Size, 1.5mm2 to 2.5mm2 | RS Components
165536-1 | TE Connectivity, PIDG Positive Lock .250 EX Blue Insulated Spade Connector, 6.35 x 0.81mm Tab Size, 1.5mm2 to 2.5mm2 | RS Components
I've used hundreds of those (locally made ones) and never had a problem soldering them, not a failure when pulling them out.
However they fit very snug to the drill, you have to wiggle a bit to get them in. For quick soldering I use a 35W iron, wet the tip a bit and heat the joint while singing Happy Birthday to myself, till I get to the name and then I mash the solder.
Works every time, though ours are either nickel plated brass or silver plated copper. The copper ones are actually worse, they tarnish easy and don't clean up on reattaching. Don't mind the flux, this is not a completed project.
Attachments
Good tip 🙂For quick soldering I use a 35W iron, wet the tip a bit and heat the joint while singing Happy Birthday to myself, till I get to the name and then I mash the solder.
I count to 10 approximately (for double sided boards), with a heavier iron, but your way is funnier 🙂
Good comment...First time I used them they pulled straight off of the pcb.....before I got them hot admittedly.
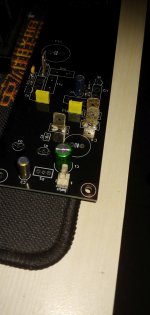
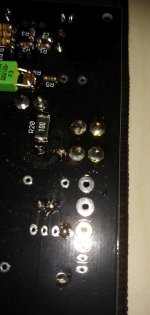
How else would these be mounted.?
They're meant to be soldered. If you use plated through-holes on a good quality PCB (big tracks connecting to them helps) you should have absolutely no issues if you solder them properly. They do take a lot of heat, however.
I find with these that dipping the pins in liquid flux helps a lot.
As a hint, the STTC-117 tip cartridge makes quick work of these if you have a Metcal. I used to really struggle to solder these things when I was just using my Hakko with the small tip- this is where the newer style systems (especially the induction heating systems used by the Hakko FX100, Metcal and Thermaltronics stations) really shows its strength.
Last edited:
A little smaller drilled hol and the use of a hammer is a big advantage as this will provide better mechanical stability,and easy soldering.
You don't loose the part when turn the pcb upside down for soldering. 😉
You don't loose the part when turn the pcb upside down for soldering. 😉
- Home
- Design & Build
- Parts
- These things WILL NOT solder