I mean something like this:
https://www.youtube.com/watch?v=HELIypW0P54
Had another idea actually, getting a little 3D printed frame made that the PCB drops into (indexed by the corner holes) and supports the stencil around the PCB, and has protrusions that meet with holes in the stencil to keep it in position. Drop the PCB in the frame, place the stencil over the frame, swipe, the paste, disassemble.
Little late for that though 🙂
Actually on second thought, I know someone locally who has both a laser cutter and a 3D printer. I just might try this.
Here's a quick mockup of the idea:

Original thought was to 3D print the jig, and just use the laser cutter to add the four outer holes to the stencils I've got already. But yeah, laser cutting the works of it out of 1.6mm stock would be a lot easier. I'd have to add the pins separately but that's easy, I can just get them machined out of brass and glue them in place.
Original thought was to 3D print the jig, and just use the laser cutter to add the four outer holes to the stencils I've got already. But yeah, laser cutting the works of it out of 1.6mm stock would be a lot easier. I'd have to add the pins separately but that's easy, I can just get them machined out of brass and glue them in place.
Spent some time at my buddy's shop and got a stenciling jig made on his laser cutter. Sadly his 10W machine won't cut holes in a stencil, so my plan of aligning the jig and stencil with pins won't work unless I order new stencils... but it's fine, there's enough friction between the stencil and the jig that I can just hold it in place.

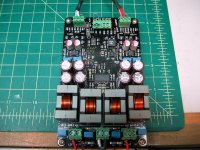
End result. Six more Pro's built - one 4 ohm, two 6 ohm, three 8 ohm.

End result. Six more Pro's built - one 4 ohm, two 6 ohm, three 8 ohm.
gmarsh, I like your stencil jig. My system is way more ghetto and involves lots of tape and a "universal" OSH jig. OK for small numbers, but not so convenient and takes careful placement.
Your populated PRO boards really look like they mean business with those delicious Coilcrafts!
BK
Your populated PRO boards really look like they mean business with those delicious Coilcrafts!
BK
Attachments

PRO board arrived today in good shape!
All systems are GO, just need to carve out some time.
BK
All systems are GO, just need to carve out some time.
BK
Your populated PRO boards really look like they mean business with those delicious Coilcrafts!
BK
Indeed! Good work. 🙂
So far only BK and apotelyt's stuff is sent. I think yours is packed and ready (6 bare Pro cards, IIRC?)
Hi Gmarsh. I made the list on group buy 3 back in April but totally forgot to check this forum since. Have I missed my chance? Can I still pay? Thanks!
I'll hopefully have some leftover boards to sell when I've got this build done. I'll keep everyone posted.
Up to 10 Pro cards built and tested now. Takes me about 45 minutes per card between placing parts, baking, clearing solder bridges and fixing tombstoned parts if it happens, stuffing through hole parts and testing.
Up to 10 Pro cards built and tested now. Takes me about 45 minutes per card between placing parts, baking, clearing solder bridges and fixing tombstoned parts if it happens, stuffing through hole parts and testing.
Here's the PRO fresh out of the oven. Looks really good under magnification. The SS stencil was an absolute joy to use.
Scratched my head a bit on U4/U5 and SW1 orientation, but I think I got it right.
gmarsh, I'm impressed with your build speed. Pick-N-Place takes me a couple hours. Lots of hunting. Measure twice and cut once. I suppose if I designed the board I'd be a bit more intimate with the layout.
Time for a beer.
BK
Attachments

You're missing D1. Other than that, looks great 🙂
Got a bit of a system going. I've got all my parts (IC's aside) dumped out of the reels/tubes and dumped in a parts organizer. I pull a drawer out, pick the parts out of the drawer and place on the PCB, move onto the next drawer.
I build two boards at a time. Could probably do 4 at a time but my desk isn't that big with the parts organizer, soldering iron etc. sitting on it.

gmarsh, do you have a recommendation for optimal input voltage and wattage for the PRO card? I've gravitated to linear regulated supplies with my other Class D amps, but will probably do an SMPS on this one. Working/sounding good, so time to think about a permanent home. Still have an unused MeanWell RS-100-24 on hand. Liked the Connexelectronics SMPS300RS in my DUG build, so could go that route at 30V or 36V. Thoughts?
BK
BK
I can't really make any recommendations, I haven't done any THD testing at different voltages or anything of the sort. The RS-100-24 will do a fine job for most music listening, unless you're driving the amp hard into clipping.
When you get your LED (be sure to get a common cathode one) make sure the LED doesn't blink amber when you crank the volume up. If it does, move on up to 30V or 36V.
The SMPS300 is a soft switched LLC resonant supply, the RS-100 is a hard switched flyback but has an additional LC filter on its output, both of them should produce about the same ripple/noise on the output. There's >2000uF of low ESR decoupling on the Pro card itself, which has a Z of a few milliohms at the 65KHz the RS100 switches at (I'm guessing the SMPS300 is higher frequency). I think I can safely say both will provide a clean supply.
- Home
- Group Buys
- "The Wiener" TPA3118 amplifier, group buy #3 + "Wiener Pro" prototypes.